
User Manual


8 ENGLISH
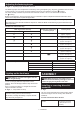
For tool with deep driver bit hole
A=17mm
B=14mm
Toinstallthesetypesofdriver
bits,followtheprocedure1.
A=12mm
B=9mm
Toinstallthesetypesofdriver
bits,followtheprocedure2.
(Note) Bit-piece is necessary
forinstallingthebit.
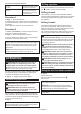
Procedure 1
►Fig.8: 1.Driverbit2. Sleeve
Toinstallthedriverbit,pullthesleeveinthedirectionof
thearrowandinsertthedriverbitintothesleeveasfar
as it will go.
Thenreleasethesleevetosecurethedriverbit.
Procedure 2
InadditiontoProcedure 1,insertthebit-pieceintothe
sleevewithitspointedendfacingin.
►Fig.9: 1.Driverbit2. Bit-piece 3. Sleeve
Toremovethedriverbit,pullthesleeveinthedirection
ofthearrowandpullthedriverbitout.
NOTE:Ifthedriverbitisnotinserteddeepenough
intothesleeve,thesleevewillnotreturntoitsoriginal
positionandthedriverbitwillnotbesecured.Inthis
case,tryre-insertingthebitaccordingtotheinstruc-
tionsabove.
NOTE:Afterinsertingthedriverbit,makesurethatit
isrmlysecured.Ifitcomesout,donotuseit.
OPERATION
CAUTION: When bending the tool to use in
the pistol shape or straightening to use in the
straight shape, do not hold the bendable part of
the tool.Failuretodosomaycauseyourhandand
ngerstobepinchedandinjuredbythispart.
Thetoolcanbeusedintwoways;astraightshapeand
apistolshapewhichareselectableaccordingtothe
conditionsofworkplaceandscrewdriving.
►Fig.10: 1. Straight shape 2.Pistolshape
Screwdriving operation
CAUTION: Adjust the adjusting ring to the
proper torque level for your work.
CAUTION: Make sure that the driver bit is
inserted straight in the screw head, or the screw
and/or driver bit may be damaged.
Placethepointofthedriverbitinthescrewheadand
applypressuretothetool.Startthetoolslowlyandthen
increasethespeedgradually.Releasetheswitchtrigger
assoonastheclutchcutsin.
►Fig.11
NOTE:Whendrivingwoodscrew,pre-drillapilothole
2/3thediameterofthescrew.Itmakesdrivingeasier
andpreventssplittingoftheworkpiece.
Drilling operation
First,turntheadjustingringsothatthearrowpointsto
the marking.Thenproceedasfollows.
Drilling in wood
Whendrillinginwood,thebestresultsareobtained
withwooddrillsequippedwithaguidescrew.Theguide
screwmakesdrillingeasierbypullingthedrillbitinto
the workpiece.
Drilling in metal
Topreventthedrillbitfromslippingwhenstartinga
hole,makeanindentationwithacenter-punchand
hammeratthepointtobedrilled.Placethepointofthe
drillbitintheindentationandstartdrilling.
Useacuttinglubricantwhendrillingmetals.Theexcep-
tionsareironandbrasswhichshouldbedrilleddry.
CAUTION: Pressing excessively on the tool
will not speed up the drilling.Infact,thisexcessive
pressurewillonlyservetodamagethetipofyourdrill
bit,decreasethetoolperformanceandshortenthe
servicelifeofthetool.
CAUTION: Hold the tool rmly and exert care
when the drill bit begins to break through the
workpiece.Thereisatremendousforceexertedon
thetool/drillbitatthetimeofholebreakthrough.
CAUTION: A stuck drill bit can be removed
simply by setting the reversing switch to reverse
rotation in order to back out. However, the tool
may back out abruptly if you do not hold it rmly.
CAUTION: Always secure workpieces in a
vise or similar hold-down device.
CAUTION: If the tool is operated continuously
until the battery cartridge has discharged, allow
the tool to rest for 15 minutes before proceeding
with a fresh battery.
Using the tool as a hand screwdriver
►Fig.12
Switchoffthetool.
Move the lock lever to the locked position
.
Turnthetool.
NOTICE:Usethetoolwithafasteningtorqueless
than5N•m(50kgf•cm).
NOTICE:Donotusethetoolforworkrequiring
excessiveforce,suchastighteningboltM6orbolts
greaterthanM6orremovingrustedscrews.
NOTE:Thisuseisconvenientforcheckingthe
screwdriving.