ENGLISH (Original instructions) INSTRUCTION MANUAL Cordless Hammer Driver Drill DHP470 DHP480 013965 IMPORTANT: Read Before Using.
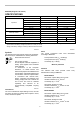
ENGLISH (Original instructions) SPECIFICATIONS Model Capacities No load speed -1 (min ) Blows per minute DHP470 DHP480 Concrete 13 mm 13 mm Steel 13 mm 13 mm Wood 38 mm 38 mm Wood screw 10 mm x 90 mm 10 mm x 90 mm Machine screw M6 M6 High (2) 0 - 1,550 0 - 1,550 Low (1) 0 - 400 0 - 400 High (2) 0 - 23,000 0 - 23,000 Low (1) 0 - 6,000 0 - 6,000 Overall length 199 mm Net weight 1.7 kg 1.5 kg 199 mm 1.
ENG901-1 • • • GEA006-2 The declared vibration emission value has been measured in accordance with the standard test method and may be used for comparing one tool with another. The declared vibration emission value may also be used in a preliminary assessment of exposure. • General Power Tool Safety Warnings WARNING Read all safety warnings and all instructions. Failure to follow the warnings and instructions may result in electric shock, fire and/or serious injury.
21. Maintain power tools. Check for misalignment or binding of moving parts, breakage of parts and any other condition that may affect the power tool’s operation. If damaged, have the power tool repaired before use. Many accidents are caused by poorly maintained power tools. 22. Keep cutting tools sharp and clean. Properly maintained cutting tools with sharp cutting edges are less likely to bind and are easier to control. 23. Use the power tool, accessories and tool bits etc.
GEB056-5 2. 3. Do not disassemble battery cartridge. If operating time has become excessively shorter, stop operating immediately. It may result in a risk of overheating, possible burns and even an explosion. 4. If electrolyte gets into your eyes, rinse them out with clear water and seek medical attention right away. It may result in loss of your eyesight. 5. Do not short the battery cartridge: (1) Do not touch the terminals with any conductive material.
Battery protection system (Lithium-ion battery with star marking) FUNCTIONAL DESCRIPTION • CAUTION: Always be sure that the tool is switched off and the battery cartridge is removed before adjusting or checking function on the tool. 1. Star marking 1 Installing or removing battery cartridge 1. Red indicator 2. Button 3. Battery cartridge 1 012128 Lithium-ion batteries with a star marking are equipped with a protection system.
Lighting up the front lamp LED indicator status Remaining battery capacity 1. Lamp About 50% or more 1 About 20% - 50% 013969 CAUTION: Do not look in the light or see the source of light directly. Pull the switch trigger to light up the lamp. The lamp keeps on lighting while the switch trigger is being pulled. The lamp goes out 10 -15 seconds after releasing the trigger.
Selecting the action mode Speed change 1 1. Speed change lever • CAUTION: Always set the ring correctly to your desired mode mark. If you operate the tool with the ring positioned halfway between the mode marks, the tool may be damaged. 2 1 013964 • • • CAUTION: Always set the speed change lever fully to the correct position. If you operate the tool with the speed change lever positioned halfway between the "1" side and "2" side, the tool may be damaged.
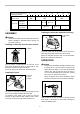
Guideline of fastening torque 1 Adjusting graduations 2 4 6 M4 Machine screw 10 12 M5 Soft wood (e.g. pine) Wood screw 8 3.5 x 22 Hard wood (e.g. lauan) 14 16 M6 4.1x 38 3.5 x 22 4.1x 38 013981 Installing the bit holder (Optional accessory) ASSEMBLY • 1 CAUTION: Always be sure that the tool is switched off and the battery cartridge is removed before carrying out any work on the tool. 1. Bit holder 2. Bit Installing or removing the driver bit or drill bit 2 1.
Hammer drilling operation Drilling operation First, turn the adjusting ring so that the pointer points to the marking. Then proceed as follows. CAUTION: • There is a tremendous and sudden twisting force exerted on the tool/bit at the time of hole breakthrough, when the hole becomes clogged with chips and particles, or when striking reinforcing rods embedded in the concrete. First, turn the action mode changing ring so that the arrow on the tool body points to the marking.
OPTIONAL ACCESSORIES CAUTION: These accessories or attachments are recommended for use with your Makita tool specified in this manual. The use of any other accessories or attachments might present a risk of injury to persons. Only use the accessories or attachments for their stated purposes. If you need any assistance for more details regarding these accessories, ask your local Makita Service Center.
Makita Corporation Anjo, Aichi, Japan 885225A221 12 www.makita.