
User Manual


10 ENGLISH
Dust cup set
Optional accessory
NOTICE: Do not use the dust cup set when drill-
ing in metal or similar. It may damage the dust cup
set due to the heat produced by small metal dust or
similar. Do not install or remove the dust cup set with
the drill bit installed in the tool. It may damage the
dust cup set and cause dust leak.
NOTE: The standard side grip cannot be used
with the dust cup set being installed on the tool.
When the dust cup set is installed on the tool, remove
thegripfromthestandardsidegrip,andthenattachit
to the optional grip base set.
Beforeinstallingthedustcupset,removethebitfrom
thetoolifinstalled.
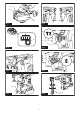
Installthespacersothatthegroovesonthespacert
in the protrusions on the tool barrel while widening it.
Becarefulforthespringnottocomeofffromtheslitof
spacer.
►Fig.14: 1. Spacer 2. Spring
►Fig.15
Installthesidegrip(optionalgripbasesetandstandard
grip)sothatthegrooveonthegriptintheprotrusion
onthespacer.Turnthegripclockwisetosecureit.
►Fig.16: 1. Side grip
Installthedustcupsetsothattheclawsofthedustcup
tinintheslitsonthespacer.
►Fig.17: 1. Dust cup 2. Claws
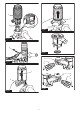
NOTE:Ifyouconnectavacuumcleanertothedust
cupset,removethedustcapbeforeconnectingit.
►Fig.18: 1. Dust cap
Toremovethedrillbit,pullthechuckcoverdownallthe
way and pull the drill bit out.
►Fig.19: 1. Bit 2. Chuck cover
Toremovethedustcupset,holdtherootofdustcup
and pull it out.
►Fig.20: 1. Dust cup
NOTE:Ifthecapcomesofffromthedustcup,attach
itwithitsprintedsidefacingupsothatgrooveonthe
captsintheinsideperipheryoftheattachment.
►Fig.21
Hook
Optional accessory
CAUTION:Alwaysremovethebatterywhen
hanging the tool with the hook.
CAUTION: Never hook the tool at high location
oronpotentiallyunstablesurface.
►Fig.22: 1. Groove 2. Hook 3. Screw
Thehookisconvenientfortemporarilyhangingthetool.
Thiscanbeinstalledoneithersideofthetool.
Toinstallthehook,insertitintoagrooveinthetool
housing on either side and then secure it with a screw.
Toremove,loosenthescrewandthentakeitout.
OPERATION
CAUTION: Always use the side grip (auxiliary
handle) and rmly hold the tool by both side grip
and switch handle during operations.
CAUTION: Always make sure that the work-
piece is secured before operation.
NOTE:Ifthebatterycartridgeisinlowtemperature,
thetool’scapabilitymaynotbefullyobtained.Inthis
case, warm up the battery cartridge by using the
toolwithnoloadforawhiletofullyobtainthetool’s
capability.
►Fig.23
Hammer drilling operation
CAUTION:Thereistremendousandsudden
twistingforceexertedonthetool/drillbitatthetimeof
hole break-through, when the hole becomes clogged
withchipsandparticles,orwhenstrikingreinforcing
rods embedded in the concrete. Always use the side
grip (auxiliary handle) and rmly hold the tool by
both side grip and switch handle during opera-
tions.Failuretodosomayresultinthelossofcontrol
ofthetoolandpotentiallysevereinjury.
Set the action mode changing knob to the symbol.
Positionthedrillbitatthedesiredlocationforthehole,
thenpulltheswitchtrigger.Donotforcethetool.Light
pressuregivesbestresults.Keepthetoolinposition
andpreventitfromslippingawayfromthehole.
Do not apply more pressure when the hole becomes
clogged with chips or particles. Instead, run the tool at
anidle,thenremovethedrillbitpartiallyfromthehole.
By repeating this several times, the hole will be cleaned
out and normal drilling may be resumed.
NOTE: Eccentricity in the drill bit rotation may occur
whileoperatingthetoolwithnoload.Thetoolauto-
maticallycentersitselfduringoperation.Thisdoesnot
affectthedrillingprecision.
Drilling in wood or metal
CAUTION: Hold the tool rmly and exert care
when the drill bit begins to break through the
workpiece.Thereisatremendousforceexertedon
thetool/drillbitatthetimeofholebreakthrough.
CAUTION: A stuck drill bit can be removed
simply by setting the reversing switch to reverse
rotation in order to back out. However, the tool
may back out abruptly if you do not hold it rmly.
CAUTION: Always secure workpieces in a
vise or similar hold-down device.