
User Manual


9 ENGLISH
NOTE:Useadryclothtowipethedirtoffthelensof
thelamp.Becarefulnottoscratchthelensoflamp,or
it may lower the illumination.
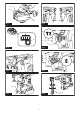
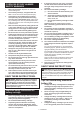
Reversing switch action
►Fig.5: 1. Reversing switch lever
CAUTION: Always check the direction of
rotation before operation.
CAUTION: Use the reversing switch only after
the tool comes to a complete stop. Changing the
directionofrotationbeforethetoolstopsmaydam-
age the tool.
CAUTION: When not operating the tool,
always set the reversing switch lever to the neu-
tral position.
Thistoolhasareversingswitchtochangethedirection
ofrotation.Depressthereversingswitchleverfromthe
AsideforclockwiserotationorfromtheBsideforcoun-
terclockwise rotation.
When the reversing switch lever is in the neutral posi-
tion, the switch trigger cannot be pulled.
Selecting the action mode
NOTICE: Do not rotate the action mode chang-
ing knob when the tool is running.Thetoolwillbe
damaged.
NOTICE: To avoid rapid wear on the mode
change mechanism, be sure that the action mode
changing knob is always positively located in one
of the action mode positions.
Rotation with hammering
For drilling in concrete, masonry, etc., rotate the action
mode changing knob to the symbol. Use a car-
bide-tipped drill bit.
►Fig.6: 1.Actionmodechangingknob
Rotation only
For drilling in wood, metal or plastic materials, rotate
the action mode changing knob to the symbol. Use a
twist drill bit or wood drill bit.
►Fig.7: 1.Actionmodechangingknob
ASSEMBLY
CAUTION: Always be sure that the tool is
switched off and the battery cartridge is removed
before carrying out any work on the tool.
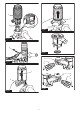
Side grip (auxiliary handle)
CAUTION: Always use the side grip to ensure
safe operation.
CAUTION: After installing or adjusting the
side grip, make sure that the side grip is rmly
secured.
Installthesidegripsothatthegroovesonthegriptin
theprotrusionsonthetoolbarrel.Turnthegripclock-
wisetosecureit.Thegripcanbexedatdesiredangle.
►Fig.8: 1. Side grip
Grease
Coattheshankendofthedrillbitbeforehandwitha
smallamountofgrease(about0.5-1g).
Thischucklubricationassuressmoothactionandlon-
gerservicelife.
Installing or removing drill bit
Cleantheshankendofthedrillbitandapplygrease
beforeinstallingthedrillbit.
►Fig.9: 1. Shank end 2. Grease
Insertthedrillbitintothetool.Turnthedrillbitandpush
it in until it engages.
Afterinstallingthedrillbit,alwaysmakesurethatthe
drill bit is securely held in place by trying to pull it out.
►Fig.10: 1. Drill bit
Toremovethedrillbit,pullthechuckcoverdownallthe
way and pull the drill bit out.
►Fig.11: 1. Drill bit 2. Chuck cover
Depth gauge
Thedepthgaugeisconvenientfordrillingholesof
uniformdepth.Loosenthesidegripandinsertthedepth
gaugeintotheholeonthesidegrip.Adjustthedepth
gauge to the desired depth and tighten the side grip
rmly.
►Fig.12: 1. Hole 2. Depth gauge
NOTE:Makesurethatthedepthgaugedoesnot
touchthemainbodyofthetoolwhenattachingit.
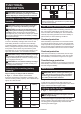
Dust cup (optional accessory)
Usethedustcuptopreventdustfromfallingoverthe
toolandonyourselfwhenperformingoverheaddrilling
operations.Attachthedustcuptothebitasshownin
thegure.Thesizeofbitswhichthedustcupcanbe
attachedtoisasfollows.
Model Bit diameter
Dust cup 5 6 mm - 14.5 mm
Dustcup9 12 mm - 16 mm
►Fig.13: 1. Dust cup