ENGLISH (Original instructions) INSTRUCTION MANUAL Cordless Combination Hammer DHR242 DHR243 012621 IMPORTANT: Read Before Using.
ENGLISH (Original instructions) SPECIFICATIONS Model DHR242 DHR243 Concrete Capacities 24 mm Steel 13 mm Wood 27 mm No load speed (min-1) 0 - 950 Blows per minute 0 - 4,700 Overall length 328 mm Net weight 3.3 kg 353 mm 3.4 kg Rated voltage D.C. 18 V • Due to our continuing program of research and development, the specifications herein are subject to change without notice. • Specifications and battery cartridge may differ from country to country.
ENG901-1 • • • Save all warnings and instructions for future reference. The declared vibration emission value has been measured in accordance with the standard test method and may be used for comparing one tool with another. The declared vibration emission value may also be used in a preliminary assessment of exposure. • The term "power tool" in the warnings refers to your mains-operated (corded) power tool or battery-operated (cordless) power tool. Work area safety 1.
and the work to be performed. Use of the power tool for operations different from those intended could result in a hazardous situation. Battery tool use and care 24. Recharge only with the charger specified by the manufacturer. A charger that is suitable for one type of battery pack may create a risk of fire when used with another battery pack. 25. Use power tools only with specifically designated battery packs. Use of any other battery packs may create a risk of injury and fire. 26.
6. 7. 8. 9. 10. 11. 12. 13. 14. Under normal operation, the tool is designed to produce vibration. The screws can come loose easily, causing a breakdown or accident. Check tightness of screws carefully before operation. In cold weather or when the tool has not been used for a long time, let the tool warm up for a while by operating it under no load. This will loosen up the lubrication. Without proper warm-up, hammering operation is difficult. Always be sure you have a firm footing.
Lithium-ion batteries with a star marking are equipped with a protection system. This system automatically cuts off power to the tool to extend battery life. The tool will automatically stop during operation if the tool and/or battery are placed under one of the following conditions: • Overloaded: The tool is operated in a manner that causes it to draw an abnormally high current. In this situation, release the trigger switch on the tool and stop the application that caused the tool to become overloaded.
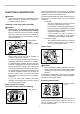
When the reversing switch lever is in the neutral position, the switch trigger cannot be pulled. • • • Selecting the action mode Rotation with hammering CAUTION: Always check the direction of rotation before operation. Use the reversing switch only after the tool comes to a complete stop. Changing the direction of rotation before the tool stops may damage the tool. When not operating the tool, always set the reversing switch lever to the neutral position. 1. Rotation with hammering 2. Lock button 3.
this time, turn the tool on or turn the chuck by hand in the symbol position and then rotate the action mode changing knob. Forcing the action mode changing knob may cause tool damage. 1. Bit shank 2. Bit grease 1 Torque limiter The torque limiter will actuate when a certain torque level is reached. The motor will disengage from the output shaft. When this happens, the bit will stop turning. • • 2 001296 CAUTION: As soon as the torque limiter actuates, switch off the tool immediately.
Depress the lock button and rotate the action mode changing knob to the symbol. Then make sure that the bit is securely held in place by turning it slightly. OPERATION Hammer drilling operation 012633 012634 Depth gauge Set the action mode changing knob to the symbol. Position the bit at the desired location for the hole, then pull the switch trigger. Do not force the tool. Light pressure gives best results. Keep the tool in position and prevent it from slipping away from the hole.
Chipping/Scaling/Demolition 1. Quick change chuck for SDS-plus 2. Change cover line 3. Change cover 2 1 3 012690 012686 Set the action mode changing knob to the symbol. Hold the tool firmly with both hands. Turn the tool on and apply slight pressure on the tool so that the tool will not bounce around, uncontrolled. Pressing very hard on the tool will not increase the efficiency. 2 Drilling in wood or metal 3 1. Chuck adapter 2. Keyless drill chuck 1 1. Spindle 2. Quick change drill chuck 3.
• • tool firmly and exert care when the bit begins to break through the workpiece. A stuck bit can be removed simply by setting the reversing switch to reverse rotation in order to back out. However, the tool may back out abruptly if you do not hold it firmly. Always secure small workpieces in a vise or similar hold-down device. NOTE: • Some items in the list may be included in the tool package as standard accessories. They may differ from country to country.
Makita Jan-Baptist Vinkstraat 2, 3070, Belgium Makita Corporation Anjo, Aichi, Japan 885236A226 www.makita.