
User Manual


18 ENGLISH
For DHR280/DHR282
Optional accessory
Attach the chuck adapter to a keyless drill chuck to
which 1/2"-20 size screw can be installed, and then
install them to the tool. When installing it, refer to the
section “Installing or removing drill bit”.
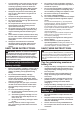
► Fig.33: 1. Keyless drill chuck 2. Chuck adapter
For DHR281/DHR283
Use the quick change drill chuck as standard equip-
ment. When installing it, refer to "changing the quick
change chuck for SDS-plus".
Hold the ring and turn the sleeve counterclockwise to
open the chuck jaws. Place the bit in the chuck as far as
it will go. Hold the ring rmly and turn the sleeve clock-
wise to tighten the chuck.
► Fig.34: 1. Sleeve 2. Ring
To remove the bit, hold the ring and turn the sleeve
counterclockwise.
Diamond core drilling
NOTICE: If performing diamond core drilling
operations using “rotation with hammering”
action, the diamond core bit may be damaged.
When performing diamond core drilling operations,
always set the change lever to the position to use
"rotation only" action.
Disposing of dust
Optional accessory
CAUTION: Always be sure that the tool is
switched off and the battery cartridge is removed
before carrying out any work on the tool.
CAUTION: Be sure to wear dust mask when
disposing of dust.
CAUTION: Empty the dust case regularly
before the dust case becomes full. Failure to do so
may decrease the dust collection performance and
cause dust inhalation.
CAUTION: The performance of dust collection
decreases if the lter in the dust case become
clogged. Replace the lter with new one after
approximately 200 times of dust fulllment as a
guide. Failure to do so may cause dust inhalation.
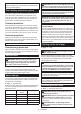
1. Remove the dust case while pressing down the
lever of the dust case.
► Fig.35: 1. Lever
2. Open the cover of the dust case.
► Fig.36: 1. Cover
3. Dispose of the dust, and then clean the lter.
► Fig.37
NOTICE: When cleaning the lter, do not touch
the lter with brush or similar, or blow com-
pressed air on the lter. It may damage the lter.
Blow-out bulb
Optional accessory
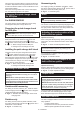
After drilling the hole, use the blow-out bulb to clean the
dust out of the hole.
► Fig.38
Using dust cup set
Optional accessory
Fit the dust cup set against the ceiling when operating
the tool.
► Fig.39
NOTICE: Do not use the dust cup set when drill-
ing in metal or similar. It may damage the dust
cup set due to the heat produced by small metal
dust or similar.
NOTICE: Do not install or remove the dust cup
set with the drill bit installed in the tool. It may
damage the dust cup set and cause dust leak.
WIRELESS ACTIVATION
FUNCTION
Optional accessory for DHR282/DHR283
What you can do with the wireless
activation function
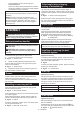
The wireless activation function enables clean and com-
fortable operation. By connecting a supported vacuum
cleaner to the tool, you can run the vacuum cleaner
automatically along with the switch operation of the tool.
► Fig.40
To use the wireless activation function, prepare follow-
ing items:
• A wireless unit (optional accessory)
• A vacuum cleaner which supports the wireless
activation function
The overview of the wireless activation function
setting is as follows. Refer to each section for detail
procedures.
1. Installing the wireless unit
2. Tool registration for the vacuum cleaner
3. Starting the wireless activation function
Installing the wireless unit
Optional accessory
CAUTION: Place the tool on a at and stable
surface when installing the wireless unit.