
operation manual


7 ENGLISH
Installing or removing the recipro
saw blade
CAUTION: Always clean out all chips or for-
eign matter adhering to the blade and around the
blade clamp.Failuretodosomaycauseinsufcient
tighteningoftheblade,resultinginaseriousinjury.
Toinstallthereciprosawblade,alwaysmakesurethat
thebladeclamplever(partofthebladeclampsleeve)
is in released position ontheinsulationcoverbefore
insertingthereciprosawblade.Ifthebladeclamplever
isinxedposition,rotatethebladeclampleverinthe
directionofthearrowsothatitcanbelockedatthe
released positon .
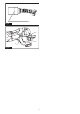
►Fig.5: 1. Blade clamp lever 2. Released position
3. Fixed position
Insertthereciprosawbladeintothebladeclampasfar
asitwillgo.Thebladeclampsleeverotatesandxes
thereciprosawblade.Makesurethatthereciprosaw
bladecannotbeextractedeventhoughyoutrytopull
it out.
►Fig.6: 1.Reciprosawblade2. Blade clamp sleeve
CAUTION: If you do not insert the recipro saw
blade deep enough, the recipro saw blade may be
ejected unexpectedly during operation.Thiscan
beextremelydangerous.
Toremovethereciprosawblade,rotatetheblade
clampleverinthedirectionofthearrowfully.Thereci-
prosawbladeisremovedandthebladeclampleveris
xedatthereleasedposition .
►Fig.7: 1.Reciprosawblade2. Blade clamp lever
CAUTION: Keep hands and ngers away from
the lever during the switching operation. Failure
to do so may cause personal injuries.
NOTE:Ifyouremovethereciprosawbladewithout
rotatingthebladeclampleverfully,thelevermaynot
belockedinthereleasedposition .Inthiscase,
rotatethebladeclampleverfullyagain,thenmake
surethatthebladeclampleverlockedatthereleased
position .
NOTE:Ifthebladeclampleverispositionedinside
thetool,switchonthetooljustasecondtoletthe
bladeoutasshowninthegure.Removethebattery
cartridgefromthetoolbeforeinstallingorremoving
thereciprosawblade.
OPERATION
CAUTION: Always press the shoe rmly
against the workpiece during operation.Ifthe
shoe is removed or held away from the workpiece
duringoperation,strongvibrationand/ortwistingwill
beproduced,causingthebladetosnapdangerously.
CAUTION: Always wear gloves to protect
your hands from hot ying chips when cutting
metal.
CAUTION: Be sure to always wear suitable
eye protection which conforms with current
national standards.
CAUTION: Always use a suitable coolant
(cutting oil) when cutting metal. Failure to do so will
causeprematurebladewear.
Presstheshoermlyagainsttheworkpiece.Donot
allowthetooltobounce.Bringthereciprosawblade
into light contact with the workpiece. First, make a pilot
grooveusingaslowerspeed.Thenuseafasterspeed
to continue cutting.
►Fig.8
MAINTENANCE
CAUTION: Always be sure that the tool is
switched off and the battery cartridge is removed
before attempting to perform inspection or
maintenance.
NOTICE: Never use gasoline, benzine, thinner,
alcohol or the like. Discoloration, deformation or
cracks may result.
Replacing carbon brushes
►Fig.9: 1. Limit mark
Checkthecarbonbrushesregularly.
Replace them when they wear down to the limit mark.
Keepthecarbonbrushescleanandfreetoslipinthe
holders.Bothcarbonbrushesshouldbereplacedatthe
sametime.Useonlyidenticalcarbonbrushes.
1. Useascrewdrivertoremovethebrushholder
caps.
2. Takeouttheworncarbonbrushes,insertthenew
onesandsecurethebrushholdercaps.
►Fig.10: 1. Brush holder cap
TomaintainproductSAFETYandRELIABILITY,
repairs,anyothermaintenanceoradjustmentshould
beperformedbyMakitaAuthorizedorFactoryService
Centers, always using Makita replacement parts.