
operation manual


6 ENGLISH
FUNCTIONAL
DESCRIPTION
CAUTION: Always be sure that the tool is
switched off and the battery cartridge is removed
before adjusting or checking function on the tool.
Installing or removing battery
cartridge
CAUTION: Always switch off the tool before
installing or removing of the battery cartridge.
CAUTION: Hold the tool and the battery car-
tridge rmly when installing or removing battery
cartridge.Failuretoholdthetoolandthebattery
cartridgermlymaycausethemtoslipoffyourhands
andresultindamagetothetoolandbatterycartridge
andapersonalinjury.
►Fig.1: 1. Red indicator 2. Button 3. Battery cartridge
Toremovethebatterycartridge,slideitfromthetool
whileslidingthebuttononthefrontofthecartridge.
Toinstallthebatterycartridge,alignthetongueonthe
batterycartridgewiththegrooveinthehousingandslip
itintoplace.Insertitallthewayuntilitlocksinplace
withalittleclick.Ifyoucanseetheredindicatoronthe
uppersideofthebutton,itisnotlockedcompletely.
CAUTION: Always install the battery cartridge
fully until the red indicator cannot be seen.Ifnot,
itmayaccidentallyfalloutofthetool,causinginjuryto
you or someone around you.
CAUTION: Do not install the battery cartridge
forcibly.Ifthecartridgedoesnotslideineasily,itis
notbeinginsertedcorrectly.
Battery protection system
Lithium-ion battery with star marking
►Fig.2: 1. Star marking
Lithium-ionbatterieswithastarmarkingareequipped
withaprotectionsystem.Thissystemautomatically
cutsoffpowertothetooltoextendbatterylife.
Thetoolwillautomaticallystopduringoperationifthe
tooland/orbatteryareplacedunderoneofthefollowing
conditions:
Overloaded:
Thetoolisoperatedinamannerthatcausesittodraw
anabnormallyhighcurrent.
Inthissituation,turnthetooloffandstoptheapplication
thatcausedthetooltobecomeoverloaded.Thenturn
the tool on to restart.
Ifthetooldoesnotstart,thebatteryisoverheated.In
thissituation,letthebatterycoolbeforeturningthetool
on again.
Low battery voltage:
Theremainingbatterycapacityistoolowandthetool
willnotoperate.Inthissituation,removeandrecharge
thebattery.
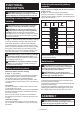
Indicating the remaining battery
capacity
Only for battery cartridges with "B" at the end of the
model number
►Fig.3: 1.Indicatorlamps2.Checkbutton
Pressthecheckbuttononthebatterycartridgetoindi-
catetheremainingbatterycapacity.Theindicatorlamps
light up for few seconds.
Indicator lamps Remaining
capacity
Lighted Off Blinking
75%to100%
50%to75%
25%to50%
0%to25%
Charge the
battery.
Thebattery
may have
malfunctioned.
NOTE: Depending on the conditions of use and the
ambienttemperature,theindicationmaydifferslightly
from the actual capacity.
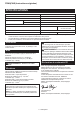
Switch action
CAUTION: Before inserting the battery car-
tridge into the tool, always check to see that the
switch trigger actuates properly and returns to
the "OFF" position when released.
CAUTION: When not operating the tool,
depress the lock-off button from A side to lock the
switch trigger in the OFF position.
►Fig.4: 1.Lock-offbutton2. Switch trigger
Topreventtheswitchtriggerfromaccidentallypulled,
thelock-offbuttonisprovided.
Tostartthetool,depressthelock-offbuttonfromBside
and pull the switch trigger.
Toolspeedisincreasedbyincreasingpressureonthe
switchtrigger.Releasetheswitchtriggertostop.After
use,alwayspressinthelock-offbuttonfromAside.
ASSEMBLY
CAUTION: Always be sure that the tool is
switched off and the battery cartridge is removed
before carrying out any work on the tool.