
User Manual

19 ENGLISH
Carrying the mower
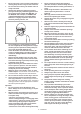
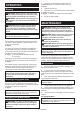
When carrying the mower, hold the front grip and rear
gripwithtwopeopleasshowninthegure.
►Fig.36: 1. Front grip 2. Rear grip
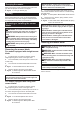
Storing
Store mower indoors in a cool, dry and locked place.
Don't store the mower and charger in locations where
the temperature may reach or exceed 40 °C.
Removing or installing the mower
blade
WARNING: The blade coasts for a few sec-
onds after releasing the switch. Do not start any
operation until the blade comes to a complete
stop.
WARNING: Always remove the lock key and
battery cartridge when removing or installing the
blade. Failure to remove the lock key and battery
cartridge may cause a serious injury.
WARNING: Always wear gloves when han-
dling the blade.
Removing the mower blade
For models equipped with straight mower
blade
1. Put the mower on its side so that the mowing
heightadjustinglevercomestotheupperside.
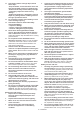
2. To lock the blade, insert the pin into a hole on the
mower body.
3. Turn the bolt counterclockwise with box wrench
17.
►Fig.37: 1. Mower blade 2. Pin 3. Box wrench
4. Remove the bolt, and then mower blade.
►Fig.38: 1. Blade support 2. Mower blade 3. Bolt
4. Protrusion
NOTICE: When installing the mower blade, make
sure that the protrusions on the blade support t
in the holes in the mower blade.
For models equipped with swing back
mower blades
1. Put the mower on its side so that the mowing
heightadjustinglevercomestotheupperside.
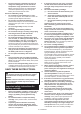
2. To lock the base plate, insert the pin into a hole on
the mower body through a hole on the base plate.
3. Turn the bolt counterclockwise with box wrench
17.
►Fig.39: 1. Pin 2. Base plate 3. Box wrench
4. Remove the bolt, and then base plate.
►Fig.40: 1. Blade support 2. Base plate 3. Bolt
4. Protrusion
NOTICE: When installing the mower blades,
make sure that the protrusions on the blade sup-
port t in the holes in the base plate.
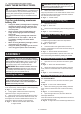
5. To remove the individual mower blade, turn the
bolt counterclockwise with box wrench 17 while holding
the base plate.
►Fig.41: 1. Base plate 2. Mower blade 3. Box wrench
6. Remove the nut, washer, spring washer, mower
blade, and bolt in order.
►Fig.42: 1. Bolt hole 2. Bolt 3. Mower blade 4. Spring
washer 5. Washer 6. Nut
NOTICE: When tightening the nuts to install the
individual mower blades, apply 30 N•m as tighten-
ing torque.
NOTICE: When installing the individual mower
blade, be sure to attach the spring washer in the
direction as shown in the gure.
NOTICE: When installing the individual mower
blade, be sure to insert the bolts into the bolt
holes shown in the gure.
Installing the mower blade
WARNING: Install the mower blade carefully.
It has a top/bottom facing.
WARNING: Tighten the bolt clockwise rmly
to secure the blade.
WARNING: Make sure that the mower blade
and all the xing parts are installed correctly and
tightened securely.
WARNING: When you replace the blades,
always follow the instructions provided in this
manual.
NOTICE: After installing the mower blades,
remove the pin from the mower body.
To install the mower blades, perform the removal proce-
dure in reverse.