
User Manual
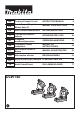


9 ENGLISH
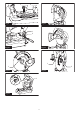
Securing the base
Thistoolshouldbeboltedwithtwoboltstoaleveland
stablesurfaceusingtheboltholesprovidedinthetool's
base.Thiswillhelppreventtippingoverandpossible
personalinjury.
►Fig.1: 1. Bolt holes 2. Base
FUNCTIONAL
DESCRIPTION
WARNING: Always be sure that the tool is
switched off and the battery cartridge is removed
before adjusting or checking the functions on
the tool.Failuretoswitchoffandremovethebattery
cartridgemayresultinseriouspersonalinjuryfrom
accidental start-up.
Unlocking/locking tool head
Thetoolheadcanbelocked.Alwayslockthetoolhead
when not in use or carrying.
To unlock, depress the tool head slightly and push the
lock pin. To lock, return the lock pin while holding down
the tool head.
►Fig.2: 1. Lock pin
Installing or removing battery
cartridge
CAUTION: Always switch off the tool before
installing or removing of the battery cartridge.
CAUTION: Hold the tool and the battery car-
tridge rmly when installing or removing battery
cartridge.Failuretoholdthetoolandthebattery
cartridgermlymaycausethemtoslipoffyourhands
andresultindamagetothetoolandbatterycartridge
andapersonalinjury.
►Fig.3: 1. Red indicator 2. Button 3. Battery cartridge
Toremovethebatterycartridge,slideitfromthetool
whileslidingthebuttononthefrontofthecartridge.
Toinstallthebatterycartridge,alignthetongueonthe
batterycartridgewiththegrooveinthehousingandslip
it into place. Insert it all the way until it locks in place
with a little click. If you can see the red indicator on the
uppersideofthebutton,itisnotlockedcompletely.
CAUTION: Always install the battery cartridge
fully until the red indicator cannot be seen. If not,
itmayaccidentallyfalloutofthetool,causinginjuryto
you or someone around you.
CAUTION: Do not install the battery cartridge
forcibly. If the cartridge does not slide in easily, it is
notbeinginsertedcorrectly.
NOTE:Thetooldoesnotworkwithonlyonebattery
cartridge.
Tool / battery protection system
Thetoolisequippedwithatool/batteryprotectionsys-
tem. This system automatically cuts off power to the
motortoextendtoolandbatterylife.Thetoolwillauto-
maticallystopduringoperationifthetoolorbatteryis
placed under one of the following conditions.
Overload protection
When the tool is operated in a manner that causes it to
drawanabnormallyhighcurrent,thetoolautomatically
stops. In this situation, turn the tool off and stop the
applicationthatcausedthetooltobecomeoverloaded.
Then turn the tool on to restart.
Overheat protection
When the tool is overheated, the tool stops automati-
cally,andthebatteryindicatorblinkabout60seconds.
Inthissituation,letthetoolcooldownbeforeturningthe
tool on again.
On Blinking
Overdischarge protection
Whenthebatterycapacitybecomeslow,thetoolstops
automaticallyandthebatteryindicatorofthedepleted
batterycartridgewillblink.Iftheproductdoesnotoper-
ate even when the switches are operated, remove the
depletedbatterycartridgefromthetoolandchargeit.
Blinking Off
Indicating the remaining battery capacity
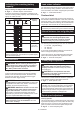
►Fig.4: 1. Battery indicator 2.Checkbutton
Pressthecheckbuttontoindicatetheremainingbattery
capacities.Thebatteryindicatorscorrespondtoeach
battery.
Battery indicator status Remaining
battery
capacity
On
Off
Blinking
50% to 100%
20% to 50%
0% to 20%
Charge the
battery