
User Manual


8 ENGLISH
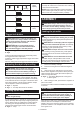
Battery indicator status Remaining
battery
capacity
On
Off
Blinking
50% to 100%
20% to 50%
0% to 20%
Charge the
battery
Trigger-lock button
CAUTION: Before installing the battery car-
tridge into the tool, always check to see that the
switch trigger actuates properly and returns to
the "OFF" position when released.
CAUTION: When not operating the tool,
depress the trigger-lock button from B side to
lock the switch trigger in the OFF position.
►Fig.4: 1.Trigger-lockbutton2.Switchtrigger
►Fig.5
Topreventtheswitchtriggerfromaccidentallypulled,
thetrigger-lockbuttonisprovided.
Topulltheswitchtrigger,depressthetrigger-lockbutton
fromAside.
Afteruse,alwayspressinthetrigger-lockbuttonfromBside.
Adjusting the depth of pin-nailing
WARNING: Always make sure that your
ngers are not placed on the switch trigger or
the contact element and the battery cartridge is
removed before adjusting the depth of nailing.
Depthofpin-nailingcanbeadjustedonthispinnailer.To
adjustthedepthofnailing,turntheadjuster.Thedepth
ofnailingisthedeepestwhentheadjusteristurnedfully
intheAdirectionshowninthegure.Itwillbecomeshal-
lowerastheadjusteristurnedintheBdirection.Depth
canbeadjusted1.5mmtothemaximum.
►Fig.6: 1.Adjuster
►Fig.7: 1.Toodeep2. Flush 3.Tooshallow
Lighting up the lamp
CAUTION: Do not look in the light or see the
source of light directly.
Pull the switch trigger or actuate the contact element to
lightupthelamp.Thelampkeepsonlightingwhilepull-
ing the switch trigger or actuating the contact element.
Thelampgoesoutapproximately10secondsafter
releasing the switch trigger and the contact element.
►Fig.8: 1. Lamp
NOTE:Useadryclothtowipethedirtoffthelensof
thelamp.Becarefulnottoscratchthelensoflamp,or
it may lower the illumination.
NOTE:Eveninthelamplightsupwhenthebattery
powerresidualgetssmall,pinnailermaynotrepin
nails.Inthiscase,chargethebatterycartridge.
ASSEMBLY
CAUTION:
Always make sure that your ngers
are not placed on the switch trigger or the con-
tact element and the battery cartridge is removed
before carrying out any work on the pin nailer.
Loading the pin nailer
CAUTION: Always make sure that the battery
cartridge is removed before loading the pin nailer.
Unintentionalringmaycausepersonalinjuriesand
property damage.
CAUTION: Do not abruptly slide the magazine
of the pin nailer loaded with pin nails.Accidentally
dropping pin nails especially when working in high
placesmaycausepersonalinjuries.
CAUTION: Load pin nails in the correct direc-
tion. Loading in wrong direction may cause prema-
turewearandtearofthedriveranddamageofthe
other parts.
CAUTION: Do not use deformed connected
pin nails.Usepinnailsspeciedinthismanual.
Usingpinnailsotherthanthosespeciedmaycause
pinnailjammingandbreakageofthepinnailer.
1. Removethebatterycartridge.
2. Press the locking lever and slide the magazine
backward.
3. Alignthetipofpinnailswiththegroovesatthe
bottomofthemagazineandpushthewholepartofpin
nailstowardthedriverguide.(Becarefultoplacepin
nails in the right direction.)
►Fig.9: 1. Pin nails 2.Magazine3. Locking lever
4. Driver guide
4. Afterloadingpinnails,pushbackthemagazinein
place until it clicks.
Toremovepinnails,followtheinstallationprocedures
in reverse.
Nose adapter
CAUTION: Always make sure that your
ngers are not placed on the switch trigger or
the contact element and the battery cartridge is
removed before installing the nose adapter.
Whenringpinnailsonthematerialwitheasily-marred
surfaces,usethenoseadapter.Toinstallthenose
adapter, place it over the driver guide cover so that the
protrusioninsidethenoseadaptertstothedentinthe
driver guide cover.