
User Manual


1 0 ENGLISH
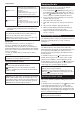
Cruise mode
Pattern mode
Application:
Largeoorswithlessobstaclessuch
as in a well-organized warehouse and
long gallery.
Description (Fig. H-1):
The Robotic Cleaner repeats a cycle of
vertical (a) and horizontal (b) travels.*
Random mode
Application:
Floors with many obstacles such as in
anofce.
Description (Fig. H-2):
The Robotic Cleaner repeats a cycle of
bouncing off (c) and along-the-wall (d)
travels.
* Depending on the conditions encountered, the
actual trail of the Robotic Cleaner may differ from
this chart.
NOTE: The Robotic Cleaner could not clean a narrow
area where the Robotic Cleaner could not travel or
where is out of the reach of the side brush.
NOTE: After a cleaning cycle is over, some dust may
remainontheoorinsomeconditions.
Sleep mode
If the Robotic Cleaner is left as it is for approx. 5
minutes in standby mode, the Robotic Cleaner
automatically enters sleep mode to save the batteries,
andthepilotlamp(Fig.F-1)slowlyashes.TheRobotic
Cleaner also enters sleep mode when the auto-on timer
has been activated.
To return to standby mode, perform step 3 in “Basic
operations.”
NOTICE: Changes of settings and starting of cleaning
operations are not possible in this mode.
Carrying the Robotic Cleaner
CAUTION: Before carrying the Robotic Cleaner,
be sure to turn OFF the Robotic Cleaner.
CAUTION: Care must be taken that your hand
never be caught between the handle and the Robotic
Cleaner’s body.
Grip the handle (Fig. J-1).
NOTICE: If you support the rear bottom of the Robotic
Cleaner with another hand, care must be taken so as
not to lift that side too much as the dust and dirt in the
Robotic Cleaner drop out of the main brush opening.
NOTICE: Do not haul the Robotic Cleaner.
Emptying the bin
Empty the bin after every use to keep the Robotic
Cleaner operating at peak performance.
1. Press and hold the
POWER button (Fig. F-8) on
the Robotic Cleaner until all indicators turn OFF, or
press the POWER OFF button (Fig. G-1) on the
remote control to turn OFF the Robotic Cleaner.
2. Press and release the top lid (Fig. K-1) to unlock it,
and then fully open the lid.
3. Take out the dust box (Fig. K-2).
4. Undo both locks (Fig. K-3), and open the dust box
lid.
5. Take out and empty the upper bin (Fig. K-4).
6. Removesmallclumpsofdustfromthelter(Fig.
K-5) and empty the lower bin (Fig. K-6).
7. Replace the dust box in the Robotic Cleaner in the
reverse sequence.
Advanced operations
The following features can be set only when the Robotic
Cleaner is in standby mode (see step 1 in “Basic
operations”).
Saving power
The Robotic Cleaner can capture most visible dust
withoutusingthevacuumfan.Ifnedustdoesnotneed
to be removed, turning OFF the vacuum fan saves
the battery power to prolong the operating time of the
Robotic Cleaner.
In standby mode, press the
Vacuum button on the
Robotic Cleaner (Fig. F-10) or on the remote control
(Fig. G-7) to turn OFF the Vacuum lamp (Fig. F-10).
To turn ON the vacuum fan, press the
Vacuum button
on the Robotic Cleaner (Fig. F-10) or on the remote
control (Fig. G-7). The lamp lights up again.
NOTICE: This setting is not possible in sleep mode
with the auto-on timer activated.
NOTICE: In cases where the vacuum fan is turned
OFF, the
Filter maintenance lamp (Fig. F-3) does
notlightevenifthelterisfullofdirt.
Adjusting the buzzer volume
Three levels of buzzer volume including mute can be
selected.
In standby mode, repeatedly press the
Buzzer button
on the Robotic Cleaner (Fig. F-9) or on the remote
control (Fig. G-6). Each time you press the button, the
buzzer beeps in the following order: at high volume (the
lamp lights up), at low volume (the lamp lights up), and
then no sound (the lamp goes off).
NOTICE: This setting is not possible in sleep mode
with the auto-on timer activated.