
User Manual


7 ENGLISH
Tool/battery cartridge protection
system
The Robotic Cleaner is equipped with a tool/battery
cartridge protection system that automatically cuts
OFF the power to the motor to extend the life cycle of
the Robotic Cleaner and the battery cartridges. The
Robotic Cleaner automatically stops under the following
conditions.
Overload
When the Robotic Cleaner is overloaded and an
abnormally high current is drawn, the Robotic Cleaner
automatically stops without any indication.
To restart the Robotic Cleaner, turn the power OFF,
eliminate the cause of the overload, and then turn the
power back ON.
Overheating
When the Robotic Cleaner overheats, the
lamp
ashes5or7timesforeachsequenceandtheRobotic
Cleaner automatically stops.
In this case, leave the Robotic Cleaner to cool down
before turning the power back ON.
Overdischarge
When the remaining battery level becomes low, the
Robotic Cleaner automatically stops and does not
respond to any switch operations.
In this case, remove and recharge the battery
cartridges.
BUTTONS AND
INDICATORS
Youcannddetailsofthepartsbysearchingfor
thegurenumbercorrespondingtoeachpartinthis
document (e.g. search for “Fig. F-8” for the
POWER
button).
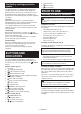
Robotic Cleaner (Fig. F)
1. Pilot lamp
2.
Troubleshooting lamp
3.
Filter maintenance lamp
4.
Brush maintenance lamp
5.
Battery indicators (for the right-hand and left-
hand battery cartridges)
6.
Timer button and lamps
7.
Cruise mode button and lamps
: Pattern mode
: Random mode
8.
POWER (start/stop) button
9.
Buzzer button and lamp
10.
Vacuum button and lamp
11.
Boundary sensor button and lamp
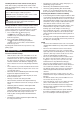
Remote control (Fig. G)
1.
POWER OFF button
2.
Start/Stop button
3.
Location beacon button
4.
/ Cruise mode buttons
5.
Timer button
6.
Buzzer button
7.
Vacuum button
PRIOR TO USE
Assembly and battery installation
CAUTION: Always be sure to turn OFF the Robotic
Cleaner before carrying out any work on the Robotic
Cleaner.
Supplied accessories
Check that the items in the following list are included in
the package.
• Size AAA (LR03) batteries (x2)
• Side brushes (x4, incl. two spare brushes)
• Screws for side brush installation (x4)
• Boundary tape (15 m (49.2 ft.) x1)
• Instruction Manual (x1)
• Quick start guide (x1)
• Notes on use (x1)
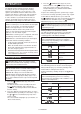
Installing the side brushes (Fig. A)
Install the side brushes on both sides of the bottom front
of the Robotic Cleaner.
NOTICE: Before work, be sure to spread a rug or
othercushioningmaterialontheoortoprevent
damagetotheoorandRoboticCleaner(Fig.B).
1. Place the side brush on the rotating shaft head on
the Robotic Cleaner with the groove of the brush
ttedtotheshafthead.
2. Secure the side brush using the supplied screw.
NOTICE: Make sure that the Robotic Cleaner is
operated with the side brushes installed.
Installing the battery cartridges
Align the groove (Fig. C-2) on the battery cartridge with
the tongue (Fig. C-3) on the battery dock and slip it into
place. Insert it all the way until it locks in place with a
small click.
If you can see the red indicator (Fig. C-1) on the upper
side of the release button, the battery cartridge is not
completely locked.
CAUTION: Care must be taken in installing the
batterycartridgessothatngersarenotcaught
between the dock and the battery cartridge.
The Robotic Cleaner operates with only one battery
cartridge installed on either of the battery dock.
To remove the battery cartridge, slide it from the battery
dock while pressing the release button (Fig. D-1) on the
cartridge.