
User Manual


20 ENGLISH
NOTE:
-
in diameter into the center hole to secure the straight
direction.
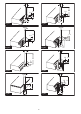
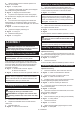
Fig.50: 1. Nail 2. Center hole
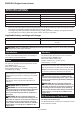
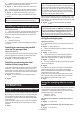
Optional accessory
The templet guide allows for repetitive cut with templet
1.
2.
Fig.51: 1. Base plate 2. Templet guide
3.
with the templet guide sliding along the side of the
templet.
Fig.52
NOTE: The actual cut size on the workpiece is slightly
-
Fig.53: 1.2. Templet guide 3. Distance
4. Outside diameter of templet guide
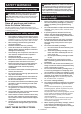
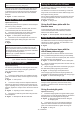
Optional accessory
The trimmer guide allows for trimming the curved side
along the side of the workpiece.
Fig.54
1. Loosen the clamp screw, then install the trimmer
screw.
Fig.55: 1. Clamp screw
2.
-
distance, tighten the clamp screw to secure the trimmer
guide.
Fig.56: 1.2. Clamp screw
3. Move the tool with the guide roller riding the side
of the workpiece.
Fig.57: 1. Workpiece 2. Bit 3. Guide roller
sheet or similar materials.
wing screws, then tilt the tool at the desired angle, and
then tighten the wing screws.
direction of the arrow.
Fig.58: 1. Wing screw
Fig.59: 1.2.
-
-
venient for work in a tight area.
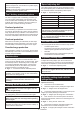
Fig.60
1.
Fig.61: 1.2.
2.
tightening the screws.
3.
Fig.62: 1. Bar type grip 2. Grip attachment
Fig.63: 1. Screw 2.
operation. Operate the tool in the same way as the
Optional accessory
1.
-
ening the wing nut. Insert the guide holder into the holes in
Fig.64: 1.2. Guide holder 3. Wing nut
4. Straight guide
2. Loosen the wing nut on the straight guide and
Fig.65: 1. Wing nut