ENGLISH (Original instructions) INSTRUCTION MANUAL Cordless Circular Saw DSS610 DSS611 006699 IMPORTANT: Read Before Using.
ENGLISH (Original instructions) SPECIFICATIONS Model DSS610 Blade diameter Max. Cutting depth DSS611 165 mm at 90° 57 mm at 45° 40 mm at 50° 36 mm No load speed (min-1) 3,700 Overall length 347 mm Net weight 3.5 kg Rated voltage 3.3 kg D.C. 18 V • Due to our continuing program of research and development, the specifications herein are subject to change without notice. • Specifications and battery cartridge may differ from country to country.
8. When operating a power tool outdoors, use an extension cord suitable for outdoor use. Use of a cord suitable for outdoor use reduces the risk of electric shock. 9. If operating a power tool in a damp location is unavoidable, use a ground fault circuit interrupter (GFCI) protected supply. Use of an GFCI reduces the risk of electric shock. Personal safety 10. Stay alert, watch what you are doing and use common sense when operating a power tool.
GEB060-5 20. Store idle power tools out of the reach of children and do not allow persons unfamiliar with the power tool or these instructions to operate the power tool. Power tools are dangerous in the hands of untrained users. 21. Maintain power tools. Check for misalignment or binding of moving parts, breakage of parts and any other condition that may affect the power tool’s operation. If damaged, have the power tool repaired before use. Many accidents are caused by poorly maintained power tools. 22.
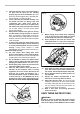
Kickback causes and related warnings kickback is a sudden reaction to a pinched, bound or misaligned saw blade, causing an uncontrolled saw to lift up and out of the workpiece toward the operator; when the blade is pinched or bound tightly by the kerf closing down, the blade stalls and the motor reaction drives the unit rapidly back toward the operator; if the blade becomes twisted or misaligned in the cut, the teeth at the back edge of the blade can dig into the top surface of the wood causing the blade to
19. Check the operation of the lower guard spring. If the guard and the spring are not operating properly, they must be serviced before use. Lower guard may operate sluggishly due to damaged parts, gummy deposits, or a build-up of debris. 20. Lower guard may be retracted manually only for special cuts such as "plunge cuts" and "compound cuts". Raise lower guard by retracting handle and as soon as blade enters the material, the lower guard must be released.
the safety rules stated in this instruction manual may cause serious personal injury. FUNCTIONAL DESCRIPTION ENC007-7 IMPORTANT SAFETY INSTRUCTIONS • FOR BATTERY CARTRIDGE 1. 2. 3. 4. 5. 6. 7. 8. 9. Installing or removing battery cartridge Before using battery cartridge, read all instructions and cautionary markings on (1) battery charger, (2) battery, and (3) product using battery. Do not disassemble battery cartridge.
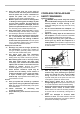
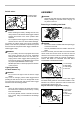
Battery protection system (Lithium-ion battery with star marking) Bevel cutting 1. Lever 1. Star marking 1 1 006702 For Model DSS610 012128 Lithium-ion batteries with a star marking are equipped with a protection system. This system automatically cuts off power to the tool to extend battery life.
Switch action 1 ASSEMBLY 2 1. Switch trigger 2. Lock-off lever • CAUTION: Always be sure that the tool is switched off and the battery cartridge is removed before carrying out any work on the tool. Removing or installing saw blade 1. Shaft lock 2. Hex wrench 006705 1 CAUTION: Before inserting the battery cartridge into the tool, always check to see that the switch trigger actuates properly and returns to the "OFF" position when released.
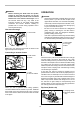
• WARNING: Before mounting the blade onto the spindle, always be sure that the correct ring for the blade's arbor hole you intend to use is installed between the inner and the outer flanges. Use of the incorrect arbor hole ring may result in the improper mounting of the blade causing blade movement and severe vibration resulting in possible loss of control during operation and in serious personal injury. OPERATION • • Hex wrench storage 1.
The handy rip fence allows you to do extra-accurate straight cuts. Simply slide the rip fence up snugly against the side of the workpiece and secure it in position with the screw on the front of the base. It also makes repeated cuts of uniform width possible. Replacing carbon brushes 1. Limit mark MAINTENANCE • • CAUTION: Always be sure that the tool is switched off and the battery cartridge is removed before attempting to perform inspection or maintenance.
Makita Jan-Baptist Vinkstraat 2, 3070, Belgium Makita Corporation Anjo, Aichi, Japan 885250A222 12 www.makita.