
Use and Care Manual


8 ENGLISH
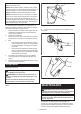
Installing hook
3
2
1
► 1. Groove 2. Hook 3. Screw
The hook is convenient for temporarily hanging the tool.
This can be installed on either side of the tool. To install
the hook, insert it into a groove in the tool housing on
either side and then secure it with a screw. To remove,
loosen the screw and then take it out.
OPERATION
The proper fastening torque may differ depending upon
the kind or size of the screw/bolt, the material of the
workpiece to be fastened, etc. The relation between fas-
tening torque and fastening time is shown in the gures.
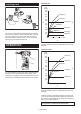
Standard bolt
N•m
(ft•lbs)
2
1
2.01.03.00
100
(72)
120
(87)
80
(58)
60
(43)
40
(29)
20
(14)
M12
(1/2")
M14
(9/16")
M10
(3/8")
M12
(1/2")
M14
(9/16")
M10
(3/8")
M8
(5/16")
M8
(5/16")
3
1. Fastening time (second) 2. Fastening torque
3. Proper fastening torque corresponding to each bolt
diameter
High tensile bolt
32
1
2.01.0
03
.0
M10
(3/8")
M12
(1/2")
M12
(1/2")
M8
(5/16")
M8
(5/16")
M10
(3/8")
N•m
(ft•lbs)
100
(72)
120
(87)
80
(58)
60
(43)
40
(29)
20
(14)
1. Fastening time (second) 2. Fastening torque
3. Proper fastening torque corresponding to each bolt
diameter
Hold the tool rmly and place the point of the driver bit
in the screw head. Apply forward pressure to the tool to
the extent that the bit will not slip off the screw and turn
the tool on to start operation.
NOTICE: If you use a spare battery to continue
the operation, rest the tool at least 15 min.