ENGLISH: Original instructions INSTRUCTION MANUAL Cordless Impact Driver DTD153 Read before use.
SPECIFICATIONS Model: DTD153 Fastening capacities Machine screw 4 mm - 8 mm Standard bolt 5 mm - 16 mm High tensile bolt 5 mm - 14 mm No load speed 0 - 3,400 min-1 Impacts per minute 0 - 3,600 min-1 Overall length 126 mm Rated voltage D.C. 18 V Battery cartridge BL1815, BL1815N, BL1820, BL1820B BL1830, BL1830B, BL1840, BL1840B, BL1850, BL1850B, BL1860B 1.3 kg 1.
Save all warnings and instructions for future reference. 5. The term "power tool" in the warnings refers to your mains-operated (corded) power tool or battery-operated (cordless) power tool. 6. Work area safety 1. Keep work area clean and well lit. Cluttered or dark areas invite accidents. 2. Do not operate power tools in explosive atmospheres, such as in the presence of flammable liquids, gases or dust. Power tools create sparks which may ignite the dust or fumes. 3.
Service 1. Have your power tool serviced by a qualified repair person using only identical replacement parts. This will ensure that the safety of the power tool is maintained. 2. Follow instruction for lubricating and changing accessories. 3. Keep handles dry, clean and free from oil and grease. 6. 7. 8. 9. 10. Cordless impact driver safety warnings 1. 2. 3. 4. 5. 6. Hold power tool by insulated gripping surfaces, when performing an operation where the fastener may contact hidden wiring.
Indicating the remaining battery capacity FUNCTIONAL DESCRIPTION Only for battery cartridges with "B" at the end of the model number CAUTION: Always be sure that the tool is switched off and the battery cartridge is removed before adjusting or checking function on the tool. Installing or removing battery cartridge 1 CAUTION: Always switch off the tool before installing or removing of the battery cartridge.
Overheat protection Lighting up the front lamp When the tool/battery is overheated, the tool stops automatically. In this situation, let the battery cool before turning the tool on again. Overdischarge protection When the battery capacity is not enough, the tool stops automatically. In this case, remove the battery from the tool and charge the battery. NOTE: Overload protection will work only with batteries with star marking. 1 1 ► 1.
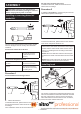
ASSEMBLY For tool with one-touch type sleeve To install the driver bit, insert the driver bit into the sleeve as far as it will go. CAUTION: Always be sure that the tool is switched off and the battery cartridge is removed before carrying out any work on the tool. Procedure 2 In addition to Procedure 1, insert the bit-piece into the sleeve with its pointed end facing in. Installing or removing driver bit/ socket bit 1 2 3 ► 1. Driver bit 2. Bit-piece 3.
Proper fastening torque for high tensile bolt OPERATION N•m (kgf•cm) 200 (2040) 180 (1836) 160 (1632) 2 The proper fastening torque may differ depending upon the kind or size of the screw/bolt, the material of the workpiece to be fastened, etc. The relation between fastening torque and fastening time is shown in the figures. Proper fastening torque for standard bolt 140 (1428) M12 120 (1224) 100 (1020) M10 80 (816) (M12) (M8) 1.0 2.0 3.0 1 ► 1. Fastening time (second) 2.
• 4. 5. Even though the diameters of bolts are the same, the proper fastening torque will differ according to the torque coefficient, the class of bolt and the bolt length. The manner of holding the tool or the material of driving position to be fastened will affect the torque. Operating the tool at low speed will cause a reduction in the fastening torque.
Makita Europe N.V. Jan-Baptist Vinkstraat 2, 3070 Kortenberg, Belgium Makita Corporation 3-11-8, Sumiyoshi-cho, Anjo, Aichi 446-8502 Japan www.makita.