
operation manual


6 ENGLISH
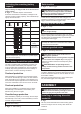
Indicating the remaining battery
capacity
Only for battery cartridges with "B" at the end of the
model number
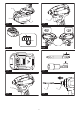
►Fig.2: 1. Indicator lamps 2. Check button
Pressthecheckbuttononthebatterycartridgetoindi-
catetheremainingbatterycapacity.Theindicatorlamps
lightupforfewseconds.
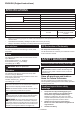
Indicator lamps Remaining
capacity
Lighted Off Blinking
75%to100%
50%to75%
25%to50%
0%to25%
Charge the
battery.
Thebattery
may have
malfunctioned.
NOTE:Dependingontheconditionsofuseandthe
ambienttemperature,theindicationmaydifferslightly
fromtheactualcapacity.
Tool / battery protection system
Thetoolisequippedwithatool/batteryprotectionsys-
tem.Thissystemautomaticallycutsoffpowertothe
motortoextendtoolandbatterylife.Thetoolwillauto-
maticallystopduringoperationifthetoolorbatteryis
placedunderoneofthefollowingconditions:
Overload protection
Whenthebatteryisoperatedinamannerthatcauses
it to draw an abnormally high current, the tool automat-
ically stops without any indication. In this situation, turn
thetooloffandstoptheapplicationthatcausedthetool
tobecomeoverloaded.Thenturnthetoolontorestart.
Overheat protection
Whenthetool/batteryisoverheated,thetoolstops
automatically. In this situation, let the battery cool
beforeturningthetoolonagain.
Overdischarge protection
Whenthebatterycapacityisnotenough,thetoolstops
automatically.Inthiscase,removethebatteryfromthe
tool and charge the battery.
NOTE: Overload protection will work only with batter-
ies with star marking.
►Fig.3: 1. Star marking
Switch action
►Fig.4: 1. Switch trigger
CAUTION: Before installing the battery car-
tridge into the tool, always check to see that the
switch trigger actuates properly and returns to
the "OFF" position when released.
Tostartthetool,simplypulltheswitchtrigger.Tool
speed is increased by increasing pressure on the switch
trigger. Release the switch trigger to stop.
Lighting up the front lamp
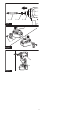
►Fig.5: 1. Lamp
CAUTION: Do not look in the light or see the
source of light directly.
Pulltheswitchtriggertolightupthelamp.Thelamp
keeps on lighting while the switch trigger is being pulled.
Thelampgoesoutapproximately10secondsafter
releasing the switch trigger.
NOTE:Useadryclothtowipethedirtoffthelensof
thelamp.Becarefulnottoscratchthelensoflamp,or
it may lower the illumination.
Reversing switch action
►Fig.6: 1. Reversing switch lever
CAUTION: Always check the direction of
rotation before operation.
CAUTION: Use the reversing switch only after
the tool comes to a complete stop. Changing the
directionofrotationbeforethetoolstopsmaydam-
age the tool.
CAUTION: When not operating the tool,
always set the reversing switch lever to the neu-
tral position.
Thistoolhasareversingswitchtochangethedirection
ofrotation.Depressthereversingswitchleverfromthe
AsideforclockwiserotationorfromtheBsideforcoun-
terclockwise rotation.
Whenthereversingswitchleverisintheneutralposi-
tion, the switch trigger cannot be pulled.
ASSEMBLY
CAUTION: Always be sure that the tool is
switched off and the battery cartridge is removed
before carrying out any work on the tool.
Installing or removing driver bit/
socket bit
►Fig.7
Useonlydriverbit/socketbitthathasinsertingportion
showninthegure.Donotuseanyotherdriverbit/
socket bit.