
Operators Manual


8 ENGLISH
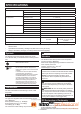
Impact force grade displayed
on panel
Maximum blows Purpose Example of application
Hard
TS H
3,800 min
-1
(/min) Tightening when force and
speed are desired.
Tightening underwork mate-
rials, tightening long screws,
tightening bolts.
Medium
TS H
2,600 min
-1
(/min) Tighteningwhenagoodnish-
ing is needed.
Tighteningnishingboards,
plaster boards.
Soft
TS H
1,100 min
-1
(/min) Tightening with less force to
avoid screw thread breakage.
Tightening sash screws, tight-
ening small screws such as M6.
T mode
TS H
2,600 min
-1
(/min) Tightening when speed and
goodnishingareneeded.
Tightening self drilling screws.
NOTE:Whenalllampsontheswitchpanelgoout,thetoolisturnedofftosavethebatterypower.Theimpactforce
grade can be checked by pulling the switch trigger to the extent that the tool does not operate.
NOTE:Whilepullingtheswitchtrigger,theimpactforcegradecannotbechanged.
ASSEMBLY
CAUTION: Always be sure that the tool is
switched off and the battery cartridge is removed
before carrying out any work on the tool.
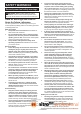
Installing or removing driver bit/
socket bit
Useonlydriverbit/socketbitthathasinsertingportion
showninthegure.Donotuseanyotherdriverbit/
socket bit.
For tool with shallow driver bit hole
A=12mm
B=9mm
Useonlythesetypeofdriver
bit. Follow the procedure
1. (Note) Bit-piece is not
necessary.
For tool with deep driver bit hole
A=17mm
B=14mm
To install these types of driver
bits, follow the procedure 1.
A=12mm
B=9mm
To install these types of driver
bits, follow the procedure 2.
(Note) Bit-piece is necessary
for installing the bit.
Procedure 1
For tool without one-touch type sleeve
1
2
►1. Driver bit 2. Sleeve
To install the driver bit, pull the sleeve in the direction of
the arrow and insert the driver bit into the sleeve as far
as it will go.
Then release the sleeve to secure the driver bit.
For tool with one-touch type sleeve
To install the driver bit, insert the driver bit into the
sleeve as far as it will go.