
User Manual


9 ENGLISH
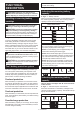
Procedure 2
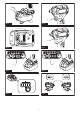
In addition to Procedure 1, insert the bit-piece into the
sleeve with its pointed end facing in.
►Fig.13: 1. Driver bit 2. Bit-piece 3. Sleeve
To remove the driver bit, pull the sleeve in the direction
of the arrow and pull the driver bit out.
NOTE: If the driver bit is not inserted deep enough
into the sleeve, the sleeve will not return to its original
position and the driver bit will not be secured. In this
case, try re-inserting the bit according to the instruc-
tions above.
NOTE:Whenitisdifculttoinsertthedriverbit,pull
the sleeve and insert it into the sleeve as far as it will
go.
NOTE:Afterinsertingthedriverbit,makesurethatit
isrmlysecured.Ifitcomesout,donotuseit.
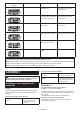
Installing hook
►Fig.14: 1. Groove 2. Hook 3. Screw
The hook is convenient for temporarily hanging the tool.
This can be installed on either side of the tool. To install
the hook, insert it into a groove in the tool housing on
either side and then secure it with a screw. To remove,
loosen the screw and then take it out.
OPERATION
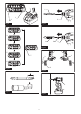
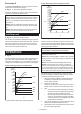
►Fig.15
The proper fastening torque may differ depending upon
thekindorsizeofthescrew/bolt,thematerialofthe
workpiece to be fastened, etc. The relation between fas-
teningtorqueandfasteningtimeisshowninthegures.
Proper fastening torque for standard bolt
N•m
(kgf•cm)
M14
M12
M10
M8
M16
M14
M12
M10
M8
M16
140
(1428)
(1224)
(1020)
(816)
(612)
(408)
(204)
120
100
80
60
40
20
01
2
1
2
1. Fastening time (second) 2. Fastening torque
Proper fastening torque for high tensile bolt
2
1
M14
M12
M14
M12
M10
M8
M10
M8
200
180
160
140
120
100
80
60
40
20
0123
(2040)
(1836)
(1632)
(1428)
(1224)
(1020)
(816)
(612)
(408)
(204)
N•m
(kgf•cm)
1. Fastening time (second) 2. Fastening torque
Holdthetoolrmlyandplacethepointofthedriverbit
inthescrewhead.Applyforwardpressuretothetoolto
the extent that the bit will not slip off the screw and turn
the tool on to start operation.
NOTICE: If you use a spare battery to continue
the operation, rest the tool at least 15 min.
NOTE:Usetheproperbitfortheheadofthescrew/
bolt that you wish to use.
NOTE:WhenfasteningM8orsmallerscrew,carefully
adjustpressureontheswitchtriggersothatthescrew
is not damaged.
NOTE: Hold the tool pointed straight at the screw.
NOTE:
If the impact force is too strong or you tighten the
screwforatimelongerthanshowninthegures,thescrewor
the point of the driver bit may be overstressed, stripped, dam-
aged,etc.Beforestartingyourjob,alwaysperformatestoper-
ation to determine the proper fastening time for your screw.
The fastening torque is affected by a wide variety of
factorsincludingthefollowing.Afterfastening,always
check the torque with a torque wrench.
1. Whenthebatterycartridgeisdischargedalmost
completely, voltage will drop and the fastening
torque will be reduced.
2. Driver bit or socket bit
Failure to use the correct size driver bit or socket
bit will cause a reduction in the fastening torque.
3. Bolt
•
Eventhoughthetorquecoefcientandtheclass
of bolt are the same, the proper fastening torque
will differ according to the diameter of bolt.
• Eventhoughthediametersofboltsarethe
same, the proper fastening torque will differ
accordingtothetorquecoefcient,theclass
of bolt and the bolt length.
4.
The manner of holding the tool or the material of driving
position to be fastened will affect the torque.
5. Operating the tool at low speed will cause a reduc-
tion in the fastening torque.