
operation manual


7 ENGLISH
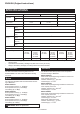
Indicator lamps Remaining
capacity
Lighted Off Blinking
Thebattery
may have
malfunctioned.
NOTE: Depending on the conditions of use and the
ambient temperature, the indication may differ slightly
from the actual capacity.
Switch action
►Fig.4: 1. Switch trigger
CAUTION: Before inserting the battery car-
tridge into the tool, always check to see that the
switch trigger actuates properly and returns to
the "OFF" position when released.
Tostartthetool,simplypulltheswitchtrigger.Tool
speed is increased by increasing pressure on the switch
trigger. Release the switch trigger to stop.
NOTE:Thetoolautomaticallystopsifyoukeeppull-
ing the switch trigger for about 6 minutes.
Lighting up the front lamp
CAUTION: Do not look in the light or see the
source of light directly.
►Fig.5: 1. Lamp
►Fig.6: 1. Button
Toturnonthelampstatus,pressthebutton
for
onesecond.Toturnoffthelampstatus,pressthebut-
ton for one second again.
WiththelampstatusON,pulltheswitchtriggertoturn
onthelamp.Toturnoff,releaseit.Thelampgoesout
approximately 10 seconds after releasing the switch
trigger.
WiththelampstatusOFF,thelampdoesnotturnon
even if pulling the trigger.
NOTE:Toconrmthelampstatus,pullthetrigger.
Whenthelamplightsupbypullingtheswitchtrigger,
thelampstatusisON.Whenthelampdoesnotcome
on, the lamp status is OFF.
NOTE:Whenthetoolisoverheated,thelightashes
foroneminute,andthentheLEDdisplaygoesoff.In
this case, cool down the tool before operating again.
NOTE: Use a dry cloth to wipe the dirt off the lens of
the lamp. Be careful not to scratch the lens of lamp, or
it may lower the illumination.
NOTE:Whilepullingtheswitchtrigger,thelamp
status cannot be changed.
NOTE: For approximately 10 seconds after releasing
the switch trigger, the lamp status can be changed.
Reversing switch action
►Fig.7: 1. Reversing switch lever
CAUTION: Always check the direction of
rotation before operation.
CAUTION: Use the reversing switch only after
the tool comes to a complete stop. Changing the
direction of rotation before the tool stops may dam-
age the tool.
CAUTION: When not operating the tool,
always set the reversing switch lever to the neu-
tral position.
Thistoolhasareversingswitchtochangethedirection
of rotation. Depress the reversing switch lever from the
AsideforclockwiserotationorfromtheBsideforcoun-
terclockwise rotation.
Whenthereversingswitchleverisintheneutralposi-
tion, the switch trigger cannot be pulled.
Changing the impact force
►Fig.8: 1. Changed in three steps 2. Hard 3. Medium
4. Soft 5. Button
Youcanchangetheimpactinthreesteps:hard,mediumandsoftmode.
Thisallowsatighteningsuitabletothework.
Everytimethebutton
is pressed, the number of blows changes in three steps.
For approximately one minute after releasing the switch trigger, the impact force can be changed.
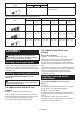
Specications of each impact force grade
Impact force grade displayed on
panel
Maximum blows Application
DTW1001 DTW1002 DTW800
Hard
2,200 min
-1
(/min) Tighteningwhenforceandspeedaredesired.
Medium
2,000 min
-1
(/min) Tighteningwhenyouneedgoodcontrolledpower.