
Instructions


9 ENGLISH
Changing the application mode
.
NOTE:-
ton
or .
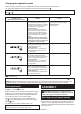
Fig.8
Application mode
(Assist type displayed on panel)
Feature Purpose
Bolt mode Clockwise
This mode helps to repeat screwdriving
also helps to reduce the risk of breakage
of bolts/nuts due to overtightening.
Counterclockwise
This mode helps to prevent a bolt from
tool driving in counterclockwise rotation,
after the bolt/nut gets enough loosened.
NOTE:
The timing to stop the driving varies
depending on the type of the bolt/nut
and material to be driven. Make a test
driving before using this mode.
Clockwise
Preventing over tightening of bolts.
Counterclockwise
Loosening bolts.
Bolt mode (1)
Clockwise
it has started impact blows.
Counterclockwise
The impact force is 4. The tool stops
-
ened the bolt/nut.
–
Bolt mode (2)
Clockwise
-
that the tool has started impact blows.
Counterclockwise
The impact force is 4. The tool stops
-
ened the bolt/nut.
–
Bolt mode (3)
Clockwise
-
that the tool has started impact blows.
Counterclockwise
The tool slows down the rotation after it
has loosened the bolt/nut.
–
: The lamp is on.
NOTE: When none of the lamp on the panel is lit, pull the switch trigger once before pressing the button
.
NOTE:
Full speed mode
Fig.9: 1. Button 2. Lamp
When full speed mode is turned on, the tool speed becomes
To turn on full speed mode, press and hold the but-
ton
button again.
The lamp turns on while full speed mode is on.
NOTE: Full speed mode continues even after switch-
ing the impact force mode/auto stop mode.
ASSEMBLY
CAUTION: Always be sure that the tool is
before carrying out any work on the tool.
Selecting correct impact socket
nuts. An incorrect size impact socket will result in inac-
curate and inconsistent fastening torque and/or damage
to the bolt or nut.