ENGLISH (Original instructions) INSTRUCTION MANUAL Cordless Hedge Trimmer DUH481 DUH483 DUH521 DUH523 012444 IMPORTANT: Read Before Using.
ENGLISH (Original instructions) SPECIFICATIONS Model DUH481 Blade length DUH483 DUH521 480 mm DUH523 520 mm Strokes per minute (min-1) 1,350 Rated voltage D.C. 14.4 V D.C. 18 V D.C. 14.4 V D.C. 18 V Overall length 869 mm 881 mm 873 mm 888 mm 919 mm 931 mm 923 mm Net weight 2.9 kg 3.1 kg 3.0 kg 3.2 kg 3.0 kg 3.2 kg 3.
ENH040-2 GEA006-2 For European countries only General Power Tool Safety Warnings EC Declaration of Conformity We Makita Corporation as the responsible manufacturer declare that the following Makita machine(s): Designation of Machine: Cordless Hedge Trimmer Model No./ Type: DUH481,DUH483,DUH521,DUH523 Specifications: see "SPECIFICATIONS" table.
21. Maintain power tools. Check for misalignment or binding of moving parts, breakage of parts and any other condition that may affect the power tool’s operation. If damaged, have the power tool repaired before use. Many accidents are caused by poorly maintained power tools. 22. Keep cutting tools sharp and clean. Properly maintained cutting tools with sharp cutting edges are less likely to bind and are easier to control. 23. Use the power tool, accessories and tool bits etc.
GEB062-5 14. CORDLESS HEDGE TRIMMER SAFETY WARNINGS 1. 2. 3. 4. 5. 6. 7. 8. 9. 10. 11. 12. 13. Keep all parts of the body away from the cutter blade. Do not remove cut material or hold material to be cut when blades are moving. Make sure the switch is off when clearing jammed material. A moment of inattention while operating the hedge trimmer may result in serious personal injury. Carry the hedge trimmer by the handle with the cutter blade stopped.
ENC007-7 FUNCTIONAL DESCRIPTION IMPORTANT SAFETY INSTRUCTIONS • FOR BATTERY CARTRIDGE 1. 2. 3. 4. 5. 6. 7. 8. 9. Before using battery cartridge, read all instructions and cautionary markings on (1) battery charger, (2) battery, and (3) product using battery. Do not disassemble battery cartridge. If operating time has become excessively shorter, stop operating immediately. It may result in a risk of overheating, possible burns and even an explosion.
For your safety, this tool is equipped with a dual switching system. To turn on the tool, press the lock-off button and triggers A and B. Release either one of the two pressed triggers to turn off. The sequence of switching is unimportant as the tool only starts when both switches are activated. Battery protection system (Lithium-ion battery with star marking) 1. Star marking 1 012128 Lithium-ion batteries with a star marking are equipped with a protection system.
When the tool is also overloaded and has stopped during operation, the lamp lights up in red. Refer to the following table for the status and action to be taken for the indication lamp. Indication lamp 1 1. Indication lamp 012480 Running the tool allows the indication lamp to show the battery cartridge capacity status. Indication lamp The lamp blinks in red. Action to be taken Status This indicates the appropriate Recharge the battery cartridge time to replace the battery as soon as possible.
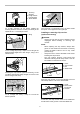
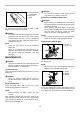
1. Trimming direction 2. Hedge surface to be trimmed 3. Tilt the blades 1 3 2 012485 012489 As a basic operation, tilt the blades towards the trimming direction and move it calmly and slowly at the speed rate of 3 - 4 seconds per meter. Trim boxwood or rhododendron from the base toward the top for a nice appearance and good job. 1 Installing or removing chip receiver (optional accessory) 1.
1. Press the levers on both sides 2. Unlock the hooks • Removing or installing shear blade 1 2 • 009293 To remove the chip receiver, press its lever on both sides so that the hooks are unlocked. • • CAUTION: The blade cover (standard equipment) cannot be installed on the tool with the chip receiver being installed. Before carrying or storing, uninstall the chip receiver and then install the blade cover to avoid blade exposure.
2 3 1 1. Gear 2. Sleeves 3. Washer 4. Groove 1. Grease 1 4 012481 012455 If the sleeves are still left in the holes of the gear, remove the gear and push the sleeves out of it with a screwdriver or the like. Apply some grease provided with the new shear blades as illustrated. 1 3 NOTE: The washer underneath the gear may come off by mistake when removing the gear. In this case, return it to the original position as it was installed. 2 1. Blade 2. Sponge 3.
Storage The hook hole in the tool bottom is convenient for hanging the tool from a nail or screw on the wall. 012453 Remove the battery cartridge and put the blade cover on the shear blades so that the blades are not exposed. Store the tool out of the reach of children carefully. Store the tool in the place not exposed to water and rain.
Makita Corporation Anjo, Aichi, Japan 885312A226 16 www.makita.