
User Manual


9 ENGLISH
Electronic function
Thetoolisequippedwiththeelectronicfunctionsfor
easyoperation.
• Soft start
The soft-start function minimizes start-up shock,
andmakesthetoolstartsmoothly.
ASSEMBLY
CAUTION: Always be sure that the tool is
switched off and the battery cartridge is removed
before carrying out any work on the tool.
Installing the front cover and side
grip
CAUTION: Tighten the side grip rmly.
Otherwise,thefrontcovermayfallandcausean
injury.
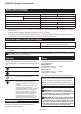
►Fig.7: 1. Front cover 2. Side grip
Attach the front cover to the tool and screw the side grip
onthetoolsecurely.
The side grip can be installed on either side of the tool.
Installing the shaft
Optional accessory
For DUT130
1. Tighten the shaft into the shaft holder.
►Fig.8: 1. Shaft 2. Shaft holder
2. Tighten the shaft with wrench while holding the
shaft holder with another wrench.
►Fig.9: 1. Shaft 2. Shaft holder
For DUT131
1. Insert the shaft into the chuck as far as it will go.
►Fig.10: 1. Shaft 2. Chuck
2. Tightenthechuckbyhand,andthenplacethe
chuckkeyineachofthreeholesandtightenitclock-
wise.Besuretotightenthechuckkeyatallthreeholes
evenly.
►Fig.11: 1.Chuckkey2. Chuck
Toremovetheshaft,turnthechuckkeycounterclock-
wiseatoneoftheholes,andthenloosenthechuckby
hand.
Installing the mixing blade
Optional accessory
Attach the mixing blade on the top of the shaft, and then
secure it with the hex bolt.
►Fig.12: 1. Mixing blade 2. Shaft 3. Hex bolt
NOTICE: Be sure to attach the mixing blade with
"UP" mark facing the tool.
►Fig.13: 1. Mark
Hook
Optional accessory
CAUTION: Always remove the battery when
hanging the tool with the hook.
CAUTION: Never hook the tool at high loca-
tion or on potentially unstable surface.
►Fig.14: 1. Groove 2. Hook 3. Screw
Thehookisconvenientfortemporarilyhangingthetool.
This can be installed on either side of the tool.
To install the hook, insert it into a groove in the tool
housing on either side and then secure it with a screw.
To remove, loosen the screw and then take it out.
Installing or removing the shaft
holder
Optional accessory
For DUT131
1. Insert the hex wrench into the chuck, and then
loosen the chuck with the hex wrench while holding the
spindle with the wrench.
►Fig.15: 1. Hex wrench 2. Chuck 3. Wrench
2. Tighten the shaft holder with a wrench while hold-
ing the spindle with another wrench.
►Fig.16: 1. Shaft holder 2. Wrench
To remove the shaft holder, perform the installation
procedure in reverse.
OPERATION
CAUTION: Do not mix ammable materials or
operate the tool around ammable materials such
as paint with thinner used as solvent. Failure to do
somaycauseaninjury.
CAUTION: Do not mix high viscosity material,
such as mortar or adhesive, in the high speed
mode.Youmaylosethecontrolofthetoolandcause
aninjury.
NOTICE: When you mix the material while the
mixing blade oating out of the material, be care-
ful not to splash the material.
1. Select high speed or low speed according to the
material to be mixed.
2. Hold the rear handle of the tool with one hand
andthegripwiththeotherhandrmly,placethemixing
bladeundermaterialfullyandturnonthetoolafter
makingsureworksitesafety.
3. Move the mixing blade up and down during the
mixing operation so that whole part of material can be
mixed.
4. Whennishingmixing,turnoffthetool,makesure
that the mixing blade has come to a complete stop, and
then pull it out of the mixing container.