
User Manual


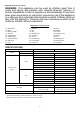


9
1
2
3
4
5
011123
NOTE:
• Long cut-off decorative paper that may be
produced by plaster board cutting work depending
on the conditions of workpiece to be cut and that
may be stuffed inside the hose may cause the hose
suction blocking. When this occurs, change the
cutting depth setting of power tool to deeper depth,
which will relieve the hose suction blocking.
CAUTION:
• When the dust bag is just new, dust may come out
of its surface. Using it a few times will minimize the
dust leak from the surface.
Operation of the cleaner with a nozzle or a
dust bag being installed
WARNING:
• Always be sure that the cleaner is switched off
and the battery cartridge is removed before
installing or removing the nozzle or any other
attachment on the cleaner. Failure to switch off
and remove the battery cartridge may result in
serious personal injury.
NOTE:
• Before the blower mode operation immediately
after the cleaner mode operation, remove all
remaining dust from the cleaner due to possible
blow out of dust .
Using as a blower
Fig.12
Install the nozzle onto the outlet (air vent) without fail.
To install the nozzle, fit the pin protruding from the inside
of nozzle to one of the cleaner notches and then turn
the nozzle clockwise securely.
To remove the nozzle, turn counterclockwise and pull it out.
Direct the top point of the cleaner and then switch on.
Emptying the dust bag
WARNING:
•
Always be sure that both the cleaner and a
connected power tool are switched off and the
battery cartridge is removed and the power
tool, if corded tool, is unplugged before
installing or removing the dust bag on the
cleaner and emptying the dust bag( made of
cloth).
Failure to switch off, remove the battery
cartridge and unplug the connected power tool may
result in electric shock and serious personal injury.
• When the dust bag is about half full, remove the
dust bag from the cleaner and pull the fastener out.
Empty the dust bag of its contents, tapping it lightly
so as to remove particles adhering to the insides
which might hamper further collection.
NOTE:
• For the time to empty the dust bag, use a guide
line that the dust bag becomes full when
drilling about 450 holes with 6.5 mm diameter
and 40 mm depth on the concrete. A dust bag
clogged with the built up particles may reduce the
dust collection power and cause damage to the
cleaner motor.
CAUTION:
• Attach the dust bag (made of cloth) to the dust
bag joint securely and close the fastener
completely before use. Failure to attach the dust
bag securely and close its fastener completely may
cause blow-out of dust and result in serious
personal injury.
Fig.13
Pick up the square section of the dust bag joint firmly,
turn it counterclockwise and then remove the dust bag.
Fig.14
Open the fastener and dispose of the dust.
CAUTION:
• Remove all particles adhering to the fastener area.
MAINTENANCE
WARNING:
• Always be sure that the cleaner is switched off and
the battery cartridge is removed before attempting
to perform inspection or maintenance.
Cleaning the filter area
CAUTION:
• Do not pick up materials other than dust , such as
stone, wood chip and the like since this cleaner is
intended for dust collection. Picking up stone, wood
chip and the like may cause damage to the fan and
the cleaner.
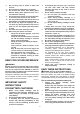
1. Decorative
paper
2. Saw blade
3. Base
4. Cutting depth
5. Plaster board