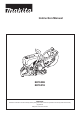
Instruction Manual EK7650H EK7651H Important: Read this instruction manual carefully before putting the Power Cutter into operation and strictly observe the safety regulations! Keep this instruction manual!
English Thank you for purchasing a MAKITA product! Table of Contents Page Delivery inventory...........................................................................3 Congratulations on choosing a MAKITA Power Cutter! We are confident that you will be satisfied with this modern piece of equipment. We want you to be satisfied with your MAKITA product.
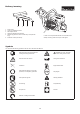
Delivery inventory 2 3 4 5 1. Power Cutter 2. 13/19 AF combination wrench 3. Star-shaped wrench 4. Carburetor adjustment screwdriver 5. Adapter ring (Tools for some countries may not require this ring.) 6. Instruction manual (not shown) 1 In case one of the parts listed should not be included in the delivery inventory, please consult your sales agent.
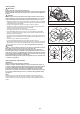
SAFETY PRECAUTIONS General precautions -- The operator MUST read this instruction manual to ensure safe operation (even if you already have experience in using cutoff saws). It is important to be familiar with the operation of this particular cutoff saw. Users insufficiently informed will endanger themselves as well as others due to improper handling. -- Let only persons who have experience in using cutoff saws work with this unit.
-- Always wear safety shoes or boots (G) with steel toes, non-skid soles, and leg protectors when working with the Power Cutter. Safety shoes equipped with a protective layer provide protection against cuts and ensure a secure footing. -- Always wear a work suit (H) of sturdy material. Fuels / Refuelling -- Go to a safe, level place before refuelling. Never refuel while on scaffolding, on heaps of material, or in similar places! -- Switch off the engine before refuelling the Power Cutter.
Cutoff discs -- The protection hood must always be on! Change discs only with the engine off! -- There are two basic types of cutoff discs: -- For metal (hot cutting) -- For masonry (cold cutting) NOTE: When using diamond cutoff discs, always make sure to observe the “direction of rotation” markings. Diamond discs should only be used for cutting masonry/brick/ concrete etc. -- Cutoff discs are intended only for radial loading, i.e. for cutting.
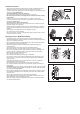
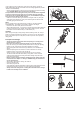
Kickback and lock-in -- When working with the Power Cutter there is a danger of kickback and lock-in. -- Kickback occurs when the top of the cutting disc is used for cutting (15). -- This causes the Power Cutter to be thrown back toward the user with great force and out of control. Risk of injury! To prevent kickback, observe the following: -- Never cut with the section of the cutting disc shown in figure 15.
Cutting metals IMPORTANT! Always wear approved respiratory protection! Materials that can release toxic substances may be cut only after notifying the proper authorities and under their supervision or that of a person appointed by them. CAUTION: The rapid rotation of the cutting disc heats metal and melts it at the point of contact. Swing the guard as far down as possible behind the cut (19) in order to direct the stream of sparks forward, away from the operator (fire hazard).
In wet cutting, the disc is wetted at an equal rate on both sides by a trickle of water. MAKITA offers the right accessories for all wet cutting applications (see also “SPECIAL ACCESSORIES”). -- Remove foreign objects such as sand, stones and nails found within the working area. CAUTION: Watch out for electric wires and cables! The rapid rotation of the cutting disc at the point of contact throws fragments out of the cut groove at high speed.
Maintenance -- Before performing maintenance work switch off the Power Cutter (27) and pull out the plug cap. -- Always check the Power Cutter before using it to make sure that it is in good working order. In particular, make sure that the cutting disc is properly mounted. Make sure that the cutting wheel is undamaged and suitable for the job it will be used for. -- Operate the Power Cutter only at a low noise and emission level. For this ensure the carburetor is adjusted correctly.
Technical data Model Item Engine EK7650H EK7651H 3 Displacement cm 75.6 Bore mm 51 Stroke mm 37 Max. power kW 3.0 Max. torque Nm 4.6 Idling speed min-1 2,600 Clutch Auto centrifugal system Engine speed limitation min-1 9,100 Max. spindle speed min-1 4,300 Carburetor Diaphragm type Ignition system (with speed limitation) Non-contact, magnet type Spark plug Type NGK CMR6H Electrode gap mm 0.5 Starting system Fuel consumption at max.
Denomination of components 1. 2. 3. 4. 5. 6. 7. 8. 9. 10. 11. 12. 13. 14. 15. 16. 17. 18. 19. 20. Rear handle Filter cover Lock screw Top cover for air filter and spark plug cap Top cover Front handle Protection hood Tensioning screw Hex.
PUTTING INTO OPERATION CAUTION: Always turn off the engine and pull off the spark plug cap before doing any work on the Power Cutter! Always wear protective gloves! CAUTION: Start the Power Cutter only after complete assembly and inspection. For the following work, use the assembly tools included with delivery: 1. 2. 3. 4.
Tightening the V-belt / Checking V-belt tension IMPORTANT: Exact V-belt tension is essential for maximum cutting performance with minimum fuel consumption. Improper V-belt tension will result in premature wear to the V-belt and V-belt wheel or damage to the clutch bearing. NOTE: The two hex. nut (9) must be loosened before tightening the V-belt or checking the tension.
(1) Place engine on the level and remove oil cap. (2) Replenish oil to the base of the oil filling neck. When replenishing oil, use a proper lubricant container for refilling. (3) Firmly tighten oil cap. If oil cap is loose, oil may leak out. Oil replacement Point 2 If oil is spilt between fuel tank and engine, and the Power Cutter operated, oil will be sucked in via the cold air intake, which may cause dirtying. Always wipe off spilt oil before using the power cutter.
Operating Starting Starter grip WARNING: Do not start the engine in locations where refueling has taken place. Move at least three meters away from the place where the Power Cutter was fuelled. • Failure to do so may cause flames or fire. Switch Safety locking button CAUTION: Before starting engine, be sure to check that the cutting disc is not touching the ground or any other obstacle. • If the cutting disc is touching the ground or other obstacle, it may cause an accident.
Adjusting the carburetor NOTE: This engine is equipped with an electronic ignition to limit the speed. The carburetor also has a fixed jet which cannot be adjusted. At the factory the idling speed has been set to approx. 2,600 min-1, but the running-in process of a new engine may require slight readjustment of the idling speed. Set the idling speed with a screwdriver (width of blade: 4 mm). A screwdriver with a molded-on lug, supplied as an optional accessory, is useful for the adjustment. 4.
IMPORTANT: Because many of the parts and assemblies not mentioned in this Instruction Manual are vital to the safety of the unit, and because all parts are subject to a certain amount of wear and tear, it is important for your own safety that you have the unit checked and maintained regularly by a MAKITA service center. IMPORTANT: If the cutting wheel breaks during cutting, the Power Cutter must be repaired by a MAKITA service centre before being used again! SERVICE Belt cover V-belt 1.
Cleaning/changing the air filter • If the air filter becomes clogged, it may cause poor engine performance. Therefore, every time after using the Power Cutter, be sure to clean the air filter in the following way. • Turn the cover lock to the left and remove it. • Remove the top cover after blowing off dust from it. • Next, remove the prefilter. • Remove the four star-shaped screws. • Remove the filter cover. • Remove the air filter.
Spark plug maintenance (1) Loosen the cover lock and remove the top cover. (2) Open plug cover, remove plug cap, and remove spark plug. (3) Check to see whether or not the electrode gap is 0.5 mm. If the gap is too big or too small, adjust it to 0.5 mm. (4) If carbon and/or dirt has gathered on spark plug, clean, and then remount. An excessively worn or burnt spark plug should be replaced with a new one.
Cleaning the starter 14 When the starter doesn’t work well, for example the starter rope doesn’t return to initial position, it is necessary to blow off dust from the starter (14) and the clutch (15). To clean the starter and the clutch, remove three screws (16) for access.
Mounting direction Changing the cutting attachment position (central/side) Mounting direction of hood • The Power Cutter’s cutting attachment is mounted in the direction shown in Fig. A. If desired, use the following procedure to mount it in the direction shown in Fig. B. A Mounting in direction B (1) Loosen tightening nut, and turn tension adjustment screw to the left until the end of the screw is visible. (Fig. 1) (2) Remove tightening nuts and remove belt cover. (Fig.
SPECIAL ACCESSORIES Water tank (the component of trolley) The water tank is designed to be mounted on the guide trolley. Its high capacity makes it especially suitable for situations involving frequent site changes. For filling or for fast changing to reserve tanks, the tank can be simply lifted off the trolley. The water tank comes with all necessary connections and hoses. Mounting to the trolley and Power Cutter are very fast and simple.
Maintenance chart Item Engine oil Wheel, tightening bolt, hood Inspecting Regularity Inspection/clean Before commencing work Replace Initially, after 20 operating hours, and subsequently every 30 operating hours Visual inspection Before commencing work Throttle system Functional check Before commencing work Air filter Gently tap or replace. Monthly (every 50 operating hours) Dust bag filter Clean or replace.
Troubleshooting Before making a request for repairs, check a trouble for yourself. If any abnormality is found, control your machine according to the description of this manual. Never tamper or dismount any part contrary to the description. For repairs, contact Authorized Service Agent or local dealership.
Storage WARNING: When draining out fuel, always stop the engine, let it cool, and then drain fuel. • Draining fuel directly after stopping the engine may cause flames or fire, which could cause burn injuries. CAUTION: If the Power Cutter is not to be used for a prolonged period, drain out all the fuel, and store the Power Cutter in a dry, clean location. • Use the following procedures to drain out fuel from fuel tank and carburetor. (1) Remove fuel tank cap, drain out fuel until tank is empty.
Makita Corporation 885023C7 ALA www.makita.