
Specifications


Repair
[4] DISASSEMBLY/ASSEMBLY
[4]-3. Shaft pipe complete
DISASSEMBLING
ASSEMBLING
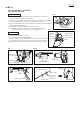
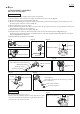
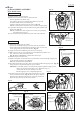
(1) Loosen two M6x30 Hex. socket head bolt (2pcs.) and remove Protector with Protector extension attached. (Fig. 7)
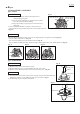
(2) Enlarge the space between the side wall of Protector cover and M5x14 Hex socket head bolt, and remove Protector cover
from Shaft pipe complete. (Fig. 8)
(3) Remove M5x14 Hex socket head bolt with Flat washer and spring washer then remove Protector clamp.
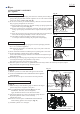
(4) Loosen M5x25 Hex socket head bolt then remove Gear case assembly. (Fig. 9)
(5) Remove four M5x30 Pan head screws then remove Loop handle and Handle clamp 24 from Shaft pipe complete. (Fig. 10)
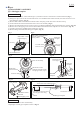
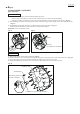
(6) Remove four 4x18 Tapping screws and two M5x14 Hex socket head bolts then separate Lever case R and L. (Fig. 11)
(7) According to the clause of [4]-2, Remove Shaft pipe complete.
(8) Remove Hanger and Shaft from Shaft pipe complete. (Fig. 12)
Assemble in the reverse order of disassembly.
• Slip Hanger on Shaft pipe complete as drawn in Fig. 12.
Fig. 7
Shaft pipe
complete
4x18 Tapping screw
Lever case set
M5x14 Hex socket
head bolt
M6x30 Hex. socket
head bolt (2pcs.)
Protector
Protector clamp
Gear case
assembly
Shaft pipe
complete
M5x14 Hex socket head bolt
with Flat washer and
Spring washer
M5x25 Hex
socket head bolt
Protector extension
M5x30 Pan head
screw (4pcs.)
Loop
handle
Handle
clamp 24
Gear case assembly
M5x14 Hex socket
head bolt with Flat washer
and spring washer (2 pcs.)
The distance between a hole
and one pipe end is long.
The distance is short.
Note: Hanger has to be assembled to Shaft pipe complete
in direction of the following arrow.
Hanger
Shaft Shaft pipe complete
Fig. 8
Fig. 10Fig. 9
Fig. 11 Fig. 12
The side wall of
Protector cover
P 4/ 14