Original Instruction Manual Instructions d’emploi d’origine Originalbetriebsanleitung Manuale di istruzioni originale Originele gebruiksaanwijzing Instrucciones de manejo originales Instruções de serviço original Original brugsanvisning Πρωτότυπο εγχειρίδιο οδηγιών Orijinal Kullanım Kılavuzu Important: Read this instruction manual carefully before putting the Petrol String Trimmer into operation and strictly observe the safety regulations! Preserve instruction manual carefully! Important : Veuillez lire att
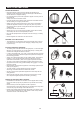
English (Original instructions) Thank you very much for purchasing the MAKITA Outdoor Power Equipment. We are pleased to recommend to you the MAKITA product which is the result of a long development program and many years of knowledge and experience. Please read this booklet which refers in detail to the various points that will demonstrate its outstanding performance. This will assist you to obtain the best possible result from your MAKITA product. Table of Contents Page Symbols.......................
SAFETY INSTRUCTIONS General Instructions –– Read this instruction manual to become familiar with handling of the equipment. Users insufficiently informed will risk danger to themselves as well as others due to improper handling. –– It is recommended only to lend the equipment to people who have proven to be experienced. Always hand over the instruction manual. –– First users should ask the dealer for basic instructions to familiarize oneself with the handling of an engine powered cutter.
–– Start the Petrol String Trimmer only in accordance with the instructions. –– Do not use any other methods for starting the engine! –– Use the Petrol String Trimmer and the tools only for such applications as specified. –– Only start the engine, after the entire assembly is done. Operation of the device is only permitted after all the appropriate accessories are attached! –– Before starting make sure that the cutting attachment has no contact with hard objects such as branches, stones etc.
Method of operation –– Only use in good light and visibility. During the winter season beware of slippery or wet areas, ice and snow (risk of slipping). Always ensure a safe footing. –– Never cut above waist height. –– Never stand on a ladder. –– Never climb up into trees to perform cutting operation. –– Never work on unstable surfaces. –– Remove sand, stones, nails etc. found within the working range. –– Before commencing cutting, the cutting attachment must have reached full working speed.
TECHNICAL DATA ER2650LH ER2650LH Model Loop handle Dimensions: length x width x height (without cutting attachment) mm 1,621 x 310 x 479 Cutting diameter mm 412 kg 4.8 Volume (fuel tank) L 0.6 Volume (oil reservoir) L 0.08 Engine displacement 3 Mass (without plastic guard and cutting attachment) 25.4 cm Maximum engine performance kw 0.77 at 7,000 min-1 min-1 Engine speed at recommended max.
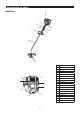
DESIGNATION OF PARTS ER2650LH 5 7 8 9 12 10 11 4 13 14 15 GB 6 3 17 18 19 16 1 2 7 DESIGNATION OF PARTS 1 Fuel tank 2 Rewind starter 3 Air cleaner 4 I-O switch (on/off) 5 Spark plug 6 Exhaust muffler 7 Clutch case 8 Rear grip 9 Lock-off lever 10 Handle 11 Throttle lever 12 Control cable 13 Shaft 14 Protector 15 Nylon cutting head 16 Fuel filler cap 17 Starter knob 18 Exhaust pipe 19 Oil cap
MOUNTING OF HANDLE CAUTION: Before doing any work on the equipment, always stop the engine and pull the spark plug connector off the spark plug. Always wear protective gloves! CAUTION: Start the engine only after having assembled it completely. For machines with loop handle –– Fix the loop handle on the shaft as shown. –– To keep a proper distance between the grips, set the loop handle ahead of the arrows.
BEFORE START OF OPERATION Inspection and refill of engine oil –– Perform the following procedure, with the engine cooled down. –– Set the engine level, remove oil cap (Fig. 1), and check to see whether or not there is oil in the range between the upper limit and lower limit marks of the oil pipe (Fig. 2). –– Fill with oil to upper limit mark if oil is insufficient (oil level is close to lower limit mark) (Fig. 3).
• Do not replace oil with the engine in a tilted position. Note • Filling with oil while engine is tilted leads to overfilling which causes oil contamination and/or white smoke. Point 2 in Replacement of oil: “If oil spills out” –– If oil spills out between the fuel tank and engine main unit, the oil is sucked into through the cooling air intake port, which will contaminate the engine. Be sure to wipe out spilt oil before start of operation.
POINTS IN OPERATION AND HOW TO STOP Observe the applicable accident prevention regulations! STARTING Move at least 3 m away from the place of refueling. Place the unit on the ground taking care that the cutting attachment does not come into contact with the ground or any other objects. A: Cold start Lock-off lever 1) Set this machine on a flat space. 2) Set the I-O switch (1) to OPERATION.
At times, such as winter, when starting the engine is difficult CLOSE Operate choke lever with the following procedure when starting engine. • After implementing startup steps 1) to 3), set choke lever to the CLOSE position. • Implement startup step 4) and start engine. • Once engine starts, set choke lever to the OPEN position. • Implement startup step 5) and complete warm up.
Replacing the nylon cord WARNING: Make sure that the cover of the nylon cutting head is secured to the housing properly as described below. Failure to properly secure the cover may cause the nylon cutting head to fly apart resulting in serious personal injury. Press inward on the housing latches and lift upward to remove the cover. Discard any of the remaining nylon cord.
SERVICING INSTRUCTIONS CAUTION: Before doing any work on the equipment, always stop the engine and pull the plug cap off the spark plug (see “checking the spark plug”). Always wear protective gloves! To ensure a long service life and to avoid any damage to the equipment, the following servicing operations should be performed at regular intervals. Daily checkup and maintenance –– Before operation, check the machine for loose screws or missing parts.
5) Set the engine level, and gradually fill up to upper limit mark with new oil. External mark (upper limit) 6) After filling, tightly secure oil cap, so that it will not loosen and cause leaks. If oil cap is not tightly secured, it may leak. External mark (lower limit) Internal stepped section (upper limit) Internal stepped section (lower limit) Upper limit mark Oil POINTS ON OIL –– Never discard replaced engine oil in garbage, earth or sewage ditch. Disposal of oil is regulated by law.
CHECKING THE SPARK PLUG –– Only use the supplied universal wrench to remove or to install the spark plug. –– The gap between the two electrodes of the spark plug should be 0.7 - 0.8 mm (0.028” - 0.032”). If the gap is too wide or too narrow, adjust it. If the spark plug is clogged or contaminated, clean it thoroughly or replace it. CAUTION: Never touch the spark plug connector while the engine is running (danger of high voltage electric shock).
STORAGE WARNING: When draining the fuel, be sure to stop the engine and make sure that the engine cools down. Just after stopping the engine, it may still be hot with possibility of burns, inflammability and fire. ATTENTION: W hen the machine is kept out of operation for a long time, drain up all fuel from the fuel tank and carburetor, and keep it at a dry and clean place.
Item Operating time Engine oil Tightening parts (bolt, nut) Fuel tank Before After operation lubrication Daily (10h) 30h 50h 200h Shutdown/ Corresrest ponding P Inspect/clean 9 Replace *1 14 Inspect 16 Clean/inspect — Drain fuel *3 17 Throttle lever Check function — Stop switch Check function 12 Cutting attachment Inspect 8 Low-speed rotation Inspect/adjust 12 Air cleaner Clean 15 Ignition plug Inspect 16 Cooling air inlet Clean/inspect 16 Inspect 16 Fuel pipe Fue
TROUBLESHOOTING Before making a request for repairs, check for trouble by yourself. If any abnormality is found, control your machine according to the description of this manual. Never tamper or dismount any part contrary to the description. For repairs, contact Authorized Service Agent or local dealership.
Nederlands (Originele instructies) Hartelijk dank voor uw aankoop van dit gemotoriseerd tuingereedschap van MAKITA. Met trots bevelen wij u dit gereedschap van MAKITA van harte aan als resultaat van een langdurig ontwikkelingsprogramma en jarenlange kennis en ervaring. Lees deze handleiding met daarin nauwkeurige beschrijvingen van de diverse punten die zijn hoogstaande prestaties demonstreren. Hierdoor bent u in staat de best mogelijke resultaten te behalen die het gereedschap van MAKITA u kan bieden.
VEILIGHEIDSINSTRUCTIES Algemene instructies –– Lees deze gebruiksaanwijzing om u bekend te maken met de juiste manier van omgaan met het gereedschap. Gebruikers die onvoldoende geïnformeerd zijn, lopen de kans zichzelf en anderen in gevaar te brengen als gevolg van onjuist omgaan met het multifunctionele aandrijfsysteem. –– Het verdient aanbeveling het gereedschap uitsluitend uit te lenen aan mensen die bewezen hebben ervaren te zijn. Geef altijd de gebruiksaanwijzing mee.
–– Start de benzinegraskantmaaier alleen op de manier beschreven in de instructies. –– Gebruik geen enkele andere methode om de motor te starten! –– Gebruik de benzinegraskantmaaier en de gereedschappen uitsluitend voor de beschreven toepassingen. –– Start de motor van de benzinegraskantmaaier alleen nadat deze volledig is gemonteerd.
Gebruiksmethode –– Gebruik het gereedschap alleen bij goed licht en zicht. Wees in de winter bedacht op gladde of natte plaatsen, ijs en sneeuw (gevaar voor uitglijden). Zorg er altijd voor dat u stevig staat. –– Maai nooit boven heuphoogte. –– Werk nooit vanaf een ladder. –– Klim nooit in een boom om daar met het gereedschap te werken. –– Werk nooit op onstabiele oppervlakken. –– Verwijder zand, stenen, nagels, enz. die u binnen uw werkbereik vindt.
TECHNISCHE GEGEVENS ER2650LH ER2650LH Model Beugelhandgreep Afmetingen: lengte x breedte x hoogte (zonder snijgarnituur) mm 1.621 x 310 x 479 Maaidiameter mm 412 kg 4,8 l 0,6 Volume (oliereservoir) l 0,08 Cilinderinhoud 3 cm 25,4 Maximaal motorvermogen kW 0,77 bij 7.000 min-1 Gewicht (zonder kunststofbeschermkap en snijgarnituur) Volume (brandstoftank) min-1 Motortoerental bij aanbevolen max.
NAMEN VAN ONDERDELEN ER2650LH 5 7 8 9 12 10 11 4 13 14 15 NL 6 3 17 18 19 16 1 2 79 NAMEN VAN ONDERDELEN 1 Brandstoftank 2 Trekstartinrichting 3 Luchtfilter 4 Stopschakelaar (stop - bedrijf) 5 Bougie 6 Uitlaatdemper 7 Koppelingshuis 8 Achterste handvat 9 Uit-vergrendelhendel 10 Handgreep 11 Gashendel 12 Gaskabel 13 Schacht 14 Beschermkap 15 Nylondraad-snijkop 16 Brandstofvuldop 17 Trekstarthandgreep 18 Uitlaatpijp 19 Olievuldop
DE HANDGREEP MONTEREN LET OP: Voordat u werkzaamheden uitvoert aan het gereedschap, moet u altijd de motor uitzetten en de bougiekap van de bougie aftrekken. Draag altijd veiligheidshandschoenen! LET OP: Start de motor alleen nadat hij volledig is gemonteerd. Voor gereedschappen met een beugelhandgreep –– Bevestig de beugelhandgreep aan de schacht zoals afgebeeld. –– Voor een goede afstand tussen de handgrepen, bevestigt u de beugelhandgreep vóór de pijlen.
VÓÓR HET BEGIN VAN HET WERK Controleren en bijvullen van de motorolie –– Voer de volgende procedure uit bij koude motor. –– Plaats de motor horizontaal, draai de olievuldop eraf (zie afb. 1) en controleer of het oliepeil tussen de inwendige randen in de oliebuis voor de boven- en ondergrens van het oliepeil staat (zie afb. 2). –– Vul motorolie bij tot aan de markering van de bovengrens als er te weinig motorolie in zit (het oliepeil is dicht bij de ondergrens) (zie afb. 3).
• Ververs de olie niet met de motor in een gekantelde positie. Opmerking • Als olie wordt bijgevuld terwijl de motor is gekanteld, kan te veel olie worden bijgevuld waardoor verontreiniging en/of witte rook wordt veroorzaakt. Tip 2 bij het verversen van de olie: “Olielekkage” –– Als olie eruit lekt tussen de brandstoftank en het motorblok, wordt de olie via de koelluchtinlaatopening naar binnen gezogen waardoor de motor verontreinigd raakt. Veeg gelekte olie af voordat u met het werk begint.
TIPS VOOR GEBRUIK EN PROCEDURE VOOR STOPPEN Volg de toepasselijke voorschriften voor ongevallenpreventie! STARTEN Houd ten minste 3 meters afstand tot de plaats waar brandstof is bijgevuld. Plaats het gereedschap op de grond en zorg ervoor dat de snijgarnituur de grond of andere voorwerpen niet raakt. A: Startprocedure bij koude motor Uit-vergrendelhendel 1) Plaats het gereedschap op een vlakke ondergrond. 2) Zet de stopschakelaar (1) in de stand BEDRIJF.
Wanneer de motor moeilijk te starten is, zoals in de winter DICHT Gebruik de chokehendel volgens de volgende procedure om de motor te starten. • Nadat de stappen 1) tot en met 3) van de startprocedure zijn uitgevoerd, zet u de chokehendel in de stand DICHT. • Voer stap 4) van de startprocedure uit en start de motor. • Nadat de motor is gestart, zet u de chokehendel in de stand OPEN. • Voer stap 5) van de startprocedure uit en voltooi het opwarmen.
De nylondraad vervangen WAARSCHUWING: Controleer of het deksel van de nylondraad-snijkop goed op de behuizing is bevestigd, zoals hieronder beschreven. Als u het deksel niet stevig bevestigt, kan de nylondraad-snijkop uit elkaar vliegen en ernstig persoonlijk letsel veroorzaken. Druk de vergrendelnokken van de behuizing naar binnen om het deksel eraf te tillen. Gooi eventueel resterende nylondraad weg.
ONDERHOUDSINSTRUCTIES LET OP: Voordat u werkzaamheden uitvoert aan het gereedschap, moet u altijd de motor uitschakelen en de bougiekap van de bougie aftrekken (zie “De bougie controleren”). Draag altijd veiligheidshandschoenen! Om een lange levensduur te garanderen en eventuele schade aan het gereedschap te voorkomen, moeten de volgende onderhoudswerkzaamheden regelmatig uitgevoerd worden.
5) Plaats de motor horizontaal en vul geleidelijk nieuwe motorolie bij tot aan de markering van de bovengrens. 6) Draai na het bijvullen de olievuldop stevig vast, zodat deze niet kan losraken en gaan lekken. Als de olievuldop niet stevig wordt vastgedraaid, kan deze gaan lekken.
DE BOUGIE CONTROLEREN –– Gebruik alleen de bijgeleverde moersleutel om de ontstekingsbougie te verwijderen of te installeren. –– De afstand tussen de twee elektroden van de bougie moet 0,7 tot 0,8 mm (0,028” - 0,032”) bedragen. Als de afstand te groot of te klein is, moet u deze aanpassen. Als de elektroden van de bougie verstopt of vervuild zijn, moet u deze grondig schoonmaken of de bougie vervangen.
OPSLAG WAARSCHUWING: Controleer of de motor is uitgeschakeld en afgekoeld voordat u begint met het aftappen van de brandstof. Vlak na het uitschakelen van de motor, kan deze nog heet zijn en brandwonden, ontbranding of brand veroorzaken. LET OP: ls het gereedschap gedurende een lange tijd niet gebruikt gaat worden, tapt A u alle brandstof uit de brandstoftank en carburateur, en slaat u het op een droge, schone plaats op.
Item Gebruikstijd Motorolie Voor gebruik Na smeren Dagelijks (10 uur) Brandstoftank 50 uur 200 uur Uitschakelen/ rusten Inspecteren/ reinigen Zie pagina 81 Vervang Vastdraaien (bouten, moeren, enz.
PROBLEMEN OPLOSSEN Alvorens een verzoek voor reparatie in te dienen, controleer u de storing zelf aan de hand van de onderstaande tabel. Als een probleem is gevonden, repareert u het gereedschap aan de hand van de beschrijvingen in deze gebruiksaanwijzing. Probeer nooit enig onderdeel te demonteren of repareren in strijd met de beschrijvingen. Voor reparatie neemt u contact op met een erkend servicecentrum of uw plaatselijke dealer.