INSTRUCTION MANUAL MANUEL D'INSTRUCTION MANUAL DE INSTRUCCIONES Cordless Driver Drill Perceuse-Visseuse sans Fil Atornillador Taladro Inalámbrico FD01 008796 IMPORTANT: Read Before Using. IMPORTANT: Lire avant usage. IMPORTANTE: Leer antes de usar.
ENGLISH (Original instructions) SPECIFICATIONS Model FD01 Steel Capacities 10 mm (3/8") Wood 21 mm (13/16") Wood screw 5.1 mm x 63 mm (7/32" X 2-1/2") Machine screw M6 (1/4") High (2) 0 - 1,300/min Low (1) 0 - 350/min No load speed (RPM) Chuck capacity 6.35 mm Overall length 157 mm (6-3/16") Net weight 0.89 kg (2.0 lbs) Rated voltage D.C. 10.
Battery tool use and care 24. Recharge only with the charger specified by the manufacturer. A charger that is suitable for one type of battery pack may create a risk of fire when used with another battery pack. 25. Use power tools only with specifically designated battery packs. Use of any other battery packs may create a risk of injury and fire. 26.
7. 8. 9. (2) Do not leave the tool running. Operate the tool only when hand-held. Do not touch the drill bit or the workpiece immediately after operation; they may be extremely hot and could burn your skin. Some material contains chemicals which may be toxic. Take caution to prevent dust inhalation and skin contact. Follow material supplier safety data. 6. SAVE THESE INSTRUCTIONS. 7.
In this situation, release the switch trigger on the tool and stop the application that caused the tool to become overloaded. Then pull the switch trigger again to restart. Low battery voltage: The remaining battery capacity is too low and the tool will not operate. If you pull the switch trigger, the motor runs again but stops soon. In this situation, remove and recharge the battery.
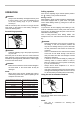
NOTE: • Use a dry cloth to wipe the dirt off the lens of lamp. Be careful not to scratch the lens of lamp, or it may lower the illumination. Adjusting the fastening torque 1 2 Reversing switch action 1. Adjusting ring 2. Graduation 3. Pointer 1. Reversing switch lever 3 008804 B A The fastening torque can be adjusted in 18 steps by turning the adjusting ring so that its graduations are aligned with the pointer on the tool body.
Drilling operation OPERATION First, turn the adjusting ring so that the pointer points to the marking. Then proceed as follows. Drilling in wood When drilling in wood, the best results are obtained with wood drills equipped with a guide screw. The guide screw makes drilling easier by pulling the bit into the workpiece. Drilling in metal To prevent the bit from slipping when starting a hole, make an indentation with a center-punch and hammer at the point to be drilled.
• Do not use the tool for work requiring excessive force, such as tightening bolt or removing rusted screws. MAINTENANCE CAUTION: Always be sure that the tool is switched off and the battery cartridge is removed before attempting to perform inspection or maintenance. • Never use gasoline, benzine, thinner, alcohol or the like. Discoloration, deformation or cracks may result.
MAKITA LIMITED ONE YEAR WARRANTY Warranty Policy Every Makita tool is thoroughly inspected and tested before leaving the factory. It is warranted to be free of defects from workmanship and materials for the period of ONE YEAR from the date of original purchase. Should any trouble develop during this one year period, return the COMPLETE tool, freight prepaid, to one of Makita’s Factory or Authorized Service Centers.
FRANÇAIS (Mode d’emploi original) SPÉCIFICATIONS Modèle FD01 Acier Capacités 10 mm (3/8") Bois 21 mm (13/16") Vis à bois 5,1 mm x 63 mm (7/32" X 2-1/2") Vis de mécanique M6 (1/4") Grande (2) 0 - 1 300/min Réduite (1) 0 - 350/min Vitesse à vide (T/MIN) Capacité du mandrin 6,35 mm Longueur totale 157 mm (6-3/16") Poids net 0,89 kg (2,0 lbs) Tension nominale CC 10,8 V/12 V maximum Batterie standard BL1014 • Étant donné l'évolution constante de notre programme de recherche et de dévelop
été conçu, il effectuera un travail de meilleure qualité et de façon plus sécuritaire. 18. N'utilisez pas l'outil électrique s'il n'est pas possible de mettre sa gâchette en position de marche et d'arrêt. Un outil électrique dont l'interrupteur est défectueux représente un danger et doit être réparé. 19. Débranchez la fiche de la source d'alimentation et/ou retirez le bloc-piles de l'outil électrique avant d'effectuer tout réglage, de changer un accessoire ou de ranger l'outil électrique.
6. 26. Lorsque vous n'utilisez pas le bloc-piles, rangez-le à l'écart des objets métalliques tels que trombones, pièces de monnaie, clés, clous, vis ou autres petits objets métalliques qui risquent d'établir une connexion entre les bornes. La mise en court-circuit des bornes de batterie peut causer des brûlures ou un incendie. 27. Dans des conditions d'utilisation inadéquates de la batterie, il peut y avoir fuite d'électrolyte; évitez tout contact avec ce liquide.
4. 5. 6. 7. 8. 9. Si l'électrolyte pénètre dans vos yeux, rincezles à l'eau claire et consultez immédiatement un médecin. Il y a risque de perte de la vue. Ne court-circuitez pas la batterie : (1) Ne touchez les bornes avec aucun matériau conducteur. (2) Évitez de ranger la batterie dans un conteneur avec d'autres objets métalliques, par exemple des clous, des pièces de monnaie, etc. (3) Évitez d'exposer la batterie à l'eau ou à la pluie.
En surcharge : L'outil est utilisé d'une manière entraînant une consommation anormale de courant. Dans cette situation, relâchez la gâchette et arrêtez l'activité qui entraîne une surcharge de l'outil. Puis appuyez de nouveau sur la gâchette pour redémarrer. Tension de la batterie faible : La capacité restante de la batterie est trop faible pour que l'outil puisse fonctionner. Si vous appuyez sur la gâchette, le moteur démarre à nouveau mais s'arrête très rapidement.
réglé sur la bonne position avant de mettre l'outil en marche. Utilisez la vitesse qui convient pour le travail. • • 1. Embout 2. Manchon ATTENTION: Réglez toujours le levier de changement de vitesse à fond sur la position voulue. Si vous actionnez l'outil alors que le levier est placé à michemin entre la position "1" et la position "2", vous risquez d'endommager l'outil. Ne modifiez pas la position du levier de changement de vitesse pendant que l'outil tourne. Vous risqueriez de l'endommager.
NOTE: • Lorsque vous insérez des vis à bois, percez d'abord des trous de guidage pour faciliter l'insertion des vis et pour éviter que la pièce ne se fende. Voir le tableau.
• • • Les divers types de batteries et chargeurs Makita authentiques Étui Mallette de transport en plastique NOTE: • Certains éléments de la liste peuvent être inclus avec l'outil comme accessoires standard. Ils peuvent varier suivant les pays. 008808 Vous pouvez ranger deux forets à l'avant de l'étui. GARANTIE LIMITÉE D’UN AN MAKITA Politique de garantie Chaque outil Makita est inspecté rigoureusement et testé avant sa sortie d’usine.
ESPAÑOL (Instrucciones originales) ESPECIFICACIONES Modelo FD01 Acero Capacidades 10 mm (3/8") Madera 21 mm (13/16") Tornillo para madera 5,1 mm x 63 mm (7/32" X 2-1/2") Tornillo de máquina M6 (1/4") Alta (2) 0 - 1 300r/min Baja (1) 0 - 350r/min Velocidad sin carga (r.p.m.) Capacidad de mandril 6,35 mm Longitud total 157 mm (6-3/16") Peso neto 0,89 kg (2,0 lbs) Tensión nominal 10,8 V c.c. / 12 V c.c. máx.
Mantenimiento y uso de la herramienta eléctrica 17. No fuerce la herramienta eléctrica. Utilice la herramienta eléctrica correcta para su aplicación. La herramienta eléctrica adecuada hará un trabajo mejor a la velocidad para la que ha sido fabricada. 18. No utilice la herramienta eléctrica si el interruptor no la enciende y apaga. Cualquier herramienta eléctrica que no pueda ser controlada con el interruptor es peligrosa y debe ser reemplazada. 19.
5. 6. 25. Utilice las herramientas eléctricas solamente con las baterías designadas específicamente para ellas. La utilización de cualquier otra batería puede crear un riesgo de heridas o incendio. 26. Cuando no se esté usando el cartucho de la batería, manténgalo alejado de otros objetos metálicos, como sujetapapeles (clips), monedas, llaves, clavos, tornillos u otros objetos pequeños de metal los cuales pueden actuar creando una conexión entre las terminales de la batería.
3. 4. 5. 6. 7. 8. 9. Si el tiempo de operación se ha acortado en exceso, deje de operar de inmediato. Podría correrse el riesgo de sobrecalentamiento, posibles quemaduras e incluso explosión. En caso de que ingresen electrolitos en sus ojos, enjuáguelos bien con agua limpia y consulte de inmediato a un médico. Podría perder la visión. No cortocircuite el cartucho de batería: (1) No toque las terminales con ningún material conductor.
Encendido de la lámpara frontal Sistema de protección de la batería La herramienta está equipada con un sistema de protección de la batería. Este sistema corta en forma automática el suministro de energía al motor para prolongar la vida útil de la batería.
Cuando no esté utilizando la herramienta, ponga siempre la palanca del conmutador de inversión en la posición neutral. • determinar cuál nivel de torsión es el requerido para su aplicación en particular. ENSAMBLE Cambio de velocidad 1 1. Palanca de cambio de velocidad • PRECAUCIÓN: Asegúrese siempre de que la herramienta esté apagada y el cartucho de batería extraído antes de realizar cualquier trabajo en la misma.
Taladrado en metal Para evitar que la broca resbale al empezar a hacer el agujero, haga una mella con punzón y un martillo en el punto a taladrar. Coloque la punta de la broca en la mella y comience a taladrar. Emplee un lubricante para operaciones de corte cuando taladre metales. Las excepciones son hierro y latón que deberán ser taladrados en seco. Operación de atornillado • 008805 PRECAUCIÓN: Calibre el anillo de ajuste al nivel de torsión apropiado para su trabajo.
Uso de funda MANTENIMIENTO PRECAUCIÓN: No se utilice para herramientas que tengan algún aditamento puesto en al punta, como un taladro con la broca colocada. • Apague la herramienta y espere a que se detenga por completo antes de colocarla en la funda. Asegúrese de cerrar la funda con firmeza para que sostenga la herramienta de forma fija. Inserte un cinturón o similar a través del portafundas. Coloque la herramienta en la funda y fíjela con el botón de la funda.
GARANTÍA LIMITADA MAKITA DE UN AÑO Ésta Garantía no aplica para México Política de garantía Cada herramienta Makita es inspeccionada y probada exhaustivamente antes de salir de fábrica. Se garantiza que va a estar libre de defectos de mano de obra y materiales por el periodo de UN AÑO a partir de la fecha de adquisición original.
< USA only > WARNING Some dust created by power sanding, sawing, grinding, drilling, and other construction activities contains chemicals known to the State of California to cause cancer, birth defects or other reproductive harm. Some examples of these chemicals are: • lead from lead-based paints, • crystalline silica from bricks and cement and other masonry products, and • arsenic and chromium from chemically-treated lumber.