
Operators Manual


6
not suitable for the screw, continue adjusting until the
proper torque is obtained.
CAUTION:
• The adjusting ring should be turned only within the
numbered range. It should not be forced beyond
this range.
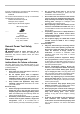
Hook
1
010191
The hook is convenient for temporarily hanging the tool.
ASSEMBLY
CAUTION:
• Always be sure that the tool is switched off and
unplugged before carrying out any work on the
tool.
Installing or removing the bit
For Model FS2700
To remove the bit, first pull the front cap off and then pull
the bit out firmly.
010116
To install the bit, insert it into the tool as far as it will go
and then replace the front cap.
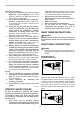
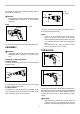
For Model FS2701
To install the bit, pull the sleeve in the direction of the
arrow and insert the bit into the sleeve as far as it will go.
Then release the sleeve to secure the bit.
1
2
010128
To remove the bit, pull the sleeve in the direction of the
arrow and pull the bit out firmly.
NOTE:
• If the bit is not inserted deep enough into the
sleeve, the sleeve will not return to its original
position and the bit will not be secured. In this case,
try re-inserting the bit according to the instructions
above.
• After inserting the bit, make sure that it is firmly
secured. If it comes out, do not use it.
OPERATION
010123
010129
Fit the screw on the point of the bit and place the point of
the screw on the surface of the workpiece to be fastened.
Apply pressure to the tool and start it. Withdraw the tool
as soon as the clutch cuts in. Then release the switch
trigger.
CAUTION:
• When fitting the screw onto the point of the bit, be
careful not to push in on the screw. If the screw is
pushed in, the clutch will engage and the screw will
1. Bit
2. Sleeve
1. Hook