INSTRUCTION MANUAL MANUAL DE INSTRUCCIONES Cordless Hedge Trimmer Cortasetos Inalámbrico GHU04 GHU05 IMPORTANT: Read Before Using. IMPORTANTE: Lea antes de usar.
ENGLISH (Original instructions) SPECIFICATIONS Model: Blade length GHU04 GHU05 600 mm (23-5/8") 750 mm (29-1/2") Strokes per minute 2,000 / 3,600 / 5,000 /min Overall length 1,085 mm (42-3/4") Rated voltage Net weight • • • 1,225 mm (48-1/4") D.C. 36 V - 40 V max 3.9 - 4.5 kg (8.6 - 9.9 lbs) 4.0 - 4.7 kg (8.8 - 10.4 lbs) Due to our continuing program of research and development, the specifications herein are subject to change without notice. Specifications may differ from country to country.
6. 7. If operating a power tool in a damp location is unavoidable, use a ground fault circuit interrupter (GFCI) protected supply. Use of a GFCI reduces the risk of electric shock. Power tools can produce electromagnetic fields (EMF) that are not harmful to the user. However, users of pacemakers and other similar medical devices should contact the maker of their device and/or doctor for advice before operating this power tool. 3. 4. Personal Safety 1.
Service 1. Have your power tool serviced by a qualified repair person using only identical replacement parts. This will ensure that the safety of the power tool is maintained. 2. Never service damaged battery packs. Service of battery packs should only be performed by the manufacturer or authorized service providers. 3. Follow instruction for lubricating and changing accessories. 4. Do not modify or attempt to repair the appliance or the battery pack except as indicated in the instructions for use and care.
3. 4. 5. 6. 7. 8. 9. 10. 11. Do not open or mutilate the battery(ies). Released electrolyte is corrosive and may cause damage to the eyes or skin. It may be toxic if swallowed. Do not charge battery in rain, or in wet locations. Do not charge the battery outdoors. Do not handle charger, including charger plug, and charger terminals with wet hands. Do not replace the battery with wet hands. Do not replace the battery in the rain.
9. 10. 11. 12. 13. 14. 15. 16. 17. 18. Do not use a damaged battery. The contained lithium-ion batteries are subject to the Dangerous Goods Legislation requirements. For commercial transports e.g. by third parties, forwarding agents, special requirement on packaging and labeling must be observed. For preparation of the item being shipped, consulting an expert for hazardous material is required. Please also observe possibly more detailed national regulations.
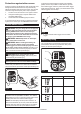
Indicating the remaining battery capacity Tool / battery protection system The tool is equipped with a tool/battery protection system. This system automatically cuts off power to the motor to extend tool and battery life. The tool will automatically stop during operation if the tool is placed under one of the following conditions: Press the check button on the battery cartridge to indicate the remaining battery capacity. The indicator lamps light up for a few seconds. 1 1 2 Fig.2 ► 1.
Protections against other causes To prevent the switch trigger from being accidentally pulled, the lever is provided. To start the tool, pull the front switch trigger, and then pull the rear switch trigger while pressing the lever. When you release either of the switch triggers, the tool stops. Protection system is also designed for other causes that could damage the tool and allows the tool to stop automatically.
Reverse button for debris removal ASSEMBLY WARNING: If the entangled branches or debris cannot be removed by the reverse function, switch off the tool and remove the battery cartridge, and then remove the entangled branches or debris using tools such as pliers. Failure to switch off the tool and remove the battery cartridge may result in serious personal injury from accidental start-up.
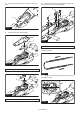
5. Remove three screws, three sleeves and the felt pad, and then remove the shear blades. 2. Place the tool upside down, and then remove six bolts. 3 1 4 1 2 Fig.10 ► 1. Bolt 3. Remove the cover and the plate. 1 2 Fig.13 ► 1. Screw 2. Sleeve 3. Felt pad 4. Shear blades NOTICE: Be careful not to lose the screws. 6. Remove the blade cover, and then attach it to the new shear blades. Fig.11 ► 1. Cover 2. Plate NOTE: The plate may remain on the cover. 4. Remove the rod and the bearing.
8. Align the protrusions on the shear blades vertically at the same position. 10. Insert the protrusion on the shear blades to the hole on the rod, then align the position of the felt pad with the holes on the tool. Attach two new sleeves. 1 1 Fig.16 ► 1. Protrusion 2 3 9. Insert the screw removed in step 5 into the holes on the blade cover and the shear blades to temporarily fix the shear blades, and then attach the felt pad to the shear blades. 4 2 1 Fig.18 ► 1. Felt pad 2. Protrusion 3.
16. 12. Remove the screw inserted into the hole on the shear blades in step 9, and then slide the blade cover. Attach the bearing and the rod. 1 1 2 3 Fig.23 ► 1. Rod 2. Small hole 3. Bearing NOTICE: Apply a small amount of grease to the inner periphery of the small hole of the rod. NOTICE: Make sure that the protrusion on the shear blades fits in the small hole on the rod. Fig.20 ► 1. Screw 13. 17. Attach the plate. Attach a new sleeve. 1 1 Fig.24 ► 1. Protrusion 2. Plate Fig.
For GHU04 19. Attach the chip receiver to the tool by tightening four screws (for GHU04) or five screws (for GHU05). For GHU04 1 1 2 Fig.28 ► 1. Chip receiver 2. Screw 2 Fig.26 ► 1. Chip receiver 2. Screw For GHU05 For GHU05 1 1 2 Fig.29 ► 1. Chip receiver 2. Screw 2 Fig.27 ► 1. Chip receiver 2. Screw NOTICE: If the shear blades do not move OPERATION NOTICE: If the parts other than the shear blades. smoothly, the shear blades are not engaged with the rods properly.
To cut a hedge top evenly, tie a string at the desired height and trim along it. NOTICE: Do not attempt to cut branches thicker than 10 mm (3/8") in diameter with the tool. Cut branches to 10 cm (4") lower than the cutting height using branch cutters before using the tool. (1) (2) Fig.33 The chip receiver gathers discarded leaves and makes clean-up afterward much easier. Fig.30 ► (1) Cutting height (2) 10 cm (4") NOTICE: Do not cut down dead trees or similar hard objects.
Storage MAINTENANCE The hook hole in the tool bottom is convenient for hanging the tool from a nail or screw on the wall. Remove the battery cartridge from the tool, and then attach the blade cover to the shear blades so that the blades are not exposed. Store the tool out of the reach of children. Store the tool in a place not exposed to moisture or rain. CAUTION: Always be sure that the tool is switched off and the battery cartridge is removed before attempting to perform inspection or maintenance.
4. Set the angle of a file to 45°, and grind the upper blade from 3 directions with the file. Grease lubrication Interval of lubrication: Every 50 operating hours 1. 1 Remove the bolt from the hole for lubrication. 2 Fig.41 ► (1) File (2) 45° Fig.43 ► 1. Bolt CAUTION: Before grinding the shear blades, make sure that the tool is switched off and the battery cartridge is removed from the tool. 1 2. Remove the cap from the grease vessel.
TROUBLESHOOTING Before asking for repairs, conduct your own inspection first. If you find a problem that is not explained in the manual, do not attempt to dismantle the tool. Instead, ask Makita Authorized Service Centers, always using Makita replacement parts for repairs. State of abnormality Probable cause (malfunction) Remedy Motor does not run. Battery cartridge is not installed. Install the battery cartridge. Battery problem (under voltage) Recharge the battery.
ESPAÑOL (Instrucciones originales) ESPECIFICACIONES Modelo: Longitud de la cuchilla GHU04 GHU05 600 mm (23-5/8″) 750 mm (29-1/2″) Carreras por minuto 2 000 cpm / 3 600 cpm / 5 000 cpm Longitud total 1 085 mm (42-3/4″) Tensión nominal Peso neto • • • 1 225 mm (48-1/4″) 36 V - 40 V c.c. máx.
2. 3. 4. 5. 6. 7. Evite tocar con el cuerpo superficies conectadas a tierra o puestas a tierra tales como tubos, radiadores, cocinas y refrigeradores. Si su cuerpo es puesto a tierra o conectado a tierra existirá un mayor riesgo de que sufra una descarga eléctrica. No exponga las herramientas eléctricas a la lluvia ni a condiciones húmedas. La entrada de agua en una herramienta eléctrica aumentará el riesgo de que se produzca una descarga eléctrica. No maltrate el cable.
7. 8. 9. Utilice la herramienta eléctrica, los accesorios y las brocas de acuerdo con estas instrucciones, considerando las condiciones laborales y el trabajo a realizar. Si utiliza la herramienta eléctrica para realizar operaciones distintas de las indicadas, podrá presentarse una situación peligrosa. Mantenga los mangos y superficies de asimiento secos, limpios y libres de aceite o grasa.
3. 4. 5. 6. 7. Un usuario con experiencia deberá enseñar a los usuarios primerizos cómo manejar la herramienta. Utilice la herramienta sólo si se encuentra en buena condición física. Si está cansado, su atención se verá disminuida. Sea especialmente cuidadoso al término de una jornada laboral. Realice todo el trabajo tranquila y cuidadosamente. El usuario será responsable de todos los daños a terceras personas.
6. 7. No abra ni mutile la(s) batería(s). El electrolito liberado es una sustancia corrosiva y puede que cause daños a la piel y los ojos. Pueden ser tóxicos si se llegan a tragar. Almacene la herramienta lejos de la lluvia y la luz directa del sol y en un sitio donde no haga calor ni haya humedad. 4. 5. GUARDE ESTAS INSTRUCCIONES.
15. 16. 17. 18. No toque el terminal de la herramienta inmediatamente después de su uso, ya que el mismo podría estar lo suficientemente caliente como para provocarle quemaduras. No permita que las rebabas, el polvo o la tierra queden atrapados en los terminales, orificios y ranuras del cartucho de batería. Podría provocar calentamiento, incendio, explosión y mal funcionamiento de la herramienta o del cartucho de batería, lo que resultaría en quemaduras o lesiones personales.
Sistema de protección para la herramienta/batería PRECAUCIÓN: Introduzca siempre completamente el cartucho de batería hasta que el indicador rojo no pueda verse. Si no, podría accidentalmente salirse de la herramienta y caer al suelo causando una lesión a usted o alguien a su alrededor. La herramienta está equipada con un sistema de protección para la herramienta/batería. Este sistema corta automáticamente la alimentación al motor para prolongar la vida de la herramienta y la batería.
Protección contra el sobrecalentamiento de la herramienta o la batería PRECAUCIÓN: Nunca coloque su dedo en los gatillos interruptores cuando transporte la herramienta. La herramienta podría ponerse en marcha accidentalmente y ocasionar una lesión. Si la herramienta o el cartucho de batería se sobrecalientan, la herramienta se detendrá automáticamente. Cuando la herramienta se sobrecalienta, la luz indicadora de precaución se ilumina en rojo.
Esta herramienta cuenta con un botón de inversión para cambiar la dirección del movimiento de las cuchillas de cizalla. Su única función es la de eliminar las ramas y residuos enredados en la herramienta. Para invertir el movimiento de las cuchillas de cizalla, oprima el botón de inversión una vez que las cuchillas de cizalla se hayan detenido, y luego jale el gatillo interruptor delantero, posteriormente el gatillo interruptor trasero mientras presiona la palanca.
2. Coloque la herramienta de cabeza y luego retire los seis pernos. MONTAJE PRECAUCIÓN: Asegúrese siempre de que la herramienta esté apagada y el cartucho de batería haya sido extraído antes de realizar cualquier trabajo en la misma. PRECAUCIÓN: Siempre utilice guantes al reemplazar las cuchillas de cizalla de manera que sus manos no hagan contacto directo con las cuchillas. 1 AVISO: Cuando reemplace las cuchillas de cizalla no elimine la grasa del engranaje y de la manivela.
8. Alinee las protuberancias en las cuchillas de cizalla verticalmente en la misma posición. 5. Retire los tres tornillos, tres manguitos y la almohadilla de fieltro, y luego extraiga las cuchillas de cizalla. 3 1 1 4 2 Fig.16 ► 1. Protuberancia 9. Inserte el tornillo que retiró en el paso 5 en los orificios de la cubierta de las cuchillas y de las cuchillas de cizalla para fijar temporalmente las cuchillas de cizalla, y luego fije la almohadilla de fieltro a las cuchillas de cizalla. Fig.
10. Inserte la protuberancia en las cuchillas de cizalla en el orificio de la barra, luego alinee la posición de la almohadilla de fieltro con los orificios en la herramienta. Coloque dos manguitos nuevos. 1 12. Retire el tornillo insertado en el orificio de las cuchillas de cizalla en el paso 9, y luego deslice la cubierta de las cuchillas. 1 2 3 4 Fig.20 ► 1. Tornillo 13. Coloque un manguito nuevo. Fig.18 ► 1. Almohadilla de fieltro 2. Protuberancia 3. Orificio 4.
16. 19. Coloque el colector de residuos a la herramienta al apretar los cuatro tornillos (para el modelo GHU04) o los cinco tornillos (para el modelo GHU05). Coloque el rodamiento y la barra. 1 Para el GHU04 2 3 1 Fig.23 ► 1. Barra 2. Orificio pequeño 3. Rodamiento 2 AVISO: Aplique una pequeña cantidad de grasa Fig.26 ► 1. Colector de residuos 2. Tornillo AVISO: Asegúrese de que la protuberancia en las cuchillas de cizalla encaje en el orificio pequeño de la barra.
Para el GHU04 AVISO: No intente usar la herramienta para cor- tar ramas con un diámetro mayor a 10 mm (3/8″). Corte las ramas a 10 cm (4″) menos que la altura de corte usando algún cortador de ramas antes de usar la herramienta. 1 (1) 2 Fig.28 ► 1. Colector de residuos 2. Tornillo (2) Para el GHU05 Fig.30 ► (1) Altura de corte (2) 10 cm (4″) 1 AVISO: No corte árboles muertos ni otros objetos duros similares. El hacerlo podría dañar la herramienta.
Para la operación básica, incline las cuchillas de cizalla hacia la dirección del podado y desplácelas lentamente y con calma a un ritmo de velocidad de 3 a 4 segundos por metro. Para cortar la parte lateral de un seto de manera uniforme, corte de abajo hacia arriba. Fig.35 Cuando desee hacer formas redondas al podar (podar setos de boj o rododendro, etc.), corte de la raíz a la parte superior para lograr un resultado excelente. Fig.
Mantenimiento de las cuchillas de cizalla Almacenamiento El orificio para el gancho en la parte inferior de la herramienta resulta útil para colgar la herramienta en la pared usando un clavo o tornillo. Extraiga el cartucho de batería de la herramienta y luego coloque la cubierta de las cuchillas a las cuchillas de cizalla de manera que las cuchillas no queden expuestas. Almacene la herramienta fuera del alcance de los niños.
4. Ajuste el ángulo de la lima a 45°, y afile la cuchilla superior desde 3 direcciones con la lima. Lubricación con grasa Intervalo de lubricación: Cada 50 horas de operación 1. 1 Retire el perno del orificio para su lubricación. 2 Fig.41 ► (1) Lima (2) 45° Fig.43 ► 1. Perno PRECAUCIÓN: Antes de afilar las cuchillas de cizalla, asegúrese de que la herramienta esté apagada y que el cartucho de batería haya sido extraído de la herramienta. 1 2. Retire la tapa del recipiente para grasa.
RESOLUCIÓN DE PROBLEMAS Antes de solicitar alguna reparación, primero realice una inspección por su cuenta. Si detecta algún problema que no esté explicado en el manual, no intente desensamblar la herramienta. En vez de esto, solicite la reparación a un centro de servicio autorizado de Makita, usando siempre piezas de repuesto Makita. Estado de la anomalía Causa probable (avería) Remedio El motor no funciona. El cartucho de batería no está instalado. Instale el cartucho de batería.
Makita Corporation 3-11-8, Sumiyoshi-cho, Anjo, Aichi 446-8502 Japan www.makita.