
Use and Care Manual


8 ENGLISH
Protections against other causes
Protectionsystemisalsodesignedforothercausesthatcould
damagethetoolandallowsthetooltostopautomatically.
Take all the following steps to clear the causes, when the tool
hasbeenbroughttoatemporaryhaltorstopinoperation.
1.
Turnthetoolo,andthenturnitonagaintorestart.
2. Chargethebattery(ies)orreplaceit/themwith
rechargedbattery(ies).
3. Letthemachineandbattery(ies)cooldown.
Ifnoimprovementcanbefoundbyrestoringprotection
system,thencontactyourlocalMakitaServiceCenter.
Power switch action
WARNING:
For your safety, this tool is equipped
with lever which prevents the tool from unintended
starting. NEVER use the tool if it runs when you
simply pull the switch triggers without pressing the
lever. Return the tool to our authorized service center
for proper repairs BEFORE further usage.
WARNING: NEVER tape down or defeat pur-
pose and function of the lever.
WARNING:
Before installing the battery car-
tridge on the tool, always check to see that the
switch triggers and lever actuate properly and return
to the "OFF" position when released. Operating a tool
withaswitchthatdoesnotactuateproperlycanleadto
lossofcontrolandseriouspersonalinjury.
CAUTION: Never put your nger on the
switch triggers when carrying.Thetoolmaystart
unintentionallyandcauseinjury.
NOTICE:
Do not pull the switch trigger hard without
pressing the lever. This can cause switch breakage.
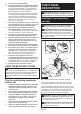
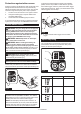
Pressthemainpowerbuttontoturnonthetool.Toturnothetool,
pressandholdthemainpowerbuttonuntilthespeedindicatorsgoo.
1
Fig.4
►1. Main power button
NOTE: The caution lamp brinks if the switch trigger
is pulled under unoperatable conditions. The caution
lampblinksifyouturnonthemainpowerswitchwhile
holding down the lever and the switch trigger.
NOTE:
Thistoolemploystheautopower-ofunction.To
avoid unintentional start up, the main power switch will auto-
maticallyshutdownwhentheswitchtriggerisnotpulledfor
a certain period after the main power switch is turned on.
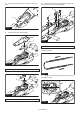
Topreventtheswitchtriggerfrombeingaccidentally
pulled, the lever is provided. To start the tool, pull the
front switch trigger, and then pull the rear switch trigger
whilepressingthelever.Whenyoureleaseeitherofthe
switch triggers, the tool stops.
2
1
3
Fig.5
►1. Lever 2. Rear switch trigger 3. Front switch
trigger
Speed adjusting
Youcanadjustthetoolspeedbypressingthemain
powerbutton.Eachtimeyoupressthemainpower
button, the level of speed changes.
2
1
Fig.6
►1. Speed indicator 2. Main power button
Speed indicator Mode Stroke speed
High 5,000 /min
Medium 3,600 /min
Low 2,000 /min