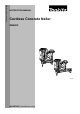
ENGLISH (Original instructions) INSTRUCTION MANUAL Cordless Concrete Nailer GN420C 013225 IMPORTANT: Read Before Using.
ENGLISH (Original instructions) SPECIFICATIONS Model GN420C Nail capacity 20 nails (2strips) 40 nails (4strips) Dimensions (L X W X H) 315 mm X 108 mm X 390 mm 430 mm X 108 mm X 390 mm Net weight 3.6 kg Nail length X Shank diameter 3.8 kg Nail L :15 mm - 40 mm Rated voltage d : 2.6 mm - 3.1 mm D.C. 7.2 V • Due to our continuing program of research and development, the specifications herein are subject to change without notice.
• Work area safety 1. Keep work area clean and well lit. Cluttered or dark areas invite accidents. 2. Do not operate power tools in explosive atmospheres, such as in the presence of flammable liquids, gases or dust. Power tools create sparks which may ignite the dust or fumes. 3. Keep children and bystanders away while operating a power tool. Distractions can cause you to lose control. Electrical safety 4. Power tool plugs must match the outlet. Never modify the plug in any way.
25. Use power tools only with specifically designated battery packs. Use of any other battery packs may create a risk of injury and fire. 26. When battery pack is not in use, keep it away from other metal objects, like paper clips, coins, keys, nails, screws or other small metal objects, that can make a connection from one terminal to another. Shorting the battery terminals together may cause burns or a fire. 27. Under abusive conditions, liquid may be ejected from the battery; avoid contact.
For Australia and New Zealand only Always wear safety glasses and face shield to protect your eyes from dust or fastener injury. The safety glasses and the face shield should conform with the requirements of AS/NZS 1336. Do not attempt to keep the contact element depressed with tape or wire. Death or serious injury may occur. • Always check contact element as instructed in this manual. fasteners may be driven accidentally if the safety mechanism is not working correctly.
instruction manual may cause serious personal injury. − when changing one driving location to another involves the use of scaffoldings, stairs, ladders, or ladder alike constructions, e.g. roof laths; − closing boxes or crates; − fitting transportation safety systems e.g. on vehicles and wagons. • Check walls, ceilings, floors, roofing and the like carefully to avoid possible electrical shock, gas leakage, explosions, etc. caused by striking live wires, conduits or gas pipes.
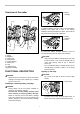
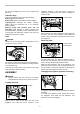
Overview of the nailer 1. Battery cartridge 2 1 9 1 013181 To install the battery cartridge, hold it so that the battery cartridge front shape fits to that of the battery installment opening and slip it into place. Insert it all the way until it locks in place with a little click. 1. Battery cartridge 2. Button 2 3 7 10 8 1 4 6 5 013151 To remove the battery cartridge, withdraw it from the tool while pressing the both sides of the cartridge. 1. Fuel cover 2. Trigger 3. Magazine 4.
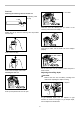
Fuel cell 1. Jet nozzle Attaching the metering valve to the fuel cell 1. Metering valve 2. Cap 1 1 2 013153 Insert the fuel cell directing the jet nozzle of the metering valve toward the adaptor. 009445 Detach the cap (in case the metering valve is provided with the cap). 013154 Insert the jet nozzle into the small hole of the adapter properly. 009446 Push in the front edge. 013155 Put the fuel cover over the metering valve and push it down to latch.
Do not turn the adjuster too much, or the adjuster may get stuck. magazine because of the nail stopper. Unlock the magazine by pressing the button of the nail stopper to insert the nails. Indication lamp Color of the indication lamp means the followings. Blinking green: Normal status Blinking red: Need to recharge the battery cartridge Lighting-up-red: Recharge the battery cartridge. Nailing cannot be performed due to no remaining battery capacity.
Failure to do so may cause concrete fragments to fly off or nails to strike back, causing serious injuries. • When driving nails, hold the tool so that it stands upright to the driving surface. Slanted nail-driving may cause concrete fragments to fly off or nails to strike back, causing serious injuries. • Do not use the tool on the surface that objects hang from, such as area where hangers for sewer pipe, dust pipe etc.
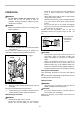
MAINTENANCE 1. Magazine • • 1 013166 CAUTION: Always remove the fuel cell, the battery cartridge and nails before attempting to perform inspection or maintenance. Never use gasoline, benzine, thinner, alcohol or the like. Discoloration, deformation or cracks may result. Maintenance after daily work Remove the fuel cell, the battery cartridge and nails. Loosen the bolt on the magazine. Remove the magazine and remove the jammed nails. At the end of daily work, conduct an end-of-workday routine.
Thoroughly cleaning If dry fires occur frequently, which means the tool is needed to be cleansed thoroughly. See the accompanying cleaning guide for detail, and perform the cleaning. If you have any questions regarding to cleaning, please ask your local Makita Service Center. OPTIONAL ACCESSORIES CAUTION: These accessories or attachments are recommended for use with your Makita tool specified in this manual. The use of any other accessories or attachments might present a risk of injury to persons.
Makita Corporation Anjo, Aichi, Japan 885157-222 16 www.makita.