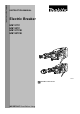
ENGLISH (Original instructions) INSTRUCTION MANUAL Electric Breaker HM1317C HM1307C HM1317CB HM1307CB 010282 DOUBLE INSULATION IMPORTANT: Read Before Using.
ENGLISH (Original instructions) SPECIFICATIONS Model HM1317C HM1307C Blows per minute HM1317CB HM1307CB 730 - 1,450 Overall length 715 mm Net weight 17.0 kg Safety class 824 mm 15.3 kg 19.0 kg 17.3 kg /II • Due to our continuing programme of research and development, the specifications herein are subject to change without notice. • Note: Specifications may differ from country to country.
ENG901-1 • • • • The declared vibration emission value has been measured in accordance with the standard test method and may be used for comparing one tool with another. The declared vibration emission value may also be used in a preliminary assessment of exposure. 10.8.
20. Disconnect the plug from the power source and/or the battery pack from the power tool before making any adjustments, changing accessories, or storing power tools. Such preventive safety measures reduce the risk of starting the power tool accidentally. 21. Store idle power tools out of the reach of children and do not allow persons unfamiliar with the power tool or these instructions to operate the power tool. Power tools are dangerous in the hands of untrained users. 22. Maintain power tools.
. 6. 7. 8. 9. 10. 11. 12. 13. 14. 15. Be sure the bit is secured in place before operation. Under normal operation, the tool is designed to produce vibration. The screws can come loose easily, causing a breakdown or accident. Check tightness of screws carefully before operation. In cold weather or when the tool has not been used for a long time, let the tool warm up for a while by operating it under no load. This will loosen up the lubrication.
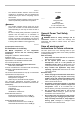
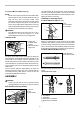
For model HM1317C,HM1317CB only The side handle can be swung 360° on the vertical and secured at any desired position. Just loosen the clamp nut to swing the side handle to a desired position. Then tighten the clamp nut securely. NOTE: • Blows at no load per minute becomes smaller than those on load in order to reduce vibration under no load, but this does not show trouble. Once operation starts with a bit against concrete, blows per minute increase and get to the numbers as shown in the table.
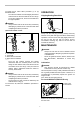
To install the bit, follow either procedure (1) or (2) described below. Pivot the tool retainer back and slightly downward. Insert the bit into the tool holder as far as it will go. To securely retain the bit, return the tool retainer to its original position. OPERATION Chipping/Scaling/Demolition CAUTION: Always assure that the bit is securely retained by attempting to pull the bit out of the tool holder after completing the above procedure.
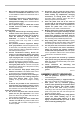
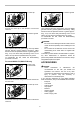
1. Crank cap 1 1 1. Hammer grease 010290 010296 Pull out the crank cap in the direction of arrow and remove it. Then replenish with fresh grease (60g). Use only Makita genuine hammer grease (optional accessory). Filling with more than the specified amount of grease (approx. 60 g; 2 oz) can cause faulty hammering action or tool failure. Fill only with the specified amount of grease. To reassemble the tool, follow the disassembling procedure in reverse. 1.
Makita Corporation Anjo, Aichi, Japan 884923C224 12 www.makita.