
Instructions


9 ENGLISH
Torque level 22 23 24 25 26 27 28 29 30 31 32 33 34 35 36 37 38 39 40 41
Machine screw –
Wood
screw
Soft
wood
(e.g.
pine)
– ø9 x 75 – ø10 x 90 –
Hard
wood
(e.g.
lauan)
– ø9 x 75 – ø10 x 90 –
High speed
Torque level 1 2 3 4 5 6 7 8 9 10 11 12 13 14 15 16 17 18 19 20 21
Machine screw M4 M5 M6 –
Wood
screw
Soft
wood
(e.g.
pine)
ø3.5
x 22
ø4.1 x 38 – ø5.1 x 50 – ø6.2 x 63 –
Hard
wood
(e.g.
lauan)
– ø3.5
x 22
ø4.1 x 38 – ø5.1 x 50 – ø6.2 x 63 –
Electronic function
The tool is equipped with the electronic functions for
easy operation.
• Active Feedback sensing Technology
If the tool is swung at the predetermined accelera-
tion during operation, the motor is forcibly stopped
to reduce the burden on the wrist.
NOTICE: Hold the tool rmly while operating.
NOTICE: If any malfunction occurred with the
electronic function, the light blinks for 3 seconds,
and then, turns off. In that case, contact with Makita
Authorized or Factory Service Centers to repair.
NOTE: This function does not work if the acceleration
does not reach the predetermined one when the tool
is swung.
NOTE: If the tool is forcibly stopped, release the
switch trigger, and then pull the switch trigger to
restart the tool.
ASSEMBLY
CAUTION: Always be sure that the tool is
switched off and the battery cartridge is removed
before carrying out any work on the tool.
Installing or removing driver bit/
drill bit
Optional accessory
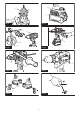
► Fig.9: 1. Sleeve 2. Close 3. Open
Turn the sleeve counterclockwise to open the chuck
jaws. Place the driver bit/drill bit in the chuck as far
as it will go. Turn the sleeve clockwise to tighten the
chuck. To remove the driver bit/drill bit, turn the sleeve
counterclockwise.
Installing side grip (auxiliary handle)
► Fig.10: 1. Side grip 2. Protrusion 3. Groove 4. Arm
Always use the side grip to ensure operating safety.
Install the side grip so that the protrusions on the arm t
in the grooves on the tool barrel. Turn the grip clockwise
to secure it. The grip can be xed at desired angle.
Adjustable depth rod
► Fig.11: 1. Depth rod 2. Clamp screw
The adjustable depth rod is used to drill holes of uniform
depth. Loosen the clamp screw, set to desired position,
then tighten the clamp screw.
Installing hook
CAUTION: When installing the hook, always
secure it with the screw rmly. If not, the hook
may come off from the tool and result in the personal
injury.
► Fig.12: 1. Groove 2. Hook 3. Screw
The hook is convenient for temporarily hanging the tool.
This can be installed on either side of the tool. To install
the hook, insert it into a groove in the tool housing on
either side and then secure it with a screw. To remove,
loosen the screw and then take it out.
Installing driver bit holder
Optional accessory
► Fig.13: 1. Driver bit holder 2. Driver bit
Fit the driver bit holder into the protrusion at the tool foot
on either right or left side and secure it with a screw.
When not using the driver bit, keep it in the driver bit
holders. Driver bits 45 mm-long (1-3/4") can be kept
there.