INSTRUCTION MANUAL MANUEL D'INSTRUCTION MANUAL DE INSTRUCCIONES 2-Speed Hammer Drill Perceuse à Percussion 2-Vitesses 2 Velocidad Taladro de percusión HP2050 HP2050F HP2051F 002989 DOUBLE INSULATION DOUBLE ISOLATION DOBLE AISLAMIENTO WARNING: For your personal safety, READ and UNDERSTAND before using. SAVE THESE INSTRUCTIONS FOR FUTURE REFERENCE. AVERTISSEMENT: Pour votre propre sécurité, prière de lire attentivement avant l'utilisation. GARDER CES INSTRUCTIONS POUR RÉFÉRENCE ULTÉRIEURE.
ENGLISH SPECIFICATIONS Model HP2050/2050F Speed Capacities HP2051F High Low High Concrete 20 mm (3/4") ----- 20 mm (3/4") ----- Steel 8 mm (5/16") 13 mm (1/2") 8 mm (5/16") 13 mm (1/2") Wood Low 25 mm (1") 40 mm (1-9/16") 25 mm (1") 40 mm (1-9/16") No load speed (RPM) 0 - 2,900/min. 0 - 1,200/min. 0 - 2,900/min. 0 - 1,200/min. Blows per minute 0 - 58,000 0 - 24,000 0 - 58,000 0 - 24,000 Overall length 362 mm (14-1/4") 360 mm (14-1/8") Net weight 2.5 kg (5.6 lbs) 2.
22. Use only accessories that are recommended by the manufacturer for your model. Accessories that may be suitable for one tool, may become hazardous when used on another tool. SERVICE 23. Tool service must be performed only by qualified repair personnel. Service or maintenance performed by unqualified personnel could result in a risk of injury. 24. When servicing a tool, use only identical replacement parts. Follow instructions in the Maintenance section of this manual.
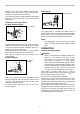
3. 4. 5. 6. 7. FUNCTIONAL DESCRIPTION Hold the tool firmly with both hands. Always use the side grip. Keep hands away from rotating parts. Do not leave the tool running. Operate the tool only when hand-held. Do not touch the bit or the workpiece immediately after operation; they may be extremely hot and could burn your skin. Some material contains chemicals which may be toxic. Take caution to prevent dust inhalation and skin contact. Follow material supplier safety data.
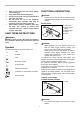
To turn on the lamp, pull the trigger. Release the trigger to turn it off. • NOTE: • Use a dry cloth to wipe the dirt off the lens of lamp. Be careful not to scratch the lens of lamp, or it may lower the illumination. • Reversing switch action CAUTION: Use the speed change knob only after the tool comes to a complete stop. Changing the tool speed before the tool stops may damage the tool. Always set the speed change knob to the correct position.
Depth gauge Always use the side grip to ensure operating safety. Install the side grip so that the teeth on the grip fit in between the protrusions on the tool barrel. Then tighten the grip by turning clockwise at the desired position. It may be swung 360° so as to be secured at any position. 1 1. Depth gauge Installing or removing drill bit For Model HP2050, HP2050F 1. Chuck key 002696 The depth gauge is convenient for drilling holes of uniform depth.
MAINTENANCE Blow-out bulb (optional accessory) 1. Blow-out bulb • 1 CAUTION: Always be sure that the tool is switched off and unplugged before attempting to perform inspection or maintenance. Cleaning vent holes The tool and its air vents have to be kept clean. Regularly clean the tool's air vents or whenever the vents start to become obstructed. 002449 1. Vent holes After drilling the hole, use the blow-out bulb to clean the dust out of the hole.
MAKITA LIMITED ONE YEAR WARRANTY Warranty Policy Every Makita tool is thoroughly inspected and tested before leaving the factory. It is warranted to be free of defects from workmanship and materials for the period of ONE YEAR from the date of original purchase. Should any trouble develop during this one year period, return the COMPLETE tool, freight prepaid, to one of Makita’s Factory or Authorized Service Centers.
FRANÇAIS SPÉCIFICATIONS Modèle HP2050/2050F Vitesse Capacités HP2051F Grande Bas Grande Béton 20 mm (3/4") ----- 20 mm (3/4") ----- Acier 8 mm (5/16") 13 mm (1/2") 8 mm (5/16") 13 mm (1/2") Bois Bas 25 mm (1") 40 mm (1-9/16") 25 mm (1") 40 mm (1-9/16") Vitesse à vide (T/MIN) 0 - 2 900/min. 0 - 1 200/min. 0 - 2 900/min. 0 - 1 200/min.
20. Prenez soin de bien entretenir les outils. Les outils de coupe doivent être toujours bien affûtés et propres. Des outils bien entretenus, dont les arêtes sont bien tranchantes, sont moins susceptibles de coincer et plus faciles à diriger. 21. Assurez-vous que les pièces mobiles ne sont pas désalignées ou coincées, qu'aucune pièce n'est cassée et que l'outil n'a subi aucun dommage affectant son bon fonctionnement. Le cas échéant, faites réparer l'outil avant de l'utiliser.
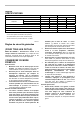
Tableau 1. Gabarit minimum du cordon Intensité nominale Plus de Pas plus de 0 6 10 12 6 10 12 16 Volts 120 V Longueur totale du cordon en pieds 25 pi 50 pi 100 pi 150 pi Calibre américain des fils 18 18 16 14 16 16 16 12 16 14 14 12 14 12 Non recommandé 000173 USB002-2 CONSERVEZ CE MODE D'EMPLOI.
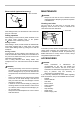
DESCRIPTION DU FONCTIONNEMENT • Allumage de la lampe Pour les modèles HP2050F et HP2051F 1. Lampe ATTENTION: Assurez-vous toujours que l'outil est hors tension et débranché avant de l'ajuster ou de vérifier son fonctionnement. Interrupteur 1 1 4 3 5 2 1. Bouton de verrouillage 2. Vis de réglage de vitesse 3. Gâchette 4. Plus rapide 5. Abaisser 002689 ATTENTION: Evitez de regarder directement le faisceau lumineux ou sa source. Pour allumer la lampe, appuyez sur la gâchette.
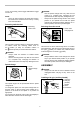
Changement de vitesse 1. Flèche 2. Bouton de changement de vitesse 1 • 2 ATTENTION: Glissez toujours le levier de changement de mode complètement sur la position du mode désiré. Si vous faites fonctionner l'outil en plaçant le levier entre les symboles de mode, vous risquez d'endommager l'outil. ASSEMBLAGE 002691 • Le bouton de changement de vitesse permet de sélectionner à l'avance deux plages de vitesse.
UTILISATION Pour retirer le foret/l'embout, tournez la clé de mandrin en sens inverse des aiguilles d'une montre dans l'un des trois trous seulement, puis desserrez à la main. Après avoir utilisé la clé de mandrin, replacez-la dans le porte-clés.
Perçage du bois Quand vous percez dans du bois, vous obtiendrez de meilleurs résultats avec des forets en bois munies d'une vis-guide. Celle-ci rend le perçage plus aisé en tirant le foret à l'intérieur de la pièce. Perçage du métal Pour empêcher le foret de glisser en début de perçage, faites une indentation au point de perçage à l'aide d'un poinçon et d'un marteau. Placez ensuite la pointe du foret dans l'indentation et commencez à percer. Quand vous forez dans du métal, utilisez un lubrifiant.
GARANTIE LIMITÉE D’UN AN MAKITA Politique de garantie Chaque outil Makita est inspecté rigoureusement et testé avant sa sortie d’usine. Nous garantissons qu’il sera exempt de défaut de fabrication et de vice de matériau pour une période d’UN AN à partir de la date de son achat initial. Si un problème quelconque devait survenir au cours de cette période d’un an, veuillez retourner l’outil COMPLET, port payé, à une usine ou à un centre de service après-vente Makita.
ESPAÑOL ESPECIFICACIONES Modelo HP2050/2050F Especificaciones eléctricas en México 120 V Velocidad Capacidades HP2051F 6,6 A 50/60 Hz Alta Baja Alta Concreto 20 mm (3/4") ----- 20 mm (3/4") Baja ----- Acero 8 mm (5/16") 13 mm (1/2") 8 mm (5/16") 13 mm (1/2") 25 mm (1") 40 mm (1-9/16") 25 mm (1") 40 mm (1-9/16") Revoluciones por minuto (r.p.m.
. Desconecte la clavija de la toma de corriente antes de hacer ajustes, cambiar accesorios, o guardar la herramienta. Tales medidas de seguridad preventiva reducirán el riesgo de que la herramienta pueda ser puesta en marcha por descuido. 19. Guarde las herramientas que no se utilicen lejos del alcance de los niños o de personas que no estén capacitadas para manejarlas. Las herramientas son peligrosas si están en manos de usuarios inexpertos. 20. Realice el mantenimiento a las herramientas eléctricas.
indicado en la placa de características. Si no está seguro, utilice el siguiente calibre más potente. Cuanto menor sea el número de calibre, más potente será el cable. Tabla 1. Calibre mínimo para el cable Volts 120 V~ Amperaje nominal Más de 0A 6A 10 A 12 A Longitud total del cable en metros 7,6 m (25 ft) 15,2 m (50 ft) 30,4 m (100 ft) 45,7 m (150 ft) No más de Calibre del cable (AWG) 6A 10 A 12 A 16 A 18 18 16 14 16 16 16 12 16 14 14 12 14 12 No se recomienda 000173 USB002-2 7.
DESCRIPCIÓN DEL FUNCIONAMIENTO • Encendido de la lámpara Para modelos HP2050F, HP2051F 1. Lámpara PRECAUCIÓN: Asegúrese siempre de que la herramienta esté apagada y desconectada antes de ajustar o comprobar cualquier función en la misma. Accionamiento del interruptor 1 4 3 5 2 1 1. Botón de bloqueo 2. Disco de control de velocidad 3. Gatillo interruptor 4. Alta 5. Baja 002689 PRECAUCIÓN: No mire a la luz ni vea la fuente de luz directamente. Para encender la lámpara, apriete el gatillo.
Cambio de velocidad 1. Flecha 2. Perilla de cambio de velocidad 1 • 2 PRECAUCIÓN: Deslice siempre la palanca de cambio del modo de accionamiento a tope hasta la posición del modo deseado. Si utiliza la herramienta con la palanca de cambio del modo de accionamiento puesta a medias entre los símbolos de modo, la herramienta podrá dañarse. ENSAMBLE 002691 Se pueden preseleccionar dos rangos de velocidad con la perilla de cambio de velocidad.
OPERACIÓN Para instalar la broca, introdúzcala a tope en el mandril. Apriete el mandril a mano. Ponga la llave del mandril en cada uno de los tres agujeros y apriete hacia la derecha. Asegúrese de apretar los tres agujeros del mandril uniformemente. Para quitar la broca, gire la llave del mandril hacia la izquierda en uno de los agujeros solamente, después afloje el mandril a mano. Después de utilizar la llave del mandril asegúrese de ponerla otra vez en su posición original.
Taladrado en Madera Cuando taladre en madera, los mejores resultados se obtendrán con brocas para madera equipadas con un tornillo guía. El tornillo guía facilita el taladrado tirando de la broca hacia el interior de la pieza de trabajo. Taladrado en metal Para evitar que la broca resbale al empezar a hacer el agujero, haga una mella con punzón y un martillo en el punto a taladrar. Coloque la punta de la broca en la mella y comience a taladrar.
GARANTÍA LIMITADA MAKITA DE UN AÑO Ésta Garantía no aplica para México Política de garantía Cada herramienta Makita es inspeccionada y probada exhaustivamente antes de salir de fábrica. Se garantiza que va a estar libre de defectos de mano de obra y materiales por el periodo de UN AÑO a partir de la fecha de adquisición original.
< USA only > WARNING Some dust created by power sanding, sawing, grinding, drilling, and other construction activities contains chemicals known to the State of California to cause cancer, birth defects or other reproductive harm. Some examples of these chemicals are: • lead from lead-based paints, • crystalline silica from bricks and cement and other masonry products, and • arsenic and chromium from chemically-treated lumber.