
User Manual


8 ENGLISH
FUNCTIONAL
DESCRIPTION
CAUTION: Always be sure that the tool is
switched off and the battery cartridge is removed
before adjusting or checking function on the tool.
Installing or removing battery
cartridge
CAUTION: Always switch off the tool before
installing or removing of the battery cartridge.
CAUTION: Hold the tool and the battery car-
tridge rmly when installing or removing battery
cartridge.Failuretoholdthetoolandthebattery
cartridgermlymaycausethemtoslipoffyourhands
andresultindamagetothetoolandbatterycartridge
andapersonalinjury.
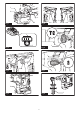
►Fig.1: 1. Red indicator 2. Button 3. Battery cartridge
Toremovethebatterycartridge,slideitfromthetool
whileslidingthebuttononthefrontofthecartridge.
Toinstallthebatterycartridge,alignthetongueonthe
batterycartridgewiththegrooveinthehousingandslip
it into place. Insert it all the way until it locks in place
withalittleclick.Ifyoucanseetheredindicatoronthe
uppersideofthebutton,itisnotlockedcompletely.
CAUTION: Always install the battery cartridge
fully until the red indicator cannot be seen.Ifnot,
itmayaccidentallyfalloutofthetool,causinginjuryto
you or someone around you.
CAUTION: Do not install the battery cartridge
forcibly.Ifthecartridgedoesnotslideineasily,itis
notbeinginsertedcorrectly.
Indicating the remaining battery
capacity
Only for battery cartridges with the indicator
►Fig.2: 1. Indicator lamps 2.Checkbutton
Pressthecheckbuttononthebatterycartridgetoindi-
catetheremainingbatterycapacity.Theindicatorlamps
lightupforfewseconds.
Indicator lamps Remaining
capacity
Lighted Off
75%to100%
50%to75%
25%to50%
0%to25%
NOTE:Dependingontheconditionsofuseandthe
ambienttemperature,theindicationmaydifferslightly
fromtheactualcapacity.
Tool / battery protection system
Thetoolisequippedwithatool/batteryprotectionsys-
tem.Thissystemautomaticallycutsoffpowertothe
motortoextendtoolandbatterylife.Thetoolwillauto-
maticallystopduringoperationifthetoolorbatteryis
placedunderoneofthefollowingconditions:
Overload protection
Whenthebatteryisoperatedinamannerthatcauses
ittodrawanabnormallyhighcurrent,thetoolautomat-
ically stops without any indication. In this situation, turn
thetooloffandstoptheapplicationthatcausedthetool
tobecomeoverloaded.Thenturnthetoolontorestart.
Overheat protection
Whenthetoolorbatteryisoverheated,thetoolstops
automaticallyandthelampblinks.Inthiscase,letthe
toolandbatterycoolbeforeturningthetoolonagain.
Overdischarge protection
Whenthebatterycapacityisnotenough,thetoolstops
automatically.Ifyouturnthetoolon,themotorruns
againbutstopssoon.Inthiscase,removethebattery
fromthetoolandchargethebattery.
Switch action
WARNING: Before installing the battery car-
tridge into the tool, always check to see that the
switch trigger actuates properly and returns to
the "OFF" position when released.
►Fig.3: 1. Switch trigger
Tostartthetool,simplypulltheswitchtrigger.Tool
speedisincreasedbyincreasingpressureontheswitch
trigger. Release the switch trigger to stop.
Lighting up the front lamp
►Fig.4: 1. Switch trigger 2. Lamp
CAUTION: Do not look in the light or see the
source of light directly.
Pulltheswitchtriggertolightupthelamp.Thelamp
keepsonlightingwhiletheswitchtriggerisbeingpulled.
Thelampgoesoutapproximately10secondsafter
releasing the switch trigger.
NOTE:Useadryclothtowipethedirtoffthelensof
thelamp.Becarefulnottoscratchthelensoflamp,or
it may lower the illumination.
Reversing switch action
►Fig.5: 1. Reversing switch lever