INSTRUCTION MANUAL MANUEL D'INSTRUCTION MANUAL DE INSTRUCCIONES Rotary Hammer Marteau rotatif Martillo rotatorio HR4001C HR4010C HR4011C 006306 DOUBLE INSULATION DOUBLE ISOLATION DOBLE AISLAMIENTO WARNING: For your personal safety, READ and UNDERSTAND before using. SAVE THESE INSTRUCTIONS FOR FUTURE REFERENCE. AVERTISSEMENT: Pour votre propre sécurité, prière de lire attentivement avant l’utilisation. GARDER CES INSTRUCTIONS POUR RÉFÉRENCE ULTÉRIEURE.
ENGLISH SPECIFICATIONS Model HR4001C HR4010C Carbide-tipped bit 40 mm (1-9/16”) Core bit 105 mm (4-1/8”) HR4011C Capacities No load speed (RPM) 235 - 480 /min. Blows per minute 1,350 - 2,750 Overall length 468 mm (18-1/2”) Net weight 5.9 kg (13.0 lbs) 6.3 kg (14.0 lbs) 6.3 kg (14.0 lbs) • Due to our continuing programme of research and development, the specifications herein are subject to change without notice. • Note: Specifications may differ from country to country.
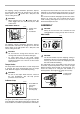
21. Check for misalignment or binding of moving parts, breakage of parts, and any other condition that may affect the tools operation. If damaged, have the tool serviced before using. Many accidents are caused by poorly maintained tools. enables better control of the tool in unexpected situations. 14. Use safety equipment. Always wear eye protection. Dust mask, non-skid safety shoes, hard hat, or hearing protection must be used for appropriate conditions. Ordinary eye or sun glasses are NOT eye protection.
5. 6. FUNCTIONAL DESCRIPTION Under normal operation, the tool is designed to produce vibration. The screws can come loose easily, causing a breakdown or accident. Check tightness of screws carefully before operation. • In cold weather or when the tool has not been used for a long time, let the tool warm up for a while by operating it under no load. This will loosen up the lubrication. Without proper warmup, hammering operation is difficult. 7. Always be sure you have a firm footing.
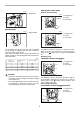
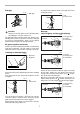
Selecting the action mode 006308 1 OFF Rotation with hammering 1. Switch lever 006309 HR4001C HR4010C ON 1. Change lever 2. Pointer 3. Lock button 2 1 3 Speed change 006334 006310 1. Adjusting dial HR4011C 2 1. Change lever 2. Pointer 3. Lock button 1 1 3 The revolutions and blows per minute can be adjusted just by turning the adjusting dial. The dial is marked 1 (lowest speed) to 5 (full speed).
tor lamp is lit but the tool does not start even if the tool is switched on, the carbon brushes may be worn out, or the controller, the motor or the ON/OFF switch may be defective. The red service indicator lamp lights up when the carbon brushes are nearly worn out to indicate that the tool needs servicing. After approx. 8 hours of use, the motor will automatically be shut off.
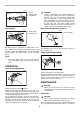
Side grip To remove the bit, pull the chuck cover down all the way and pull the bit out. 006316 006333 1. Side grip 1 1. Bit 2. Chuck cover 1 2 Bit angle (when chipping, scaling or demolishing) CAUTION: Always use the side grip to ensure operating safety when drilling in concrete, masonry, etc. The side grip swings around to either side, allowing easy handling of the tool in any position.
006322 HR4011C 1. Pointer 2. Change lever 3. Lock button 1 • 3 2 Depth gauge Blow-out bulb (optional accessory) 006323 1 CAUTION: There is a tremendous and sudden twisting force exerted on the tool/bit at the time of hole breakthrough, when the hole becomes clogged with chips and particles, or when striking reinforcing rods embedded in the concrete. Always use the side grip (auxiliary handle) and firmly hold the tool by both side grip and switch handle during operations.
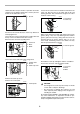
Loosen the six screws with a screwdriver and remove the crank cap. Rest the tool on the table with the bit end pointing upwards. This will allow the old grease to collect inside the crank housing. relubricated after every 6 months of operation. Send the complete tool to Makita Authorized or Factory Service Center for this lubrication service. 006326 1. Screws 006330 1. Screwdriver 2. Crank cap 1 1 2 Run the tool for several minutes to warm it up. Switch off and unplug the tool.
ACCESSORIES CIFIC PURPOSE,” AFTER THE ONE YEAR TERM OF THIS WARRANTY. This Warranty gives you specific legal rights, and you may also have other rights which vary from state to state. Some states do not allow the exclusion or limitation of incidental or consequential damages, so the above limitation or exclusion may not apply to you. Some states do not allow limitation on how long an implied warranty lasts, so the above limitation may not apply to you.
FRANÇAIS SPÉCIFICATIONS Modèle HR4001C HR4010C Foret au carbure 40 mm (1-9/16”) Trépan 105 mm (4-1/8”) HR4011C Capacités Vitesse à vide (T/MIN) 235 - 480 /min. Nombre de frappes par minute 1,350 - 2,750 Longueur totale 468 mm (18-1/2”) Poids net 5.9 kg (13.0 lbs) 6.3 kg (14.0 lbs) 6.3 kg (14.0 lbs) • Le fabricant se réserve le droit de modifier sans avertissement les spécifications. • Note: Les spécifications peuvent varier selon les pays.
19. Rangez les outils hors de la portée des enfants et d’autres personnes inexpérimentées. Les outils sont dangereux dans les mains d’utilisateurs novices. en mouvement. Des vêtements flottants, des bijoux ou des cheveux longs risquent d’être happés par des pièces en mouvement. 11. Méfiez-vous d’un démarrage accidentel. Avant de brancher l’outil, assurez-vous que son interrupteur est sur ARRÊT.
RÈGLES DE SÉCURITÉ PARTICULIÈRES 10. Ne laissez pas l’outil tourner. Ne le faites fonctionner que lorsque vous le tenez. 11. Ne pointez l’outil vers personne autour de vous pendant l’utilisation. Le foret pourrait être éjecté et blesser quelqu’un grièvement. USB010-2 NE vous laissez PAS tromper (au fil d’une utilisation répétée) par un sentiment d’aisance et de familiarité avec le produit, en négligeant le respect rigoureux des consignes de sécurité qui accompagnent le marteau perforateur.
Interrupteur Changement de vitesse 006307 006334 1. Cadran de réglage 1. Gâchette 1 1 Il est possible de régler le nombre de rotations et de frappes par minute simplement en tournant le cadran de réglage. Le cadran est gradué de 1 (vitesse la plus lente) à 5 (vitesse la plus rapide). Pour connaître le rapport entre les graduations du cadran et le nombre de rotations/frappes par minute, consultez le tableau ci-dessous.
POUR LE MODÉLE HR4011C 006310 HR4011C 2 006312 1. Levier de changement 2. Index 3. Bouton de verrouillage HR4011C 3 2 1 1 3 Pour percer du béton, de la maçonnerie, etc., appuyez sur le bouton de verrouillage et tournez le levier de changement de façon que l’index soit dirigé sur le symbole . Utilisez un foret à pointe au carbure de tungstène.
Poignée latérale indiquer que vous devez les remplacer. Après environ 8 heures d’utilisation, le moteur s’arrête automatiquement. 006316 ASSEMBLAGE • 1. Poignée latérale 1 ATTENTION: Avant d’effectuer toute intervention sur l’outil, assurez-vous toujours qu’il est hors tension et débranché. Poignée latérale 003139 ATTENTION: Pour des raisons de sécurité, le perçage dans le béton, ou la maçonnerie etc. doit toujours être pratiqué avec cette poignée.
S’il n’est pas possible d’enfoncer le foret, retirez-le. Tirez vers le bas le couvercle du mandrin à quelques reprises. Réinsérez ensuite le foret. Tournez le foret puis enfoncez-le jusqu’à ce qu’il soit engagé. Après l’installation, vérifiez toujours que le foret est solidement fixé en essayant de le sortir. Pour retirer le foret, tirez le couvercle du mandrin à fond vers le bas puis dégagez le foret. 006321 3 1 006333 1. Foret 2. Couvercle du mandrin 1 1. Levier de changement 2. Index 3.
UTILISATION Burinage / Ecaillage / Démolition 006325 Perçage avec martelage 006324 Réglez le levier de changement sur le symbole . Tenez votre outil fermement à deux mains. Mettez le contact et appliquez une légère pression sur l’outil de façon qu’il ne risque pas de sauter d’un côté ou de l’autre. Appliquer une pression excessive n’augmentera pas l’efficacité de l’opération. Réglez le levier de changement sur le symbole .
(environ 60 g; 2 oz), vous risquez une percussion défectueuse et une panne de l’outil. Respectez strictement la quantité spécifiée. Débranchez le connecteur en tirant dessus. 006327 1 2 1. Connecteur 2. Noire 3. Blanche 006331 1. Graisse pour marteau 1 3 Desserrez les vis et enlevez le levier de changement de mode. Remettez le capuchon de manivelle en place et serrez-le avec le tournevis. Branchez le connecteur et remontez la poignée. 006328 3 2 1. Levier de changement 2. Vis 3.
• • • • • • • • • • • • Graisse pour marteau Graisse rose Gabarit de profondeur Poire soufflante Lunettes de sécurité Mallette de transport en plastique Ciseau à écailler Ciseau à gratter Pelle à argile Poignée latérale Poignée latérale Foret à pointe en carbure de tungstène SDS-Max EN0006-1 GARANTIE LIMITÉE D’UN AN MAKITA Politique de garantie Chaque outil Makita est inspecté rigoureusement et testé avant sa sortie d’usine.
ESPAÑOL ESPECIFICACIONES Modelo HR4001C Especificaciones eléctricas en México HR4010C 120 V HR4011C 11 A 50/60 Hz Brocas con punta de carburo 40 mm (1-9/16”) Broca de corona 105 mm (4-1/8”) Capacidades Revoluciones por minuto (r.p.m.) 235 - 480 /min.
no preparadas. Las herramientas son peligrosas en manos de personas no preparadas. herramienta eléctrica. No utilice la herramienta cuando esté cansado o bajo la influencia de drogas, alcohol, o medicamentos. Un momento sin atención mientras se están utilizando herramientas eléctricas podrá resultar en heridas personales graves. 20. Dé manteniemiento a sus herramientas. Mantenga las herramientas de corte afiladas y limpias.
Tabla 1. Calibre mínimo para el cable Amperaje nominal Más de No más de 0 6 10 12 6 10 12 16 Voltios 120 V~ Longitud total del cable en metros 25 metros 50 metros 100 metros 150 metros Calibre del cable (AWG) 18 18 16 14 REGLAS ESPECÍFICAS DE SEGURIDAD 1. 2. 3. 4. 5.
SÍMBOLOS • Este interruptor funciona cuando la herramienta está puesta en el modo de accionamiento del símbolo ó . Para comenzar a utilizar la herramienta, simplemente presione el gatillo interruptor. Suéltelo para detenerla. Interruptor deslizable USD202-2 A continuación se muestran los símbolos utilizados para la herramienta. V............................voltios PRECAUCIÓN: Antes de enchufar la herramienta, compruebe siempre y asegúrese de que esté apagada.
Para martilleo prolongado (PARA LOS MODELOS HR4001C Y HR4010C SOLAMENTE) PRECAUCIÓN: Si la herramienta es utilizada continuamente a velocidades bajas durante largo tiempo, el motor se sobrecargará resultando en un mal funcionamiento de la herramienta. El control de ajuste de velocidad sólo se puede girar hasta 5 o hasta 1. No lo force más allá de estas marcas o la función de ajuste de velocidad podría arruirnarse. • • 006313 1. Palanca de cambio 2. Puntero 3.
• herramienta no puede sujetarse debidamente con la empuñadura lateral cuando se perfora. La empuñadura lateral se puede girar 360° en vertical y sujetarse en cualquier posición deseada. También se sujeta en ocho posiciones diferentes hacia atrás y adelante en horizontal. Simplemente afloje la tuerca de la abrazadera para girar la empuñadura lateral a la posición deseada. Después apriete la tuerca de la abrazadera firmemente.
Instalación o extracción de la broca Ángulo de cincel (al cortar, demoler o tallar) 003150 2 1 006319 1. Espiga de la broca 2. Grasa para brocas HR4001C HR4010C 1. Palanca de cambio 2. Puntero 3. Botón de bloqueo 2 3 1 006320 Limpie el eje de la broca y aplíquele grasa antes de instalar la broca. Inserte la broca en la herramienta. Gire la broca y presiónela hacia dentro hasta que quede encajada. 1. Puntero 2. Palanca de cambio 3. Botón de bloqueo 1 HR4011C 3 006318 1. Broca 2.
Tope de profundidad empuñadura lateral y empuñadura del interruptor durante las operaciones. En caso contrario podrá resultar en la pérdida del control de la herramienta y posiblemente graves heridas. 006323 1 1. Tope de profundidad 2. Tornillo de la abrazadera 2 Soplador (Accesorio opcional) 002449 1. Soplador 1 El tope de profundidad sirve para taladrar agujeros a una profundidad uniforme. Inserte el tope de profundidad en el agujero de la base de empuñadura.
006326 006330 1. Tornillos 1. Destornillador 2. Tapa del cárter 1 1 2 Limpie la grasa vieja del interior y reemplace con grasa nueva (60 g; 2 oz). Utilice solamente grasa para martillo genuina de Makita (accesorio opcional). Si llena con más grasa de la cantidad especificada (aprox. 60 g; 2 oz) podrá ocasionar una acción de martilleo defectuosa o avería en la herramienta. Llene solamente con la cantidad de grasa especificada. Deje la herramienta en marcha varios minutos para calentarla.
ACCESORIOS ESTA RENUNCIA SERÁ APLICABLE TANTO DURANTE COMO DESPUÉS DEL TÉRMINO DE ESTA GARANTÍA. MAKITA RENUNCIA LA RESPONSABILIDAD POR CUALQUIER GARANTÍA IMPLÍCITA, INCLUYENDO GARANTÍAS IMPLÍCITAS DE “COMERCIALIDAD” E “IDONEIDAD PARA UN FIN ESPECÍFICO”, DESPUÉS DEL TÉRMINO DE UN AÑO DE ESTA GARANTÍA. Esta garantía le concede a usted derechos legales específicos, y usted podrá tener también otros derechos que varían de un estado a otro.
< USA only > WARNING Some dust created by power sanding, sawing, grinding, drilling, and other construction activities contains chemicals known to the State of California to cause cancer, birth defects or other reproductive harm. Some examples of these chemicals are: • lead from lead-based paints, • crystalline silica from bricks and cement and other masonry products, and • arsenic and chromium from chemically-treated lumber.