
Manual


10 ENGLISH
Donotusethedustnozzlewiththelongleverattached.
Youwillnotbeabletomakeacutbecausethelower
guard movement is hindered by the dust nozzle.
2. Install the dust nozzle on the tool using the screw.
►Fig.19: 1.Dustnozzle2. Screw
3. Connect a hose of the vacuum cleaner to the dust
nozzle.
►Fig.20
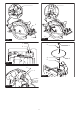
OPERATION
CAUTION: Be sure to move the tool forward
in a straight line gently. Forcing or twisting the tool
will result in overheating the motor and dangerous
kickback,possiblycausingsevereinjury.
►Fig.21
Holdthetoolrmly.Thetoolisprovidedwithbothafront
grip and rear handle. Use both to best grasp the tool.
If both hands are holding saw, they cannot be cut by
the circular saw blade. Set the base on the workpiece
to be cut without the circular saw blade making any
contact.Thenturnthetoolonandwaituntilthecircular
saw blade attains full speed. Now simply move the tool
forwardovertheworkpiecesurface,keepingitatand
advancing smoothly until the sawing is completed.
Togetcleancuts,keepyoursawinglinestraightand
your speed of advance uniform. If the cut fails to prop-
erly follow your intended cut line, do not attempt to turn
orforcethetoolbacktothecutline.Doingsomaybind
the circular saw blade and lead to dangerous kickback
andpossibleseriousinjury.Releaseswitch,waitforcir-
cular saw blade to stop and then withdraw tool. Realign
toolonnewcutline,andstartcutagain.Attemptto
avoid positioning which exposes operator to chips and
wooddustbeingejectedfromsaw.Useeyeprotection
tohelpavoidinjury.
If the front grip become loose, turn it counterclockwise
to tighten.
►Fig.22: 1. Front grip
Rip fence (Guide rule)
Optional accessory
►Fig.23: 1.Ripfence(Guiderule)2. Clamping screw
Thehandyripfenceallowsyoutodoextra-accurate
straight cuts. Simply slide the rip fence up snugly
against the side of the workpiece and secure it in posi-
tion with the clamping screw on the front of the base. It
also makes repeated cuts of uniform width possible.
MAINTENANCE
CAUTION: Always be sure that the tool is
switched off and unplugged before attempting to
perform inspection or maintenance.
CAUTION: Clean out the guard to ensure
there is no accumulated sawdust and chips
which may impede the operation of the guarding
system.Adirtyguardingsystemmaylimittheproper
operation which could result in serious personal
injury.Themosteffectivewaytoaccomplishthis
cleaning is with compressed air. If the dust is being
blown out of the guard, be sure the proper eye
and breathing protection is used.
NOTICE: Never use gasoline, benzine, thinner,
alcohol or the like. Discoloration, deformation or
cracks may result.
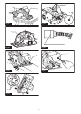
Adjusting the parallelism
Thisadjustmenthasbeenmadeatthefactory.Butifitis
off,youcanadjustitasthefollowingprocedure.
1. Make sure all levers and screws are tightened.
Slightly loosen the screw illustrated.
2. Whileopeningthelowerguard,movetherearof
thebasesothatthedistanceAandBbecomesequal.
3. Tightenthescrewsandmakeatestcuttocheck
the parallelism.
►Fig.24: 1. Screw
Adjusting 0°-cut accuracy
Thisadjustmenthasbeenmadeatthefactory.Butifitis
off,youcanadjustitasthefollowingprocedure.
1. Slightly loosen the lever and clamping screw on
the front and rear of the tool.
2. Make the base perpendicular to the blade using
atriangularruleorsquarerulebyturningtheadjusting
screw.
►Fig.25: 1.Triangularrule2.Adjustingscrew
3. Tightentheleverandclampingscrewandthen
make a test cut to check the verticalness.
Replacing carbon brushes
►Fig.26: 1. Limit mark
Check the carbon brushes regularly.
Replace them when they wear down to the limit mark.
Keep the carbon brushes clean and free to slip in the
holders. Both carbon brushes should be replaced at the
same time. Use only identical carbon brushes.
1.
Use a screwdriver to remove the brush holder caps.
2. Takeouttheworncarbonbrushes,insertthenew
ones and secure the brush holder caps.
►Fig.27: 1. Brush holder cap
TomaintainproductSAFETYandRELIABILITY,
repairs,anyothermaintenanceoradjustmentshould
beperformedbyMakitaAuthorizedorFactoryService
Centers, always using Makita replacement parts.