
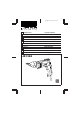
Operation Manual


ENGLISH
Explanation of general view
1 Switch trigger
2 Lock button
3 Hook
4 Cutting head
5 Screws
6 Loosen
7 Hex wrench
8 Side blade L
9 Center blade
10 Side blade R
11 Sleeve
12 Tighten
13 Side blade surface
14 Side blades
15 Workpiece
16 Lubricate
SPECIFICATIONS
Model JS1300
Max. cutting capacities
Steel up to 400 N/mm
2
............................. 1.3 mm
Steel up to 600 N/mm
2
............................. 1.0 mm
Steel up to 800 N/mm
2
............................. 0.5 mm
Aluminium up to 200 N/mm
2
.................... 2.5 mm
Strokes per minute ................................... 0 – 2,500
Overall length ............................................. 302 mm
Net weight ...................................................... 1.7 kg
•
Due to our continuing program of research and
development, the specifications herein are subject
to change without notice.
•
Note: Specifications may differ from country to
country.
Power supply
The tool should be connected only to a power supply
of the same voltage as indicated on the nameplate,
and can only be operated on single-phase AC supply.
They are double-insulated in accordance with Euro-
pean Standard and can, therefore, also be used from
sockets without earth wire.
Safety hints
For your own safety, please refer to the enclosed
safety instructions.
ADDITIONAL SAFETY RULES ENB011-2
1. Hold the tool firmly.
2. Secure the workpiece firmly.
3. Keep hands away from moving parts.
4. Edges and chips of the workpiece are sharp.
Wear gloves. It is also recommended that you
put on thickly bottomed shoes to prevent
injury.
5. Do not put the tool on the chips of the work-
piece. Otherwise it can cause damage and
trouble on the tool.
6. Do not leave the tool running. Operate the tool
only when hand-held.
7. Always be sure you have a firm footing. Be
sure no one is below when using the tool in
high locations.
8. Do not touch the blade or the workpiece imme-
diately after operation; they may be extremely
hot and could burn your skin.
9. Avoid cutting electrical wires. It can cause
serious accident by electric shock.
SAVE THESE INSTRUCTIONS.
OPERATING INSTRUCTIONS
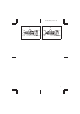
Switch action (Fig. 1)
CAUTION:
Before plugging in the tool, always check to see that
the switch trigger actuates properly and returns to the
‘‘OFF’’ position when released.
To start the tool, simply pull the trigger. Tool speed is
increased by increasing pressure on the trigger.
Release the trigger to stop. For continuous operation,
pull the trigger and then push in the lock button. To
stop the tool from the locked position, pull the trigger
fully, then release it.
Hook (Fig.2&3)
The hook is convenient for temporary hanging the
tool. When using the hook, pull it out in ‘‘A’’ direction
and then push it in ‘‘B’’ direction to secure in place.
When not using the hook, return it back to its initial
position by following the above procedures in reverse.
Replacement of blades
CAUTION:
•
Always be sure that the tool is switched off and
unplugged before replacement of the blades.
•
Never remove the blades with bare hands. Wear
gloves. Otherwise it can cause injury.
Removing cutting head (Fig. 4)
Use the hex wrench to loosen the three screws which
secure the cutting head. Pull the cutting head straight
out to remove it with turning it left and right alternately.
Removing shear blades (Fig. 5)
Remove the three screws which hold the cutting
head. When removing the second screw, be careful
not to fall the sleeve. Then the blades can be removed
easily. When removing the blades, hold the blades
and the sleeve so that they do not fall from the cutting
head.
Installing shear blades (Fig. 6)
Install the sleeve and tighten the three screws after
inserting the center blade, side blade L & R into the
cutting head. In this process, the screw heads should
be protruding 2–3mmfrom the cutting head surface.
If you will tighten the screws excessively, the cutting
head cannot be installed to the tool.
JS1300 (E) (’100. 9. 27)
5