
User Manual

8 ENGLISH
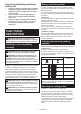
Position Cutting action Applications
0 Straight line cutting
action
For cutting mild
steel, stainless
steel and plastics.
For clean cuts in
wood and plywood.
I Smallorbitcutting
action
For cutting mild
steel, aluminum
and hard wood.
II Mediumorbit
cutting action
For cutting wood
and plywood.
For fast cutting in
aluminum and mild
steel.
III Largeorbitcutting
action
For fast cutting in
wood and plywood.
Switch action
CAUTION:
Before installing the battery cartridge into
the tool, always check to see that the switch trigger actuates
properly and returns to the "OFF" position when released.
CAUTION: When not operating the tool,
depress the lock-off button from A side to lock the
switch trigger in the OFF position.
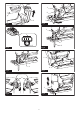
►Fig.4: 1.Lock-offbutton2. Switch trigger
Topreventtheswitchtriggerfromaccidentallypulled,
thelock-offbuttonisprovided.
Tostartthetool,depressthelock-offbuttonfromBside
and pull the switch trigger.
Toolspeedisincreasedbyincreasingpressureonthe
switch trigger. Release the switch trigger to stop. After
use,alwayspressinthelock-offbuttonfromAside.
ASSEMBLY
CAUTION: Always be sure that the tool is
switched off and the battery cartridge is removed
before carrying out any work on the tool.
Installing or removing jig saw blade
CAUTION:
Always clean out all chips or foreign
matter adhering to the jig saw blade and/or blade
holder.Failuretodosomaycauseinsufcienttighten-
ingoftheblade,resultinginaseriouspersonalinjury.
CAUTION: Do not touch the jig saw blade or
the workpiece immediately after operation.They
maybeextremelyhotandcouldburnyourskin.
CAUTION: Always secure the jig saw blade
rmly.Insufcienttighteningoftheblademaycause
bladebreakageorseriouspersonalinjury.
CAUTION:
Use only B type jig saw blades.
UsingbladesotherthanBtypecausesinsufcienttight-
eningoftheblade,resultinginaseriouspersonalinjury.
Toinstallthejigsawblade,loosentheboltcounterclock-
wiseonthejigsawbladeholderwiththehexwrench.
►Fig.5: 1.Jigsawbladeholder2. Bolt 3. Hex wrench
Withthebladeteethfacingforward,insertthejigsaw
bladeintothejigsawbladeholderasfarasitwillgo.
Makesurethatthebackedgeofthebladetsintothe
roller.Thentightentheboltclockwisetosecuretheblade.
►Fig.6: 1. Bolt 2. Roller 3.Jigsawblade
Toremovethejigsawblade,followtheinstallation
procedure in reverse.
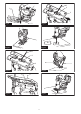
NOTE:Occasionallylubricatetheroller.
Hex wrench storage
►Fig.7: 1. Hook 2. Hex wrench
When not in use, store the hex wrench as shown in the
guretokeepitfrombeinglost.
First,insertthehexwrenchintothehole.Thenpushit
into the hook until it locked.
Dust cover
CAUTION:
Always wear safety goggles even
when operating the tool with the dust cover lowered.
Lowerthedustcovertopreventchipsfromying.
However,whenmakingbevelcuts,raiseitalltheway.
►Fig.8: 1. Dust cover
OPERATION
CAUTION: Always hold the base ush with
the workpiece.Failuretodosomaycausejigsaw
bladebreakage,resultinginaseriousinjury.
CAUTION:
Advance the tool very slowly when
cutting curves or scrolling. Forcing the tool may cause
aslantedcuttingsurfaceandjigsawbladebreakage.
►Fig.9: 1. Cutting line 2. Base
Turnthetoolonwithoutthejigsawblademakingany
contactandwaituntilthebladeattainsfullspeed.Then
restthebaseatontheworkpieceandgentlymovethe
tool forward along the previously marked cutting line.
Bevel cutting
CAUTION: Always be sure that the tool is
switched off and the battery cartridge is removed
before tilting the base.
CAUTION: Raise the dust cover all the way
before making bevel cuts.
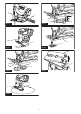
Withthebasetilted,youcanmakebevelcutsatany
anglebetween0°and45°(leftorright).
►Fig.10
Loosentheboltonthebackofthebasewiththehex
wrench.Movethebasesothattheboltispositionedin
thecenterofthecross-shapedslotinthebase.
►Fig.11: 1. Hex wrench 2. Bolt 3. Base
Tiltthebaseuntilthedesiredbevelangleisobtained.
Theedgeofthemotorhousingindicatesthebevelangle
bygraduations.Thentightenthebolttosecurethebase.
►Fig.12: 1.Edge2. Graduation