
User Manual


11 ENGLISH
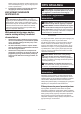
CAUTION:Iftheleverdoesnotmovetothexed
position, the blade is not installed completely. Do not
presstheleverbyhandtothexedposition.Itmay
damage the tool.
Toremovethejigsawblade,pushtheleverforwardas
farasitwillgo.Thisallowsthebladetobereleased.
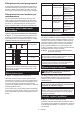
►Fig.8: 1. Jig saw blade holder 2. Jig saw blade
NOTE: Occasionally lubricate the roller.
Hex wrench storage
►Fig.9: 1. Hook 2. Hex wrench
When not in use, store the hex wrench as shown in the
guretokeepitfrombeinglost.
First,insertthehexwrenchintothehole.Thenpushit
into the hook until it locked.
OPERATION
CAUTION: Always hold the base ush with
the workpiece.Failuretodosomaycausejigsaw
bladebreakage,resultinginaseriousinjury.
CAUTION: Advance the tool very slowly when
cutting curves or scrolling. Forcing the tool may
causeaslantedcuttingsurfaceandjigsawblade
breakage.
►Fig.10: 1. Cutting line 2. Base
Turnthetoolonwithoutthejigsawblademakingany
contactandwaituntilthebladeattainsfullspeed.Then
restthebaseatontheworkpieceandgentlymovethe
tool forward along the previously marked cutting line.
Bevel cutting
CAUTION: Always be sure that the tool is
switched off and the battery cartridge is removed
before tilting the base.
With the base tilted, you can make bevel cuts at any
anglebetween0°and45°(leftorright).
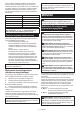
►Fig.11
Loosen the bolt on the back of the base with the hex
wrench. Move the base so that the bolt is positioned in
the center of the cross-shaped slot in the base.
►Fig.12: 1. Hex wrench 2. Bolt 3. Base
Tiltthebaseuntilthedesiredbevelangleisobtained.
Theedgeofthemotorhousingindicatesthebevel
anglebygraduations.Thentightenthebolttosecure
the base.
►Fig.13: 1. Edge 2. Graduation
Front ush cuts
►Fig.14: 1. Hex wrench 2. Bolt 3. Base
Loosen the bolt on the back of the base with the hex
wrenchandslidethebaseallthewayback.Then
tighten the bolt to secure the base.
Cutouts
Cutouts can be made with either of two methods
“Boring a starting hole” or “Plunge cutting”.
Boring a starting hole
►Fig.15
For internal cutouts without a lead-in cut from an edge,
pre-drill a starting hole 12 mm or more in diameter.
Insertthejigsawbladeintothisholetostartyourcut.
Plunge cutting
►Fig.16
You need not bore a starting hole or make a lead-in cut
if you carefully do as follows.
1.
Tiltthetooluponthefrontedgeofthebasewiththejig
sawbladepointpositionedjustabovetheworkpiecesurface.
2. Apply pressure to the tool so that the front edge of
the base will not move when you switch on the tool and
gently lower the back end of the tool slowly.
3.
Asthejigsawbladepiercestheworkpiece,slowly
lower the base of the tool down onto the workpiece surface.
4. Complete the cut in the normal manner.
Finishing edges
►Fig.17
Totrimedgesormakedimensionaladjustments,runthe
jigsawbladelightlyalongthecutedges.
Metal cutting
Alwaysuseasuitablecoolant(cuttingoil)whencutting
metal.Failuretodosowillcausesignicantjigsaw
bladewear.Theundersideoftheworkpiececanbe
greased instead of using a coolant.
Dust extraction
Clean cutting operations can be performed by connect-
ing this tool to a Makita vacuum cleaner.
Installing or removing the dust cover
Installthedustcoverasshowninthegure.
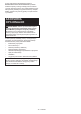
►Fig.18: 1. Dust cover
Toremovethedustcover,pressonesideofthecover,
andthenremoveitasshowninthegure.
►Fig.19: 1. Dust cover
Installing or removing the dust nozzle
Insertthedustnozzleallthewayintothetool.
►Fig.20: 1. Dust nozzle
Toremovethedustnozzle,pulloutthedustnozzle
while pressing the button on the dust nozzle.
►Fig.21: 1. Button 2. Dust nozzle
Connecting the tool to the vacuum cleaner
Connect the hose of the vacuum cleaner to the dust
nozzle.
►Fig.22