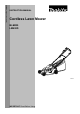
ENGLISH (Original instructions) INSTRUCTION MANUAL Cordless Lawn Mower BLM430 LM430D 012295 IMPORTANT: Read Before Using.
ENGLISH (Original instructions) SPECIFICATIONS Model BLM430 / LM430D Mowing width 430 mm No load speed 3,600 min-1 Dimensions (L x W x H) during operation 1,450 mm -1,490 mm x 460 mm x 950 mm -1,020 mm when stored 490 mm - 500 mm x 460 mm x 810 mm Net weight 17.9 kg Rated voltage D.C. 36 V Standard battery cartridge(s) Warning: Use only the battery cartridge(s) described.
ENH217-1 Save all warnings and instructions for future reference. For European countries only EC Declaration of Conformity We Makita Corporation as the responsible manufacturer declare that the following Makita machine(s): Designation of Machine: Cordless Lawn Mower Model No./ Type: BLM430, LM430D Specifications: see "SPECIFICATIONS" table.
19. 20. 21. 22. 23. 24. 25. 26. 27. 28. 29. 30. 31. 32. Remove key before servicing, cleaning or removing material from the gardening appliance. Use only the manufacturer genuine blades specified in this manual. Check the blades carefully for cracks or damage before operation. Replace cracked or damaged blades immediately. Be sure the area is clear of other people before mowing. Stop mower if anyone enters the area.
battery cartridge when you notice less tool power. Never recharge a fully charged battery cartridge. Overcharging shortens the battery service life. Charge the battery cartridge with room temperature at 10 ゚ C - 40 ゚ C (50 ゚ F - 104 ゚ F). Let a hot battery cartridge cool down before charging it. Charge the battery cartridge once in every six months if you do not use it for a long period of time. SAVE THESE INSTRUCTIONS. 2.
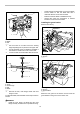
Open out the battery cover on the mower and then slide all the way and click the product mounting adapter of the BCV01 into the battery port on the mower. Run the cord of the BCV01 through the slit in the battery cover and close the battery cover. 1. Lock key 1 1. Cord 2. Slit 3. Upper holders 1 012297 2 3. Insert the lock key in the place shown in the figure as far as it will go. 4. Close the battery cover and push it on until it is latched with the locking lever.
1 2 1 1. Switch button 2. Switch lever 1. Battery converter (BCV02) 012384 012603 To remove the BCV02, press on the hook of the BCV02 and withdraw it with both hands. 2. 3. Power switch action • 4. WARNING: Before inserting the battery cartridge in the tool, always check to see that the switch lever actuates properly and returns to the original position when released. Operating a tool with a switch that does not actuate properly can lead to loss of control and serious personal injury. 5. 6.
NOTE: • The mowing height figures should be used just as a guideline, as the state of the lawn or ground may cause lawn height to be slightly different to the set height figure. • Try a test mowing of grass in a less conspicuous place to get your desired height. Indicator lamps Lighted Off Blinking E F Remaining capacity 70% to 100% 45% to 70% Battery protection system 20% to 45% Lithium-ion batteries are equipped with a protection system.
1. Holders 2. Cord 1 1 2 012421 1. Holders 2. Cord 1 2 3 1. Lower handle 2. Groove on the deck 3. Clamping screw 2 012605 012385 NOTE: • Install the upper handle so that the direction of the upper handle and the power supply cord are positioned as shown in the figure. Expand the lower handle to its both sides and with it expanded in that position pivot it backward and then fit it in the groove in the deck. 2. Tighten the clamping screws on both sides to secure the lower handle. 1 1.
• • 3 2 • • Tighten the bolt clockwise firmly to secure the blade. Put the blade so that the blade side with a rotational direction arrow faces outward. Make sure that the blade is installed securely. Always take away the screwdriver or similars inserted in a hole to lock the blade. Installing the grass basket Remove the lock key. 1 1 1. Screwdriver 2. Blade 3. Bolt 012304 1. Put the mower on its side so that the mowing height adjusting lever is placed on the upper side.
Emptying the grass basket OPERATION WARNING: To reduce a risk of accident, regularly check the grass basket for any damage or weakened strength and replace it if necessary. 1. Release the switch lever. 2. Remove the lock key. Mowing • WARNING: Before mowing, clear away sticks and stones from mowing area. Furthermore, clear away any weeds from mowing area in advance. • Always wear the safety goggles or safety glasses with side shields when operating the mower.
4. Check all nuts, bolts, knobs, screws, fasteners etc. for tightness. Inspect moving parts for damage, breakage, and wear. Have repairs made on any damaged or missing parts. Before storing the mower, remove the battery cartridge from it. Store mower indoors in a cool, dry and locked place. Don't store the mower and charger in locations where the temperature may reach or exceed 40 ゚ C (l04 ゚ F). 5. 6. 7. 3 2 5 1 Storage 4 1. Clamping screw 2. Expand 3. Move down forward 4. Clamping nut 5.
1. Front grip 1 012600 NOTE: • When putting the mower in the upright position, do not hold the handle but use the front grip of the mower. 012420 4. Store the grass basket between the handle and the mower body. To maintain product SAFETY and RELIABILITY, repairs, any other maintenance or adjustment should be performed by Makita Authorized Service Centers, always using Makita replacement parts. TROUBLE SHOOTING Before asking for repairs, conduct your own inspection first.
Malfunction status Cause Action Battery cartridge is not installed. Install the battery cartridge. Battery problem (under voltage) Recharge the battery. If recharging is not effective, replace battery. The lock key is not inserted. Insert the lock key. Battery's charge level is low. Recharge the battery. If recharging is not effective, replace battery. Cutting height set is too low. Raise the height. Battery is installed improperly. Install the battery cartridge as described in this manual.
Makita Corporation Anjo, Aichi, Japan 885081A229 16 www.makita.