
User Manual


18 ENGLISH
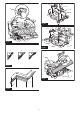
7. Always secure all moving portions before
carrying the tool.
8. Stopper pin which locks the cutter head down
is for carrying and storage purposes only and
not for any cutting operations.
9. Check the blade carefully for cracks or dam-
age before operation. Replace cracked or dam-
aged blade immediately. Gum and wood pitch
hardened on blades slows saw and increases
potential for kickback. Keep blade clean by
rst removing it from tool, then cleaning it with
gum and pitch remover, hot water or kerosene.
Never use gasoline to clean blade.
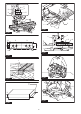
10. While making a slide cut, KICKBACK can
occur. KICKBACK occurs when the blade
binds in the workpiece during a cutting oper-
ation and the saw blade is driven rapidly
towards the operator. Loss of control and seri-
ous personal injury can result. If blade begins
to bind during a cutting operation, do not con-
tinue to cut and release switch immediately.
11. Use only anges specied for this tool.
12. Be careful not to damage the arbor, anges
(especially the installing surface) or bolt.
Damage to these parts could result in blade
breakage.
13. Make sure that the turn base is properly
secured so it will not move during operation.
Use the holes in the base to fasten the saw to a
stable work platform or bench. NEVER use tool
where operator positioning would be awkward.
14. Make sure the shaft lock is released before the
switch is turned on.
15. Be sure that the blade does not contact the
turn base in the lowest position.
16. Hold the handle rmly. Be aware that the saw
moves up or down slightly during start-up and
stopping.
17. Make sure the blade is not contacting the
workpiece before the switch is turned on.
18. Before using the tool on an actual workpiece,
let it run for a while. Watch for vibration or
wobbling that could indicate poor installation
or a poorly balanced blade.
19. Stop operation immediately if you notice any-
thing abnormal.
20. Do not attempt to lock the trigger in the "ON"
position.
21. Always use accessories recommended in this
manual. Use of improper accessories such as
abrasive wheels may cause an injury.
22. Some material contains chemicals which may
be toxic. Take caution to prevent dust inhala-
tion and skin contact. Follow material supplier
safety data.
Additional safety rules for the laser
1. LASER RADIATION, DO NOT STARE INTO THE
BEAM OR VIEW DIRECTLY WITH OPTICAL
INSTRUMENTS, CLASS 2M LASER PRODUCT.
SAVE THESE INSTRUCTIONS.
WARNING: DO NOT let comfort or familiarity
with product (gained from repeated use) replace
strict adherence to safety rules for the subject
product. MISUSE or failure to follow the safety
rules stated in this instruction manual may cause
serious personal injury.
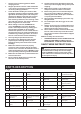
PARTS DESCRIPTION
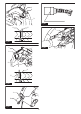
►Fig.2
1 Slide pole 2 Stopper pin (for carriage
sliding)
3 Vertical vise 4 Releasing button (for
right side bevel angle)
5 Holder 6 Turn base 7 Pointer (for miter angle) 8 Miter angle scale
9 Kerf board 10 Blade case 11 Adjustingscrew(for
laser line)
12 Rangeadjustmentscrew
(for laser line)
13 Blade guard 14 Knob (for bevel angle) 15 Hex wrench 16 Adjustingscrew(for
lower limit position)
17 Adjustingbolt(formaxi-
mum cutting capacity)
18 Stopper arm 19 Lock lever (for turn base) 20 Releasing lever (for turn
base)
21 Grip (for turn base) - - - - - -
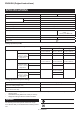
►Fig.3
1 Switch trigger 2 Lock-off button 3 Hole for padlock 4 Switch (for laser line)
5 Hose (for dust
extraction)
6 Stopper pin (for carriage
elevation)
7 Guide fence (lower
fence)
8 Guide fence (upper
fence)
9 Dust bag 10 0°adjustingbolt(for
bevel angle)
11 Bevel angle scale 12 Releasing lever (for 48°
bevel angle)
13 Latch lever (for bevel
angle)
14 Pointer (for bevel angle) 15 45°adjustingbolt(for
bevel angle)
- -