GB Radio Instruction manual F Radio Manuel d’instructions E Radio Manual de instrucciones LXRM02
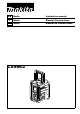
12 10 2 3 14 1 4 5 6 7 8 9 13 L K A B C 20 J PM I D H E G F 11 1 2
14 15 15 15 16 11 2 3 17 18 19 21 4 5 19 19 6 7 3
19 19 8 9 10 10 10 11 8 9 12 4
ENGLISH (Original instructions) IMPORTANT SAFETY INSTRUCTIONS WARNING: When using electric tools, basic safety precautions should always be followed to reduce the risk of fire, electric shock, and personal injury, including the following: 1. Read this instruction manual and the charger instruction manual carefully before use. 2. Clean only with dry cloth. 3. Do not block any ventilation opening. Install in accordance with the manufacturer’s instruction. 4.
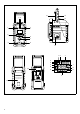
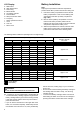
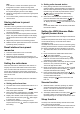
Battery Installation LCD Display: A. B. C. D. E. F. G. H. I. J. K. L. Radio alarm HWS buzzer alarm Scan tuning Band Indicator Low battery indicator Preset stations Sleep and Snooze status Frequency Stereo symbol and Volume Clock Time set PM for clock Note: Keeping back up batteries inside the compartment prevent stored data in preset memories from being lost. 1. Pull out the battery compartment locker to release battery compartment. There are main battery pack compartment and back up battery compartment.
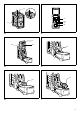
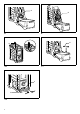
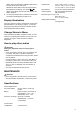
WARNING: Do not use two main batteries at the same time. 3-2. Installing or removing Cluster battery cartridge (Fig. 5 - 9) • Pull the supporting bar to allow the battery to insert to the terminal. • To insert the battery cartridge, align the tongue on the battery cartridge with the groove in the housing and slip it into place. • Release the supporting bar. • To remove the battery cartridge, pull the supporting bar and take the battery out of the terminal. 4.
Note: If the radio is in volume control status, press in the tuning/volume control to become Tuning status. 4. Keep on rotating the Tuning/Volume control knob until the required frequency shown on the display. 5. Rotate the Tuning/Volume control knob to get required sound level. 6. To turn off the radio, press the Power button. Display will show OFF. Storing stations in preset memories There are 5 memory presets for each waveband. 1. Press the Power button to turn on the radio. 2.
display will cycle through the available sleep times in the order 60-45-30-15-120-90-60. Release the Power button when the required sleep time appears in the display. The symbol will appear in the display and the radio will play the last station selected. 2. To cancel the sleep function, press the Power button. The Symbol will disappear and radio is off. Display illumination Output Power 7.2 V: 0.5 W x 2, 9.6 V: 1 W x 2 10.8 V: 1.2 W x 2, 12 V: 1.5 W x 2 14.4 V: 2.2 W x 2, 18 V: 3.
FRANÇAIS (Mode d’emploi original) CONSIGNES DE SÉCURITÉ IMPORTANTES AVERTISSEMENT : Lors de l’utilisation d’outils électriques, il faut toujours prendre des précautions élémentaires de sécurité, dont les suivantes, pour réduire les risques d’incendie, de décharge électrique et de blessure. 1. Lisez attentivement ce manuel d’instructions et celui du chargeur avant l’utilisation. 2. Nettoyez uniquement avec un chiffon sec. 3. Ne bloquez aucun orifice de ventilation.
4. Buzzer 5. Stations présélectionnées 6. Recherche automatique et réglage de l’heure 7. Bouton de commande Réglage/Volume 8. Entrée électricité 9. Borne d’entrée (AUX IN1) 10. Antenne à tige souple 11. Compartiment des batteries (couvrant le bloc-batterie principal et les batteries de secours) 12. Poignée 13. Haut-parleur 14. Casier des batteries 15. Compartiment des batteries principales 16. Compartiment des batteries de secours 17. Indicateur rouge 18. Bouton 19. Batterie 20. Borne d’entrée (AUX IN2) 21.
AVERTISSEMENT : Ne pas utiliser deux batteries principales en même temps. 3-1. Installation ou retrait de la batterie à glissière (Fig. 4) • Pour installer la batterie, aligner sa languette sur la rainure qui se trouve à l’intérieur du carter, puis glisser la batterie pour la mettre en place. Toujours l’insérer bien à fond, jusqu’à ce qu’elle se verrouille en émettant un léger clic. • Si l’indicateur rouge sur la face supérieure du bouton est visible, la batterie n’est pas parfaitement verrouillée.
Remarque : Le symbole Stéréo apparaît sur l’écran si la station trouvée est en stéréo. Remarque : La radio continue à rechercher les stations tant que vous n’appuyez pas sur le bouton de recherche. 4. Tourner le bouton de commande Réglage/Volume pour avoir le niveau sonore nécessaire. Le niveau sonore apparaît sur l’écran LCD. Remarque : Pour passer du contrôle du volume au contrôle du tuner et vice-versa, appuyer sur le bouton de contrôle Réglage/Volume. 5.
puis s’arrêtent pendant une minute, puis ce cycle recommence. Le buzzer fonctionne pendant une heure sauf si la radio est arrêtée. Appuyer sur le bouton de mise en marche pour désactiver l’alarme pendant 24 heures. 1. Le buzzer peut être réglé que la radio soit en marche ou à l’arrêt. 2. Appuyer sur le bouton du buzzer et le relâcher. Le symbole clignote. 3. Pendant le clignotement du symbole, appuyer sur le bouton pendant plus de 2 secondes suivi d’un bip et le chiffre des heures clignote. 4.
ESPAÑOL (Instrucciones originales) INSTRUCCIONES IMPORTANTES DE SEGURIDAD ADVERTENCIA: Cuando utilice herramientas eléctricas, deberá tomar siempre precauciones de seguridad básicas, incluyendo las siguientes, para reducir el riesgo de incendios, descargas eléctricas y heridas personales: 1. Lea este manual de instrucciones y el manual de instrucciones del cargador con cuidado antes de usar. 2. Limpie sólo con un paño limpio. 3. No obstruya ninguna apertura de ventilación.
8. Enchufe de entrada de CC 9. Terminal de entrada (AUX IN1) 10. Antena plegable de varilla suave 11. Compartimento para batería (cubre paquete de baterías principal y pilas de respaldo) 12. Mango 13. Altavoz 14. Cierre del compartimento de baterías 15. Compartimento para paquete de baterías principal 16. Compartimento para pilas de respaldo 17. Indicador rojo 18. Botón 19. Cartucho de batería 20. Terminal de entrada (AUX IN2) 21. Barra de soporte Pantalla LCD: A. B. C. D. E. F. G. H.
ADVERTENCIA: No utilice dos paquetes de baterías principales a la vez. 3-1. Instalación o desinstalación del cartucho deslizable de la batería (Fig. 4) • Para colocar el cartucho de batería, alinee la lengüeta sobre el cartucho de batería con la ranura en la carcasa y deslice en su lugar. Insértelo siempre por completo hasta que se fije en su lugar con un pequeño clic. • Si puede ver el indicador rojo del lado superior del botón, esto indica que no ha quedado fijo por completo.
de evitar la operación de la radio en proximidad de una pantalla de computadora u algún equipo que pudiese causar interferencia con la radio. 3. Presione y suelte el botón de exploración (presionar prolongadamente el botón de sintonía por exploración por más de 2 segundos activará el ajuste de la hora), la pantalla LCD mostrará el símbolo de sintonía por exploración parpadeando y la radio buscará y se detendrá en cuanto encuentre una estación de radio.
b. Ajuste de la estación para la alarma de la radio 1. Durante el ajuste de la hora para la alarma de radio, el símbolo de alarma de radio parpadea, presione el botón para la frecuencia de la banda para activar la radio para seleccionar la banda de frecuencia y estación de radio deseada para el despertador, ya sea mediante la sintonía manual o mediante las memorias preajustadas. Presione el botón para completar el ajuste de la alarma de radio. La pantalla mostrará el símbolo . 2.
para activar la función de fuente auxiliar de sonido AUX. • La fuente AUX no puede usarse como fuente de sonido de alarma. MANTENIMIENTO PRECAUCIÓN: • Nunca use gasolina, bencina, diluyentes (tíner), alcohol o alguna sustancia similar. El uso de estas sustancias podría generar decoloraciones, deformaciones o grietas. Especificaciones: Requisitos eléctricos Adaptador de cable eléctrico de CA CC12 V 700 mA, clavija central como polo positivo.