INSTRUCTION MANUAL MANUAL DE INSTRUCCIONES Cordless Rotary Hammer Martillo Rotativo Inalámbrico RH01 Read before use. Lea antes de usar.
ENGLISH (Original instructions) SPECIFICATIONS Model: Drilling capacities RH01 Concrete 16 mm (5/8") Steel 10 mm (3/8") Wood 13 mm (1/2") No load speed (RPM) 0 - 680/min Blows per minute 0 - 4,800/min Overall length 250 mm (9-7/8") Rated voltage D.C. 10.8 V - 12 V max Standard battery cartridge Net weight • • • BL1016 / BL1021B BL1041B 1.8 kg (4.1 lbs) 2.0 kg (4.
7. If devices are provided for the connection of dust extraction and collection facilities, ensure these are connected and properly used. Use of dust collection can reduce dust-related hazards. 2. 3. Power tool use and care 1. Do not force the power tool. Use the correct power tool for your application. The correct power tool will do the job better and safer at the rate for which it was designed. 2. Do not use the power tool if the switch does not turn it on and off.
11. Symbols SAVE THESE INSTRUCTIONS. The followings show the symbols used for tool. CAUTION: Only use genuine Makita batteries. Use of non-genuine Makita batteries, or batteries that have been altered, may result in the battery bursting causing fires, personal injury and damage. It will also void the Makita warranty for the Makita tool and charger. volts direct current no load speed Tips for maintaining maximum battery life revolutions or reciprocation per minute 1. number of blow 2.
Overload protection To remove the battery cartridge, slide it from the tool while sliding the button on the front of the cartridge. When the battery is operated in a manner that causes it to draw an abnormally high current, the tool automatically stops without any indication. In this situation, turn the tool off and stop the application that caused the tool to become overloaded. Then turn the tool on to restart.
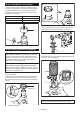
Lighting up the front lamp Selecting the action mode NOTICE: Do not rotate the action mode changing knob when the tool is running. The tool will be damaged. 1 NOTICE: To avoid rapid wear on the mode change mechanism, be sure that the action mode changing knob is always positively located in one of the action mode positions. 2 Rotation with hammering For drilling in concrete, masonry, etc., rotate the action mode changing knob to the symbol. Use a carbide-tipped drill bit. ► 1. Switch trigger 2.
Side grip (auxiliary handle) 1 CAUTION: Always use the side grip to ensure safe operation. CAUTION: After installing or adjusting the side grip, make sure that the side grip is firmly secured. Install the side grip so that the grooves on the grip fit in the protrusions on the tool barrel. Turn the grip clockwise to secure it. The grip can be fixed at desired angle. ► 1. Drill bit To remove the drill bit, pull the chuck cover down all the way and pull the drill bit out. 1 1 ► 1.
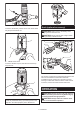
Dust cup (optional accessory) Use the dust cup to prevent dust from falling over the tool and on yourself when performing overhead drilling operations. Attach the dust cup to the bit as shown in the figure. The size of bits which the dust cup can be attached to is as follows. Model Bit diameter Dust cup 5 6 mm (1/4") - 14.
1 ► 1. Dust cap Hook (optional accessory) To remove the drill bit, pull the chuck cover down all the way and pull the drill bit out. CAUTION: Always remove the battery when hanging the tool with the hook. CAUTION: Never hook the tool at high location or on potentially unstable surface. 1 1 2 3 2 1 2 ► 1. Bit 2. Chuck cover 3 To remove the dust cup set, hold the root of dust cup and pull it out. ► 1. Groove 2. Hook 3. Screw The hook is convenient for temporarily hanging the tool.
NOTICE: Never use “rotation with hammering” NOTE: If the battery cartridge is in low temperature, the tool’s capability may not be fully obtained. In this case, warm up the battery cartridge by using the tool with no load for a while to fully obtain the tool’s capability. when the drill chuck is installed on the tool. The drill chuck may be damaged. Also, the drill chuck will come off when reversing the tool. NOTICE: Pressing excessively on the tool will not speed up the drilling.
IN NO EVENT SHALL MAKITA BE LIABLE FOR ANY INDIRECT, INCIDENTAL OR CONSEQUENTIAL DAMAGES FROM THE SALE OR USE OF THE PRODUCT. THIS DISCLAIMER APPLIES BOTH DURING AND AFTER THE TERM OF THIS WARRANTY. MAKITA DISCLAIMS LIABILITY FOR ANY IMPLIED WARRANTIES, INCLUDING IMPLIED WARRANTIES OF "MERCHANTABILITY" AND "FITNESS FOR A SPECIFIC PURPOSE," AFTER THE ONE YEAR TERM OF THIS WARRANTY.
ESPAÑOL (Instrucciones originales) ESPECIFICACIONES Modelo: Capacidades de taladrado RH01 Concreto 16 mm (5/8″) Acero 10 mm (3/8″) Madera 13 mm (1/2″) Velocidad sin carga (RPM) 0 r/min - 680 r/min Golpes por minuto 0 gpm - 4 800 gpm Longitud total 250 mm (9-7/8″) Tensión nominal 10,8 V - 12 V (máx.) c.c.
Seguridad personal 1. Manténgase alerta, preste atención a lo que está haciendo y utilice su sentido común cuando opere una herramienta eléctrica. No utilice una herramienta eléctrica cuando esté cansado o bajo la influencia de drogas, alcohol o medicamentos. Un momento de distracción mientras opera las herramientas eléctricas puede terminar en una lesión grave. 2. Use equipo de protección personal. Póngase siempre protección para los ojos.
ADVERTENCIAS DE SEGURIDAD PARA EL MARTILLO ROTATIVO INALÁMBRICO 1. 2. 3. 4. 5. 6. 7. 8. 9. 10. 11. 12. 13. 14. Utilice protectores de oídos. La exposición al ruido puede provocar pérdida auditiva. Utilice los mango(s) auxiliare(s) que se suministren con la herramienta. La pérdida de control puede ocasionar lesiones. Sujete la herramienta eléctrica por las superficies de asimiento aisladas al realizar una operación en la que el accesorio de corte pueda entrar en contacto con cableado oculto.
7. 8. 9. 10. 11. Nunca incinere el cartucho de batería incluso en el caso de que esté dañado seriamente o ya no sirva en absoluto. El cartucho de batería puede explotar si se tira al fuego. Tenga cuidado de no dejar caer ni golpear la batería. No use una batería dañada. Las baterías de ión de litio están sujetas a los requisitos reglamentarios en materia de bienes peligrosos. Para el trasporte comercial, por ej.
Protección contra sobrecalentamiento Indicación de la capacidad restante de la batería Cuando la herramienta o la batería se sobrecalienten, la herramienta se detendrá automáticamente y la lámpara parpadeará. En este caso, permita que la herramienta y la batería se enfríen antes de volver a encender la herramienta. Únicamente para cartuchos de batería con el indicador Protección en caso de sobredescarga 1 Cuando la capacidad de la batería no sea suficiente, la herramienta se detendrá automáticamente.
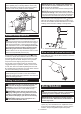
Esta herramienta tiene un conmutador de inversión para cambiar la dirección de rotación. Presione la palanca del conmutador de inversión desde el lado A para una rotación en sentido de las manecillas del reloj o desde el lado B, para una rotación en sentido inverso al de las manecillas del reloj. Cuando la palanca del conmutador de inversión esté en la posición neutral, no se podrá jalar el gatillo conmutador.
MONTAJE PRECAUCIÓN: Asegúrese siempre de que la herramienta esté apagada y el cartucho de batería haya sido extraído antes de realizar cualquier trabajo en la misma. Inserte la broca en la herramienta. Gire la broca y empújela hacia adentro hasta que quede enganchada. Después de instalar la broca, asegúrese siempre de que la broca quede asegurada en su lugar intentando jalarla hacia afuera.
Contenedor de polvo (accesorio opcional) 1 2 Utilice el contenedor de polvo para evitar que el polvo caiga sobre la herramienta y sobre usted al realizar operaciones de perforación por encima de su cabeza. Fije el contenedor de polvo en la punta tal como se muestra en la ilustración. El tamaño de las puntas en las que el contenedor de polvo puede fijarse es el que se indica a continuación.
Para extraer el juego contenedor de polvo, tome el contenedor de polvo desde la raíz y sáquelo. 1 1 2 ► 1. Contenedor de polvo NOTA: Si la tapa llega a salirse del contenedor de polvo, fíjela con su lado impreso orientado hacia arriba de manera que la ranura en la tapa encaje en la periferia interior del accesorio. ► 1. Contenedor de polvo 2. Partes salientes NOTA: Si conecta una aspiradora al juego contenedor de polvo, retire la tapa guardapolvos antes de conectarla.
Operación de taladrado con percusión 1 2 PRECAUCIÓN: En el momento de comenzar a penetrar, cuando se obstruye el orificio con virutas y partículas, o cuando se topa contra varillas de refuerzo de concreto, se ejerce una tremenda y repentina fuerza de torsión sobre la herramienta/ broca. Utilice siempre la empuñadura lateral (mango auxiliar) y sujete firmemente la herramienta tanto de la empuñadura lateral como del mango del interruptor durante las operaciones.
MANTENIMIENTO AVISO: Nunca use la “rotación con percusión” cuando el portabrocas adaptador esté instalado en la herramienta. Esto podría causar daños al portabrocas adaptador. Asimismo, el portabrocas adaptador podría salirse al invertir la rotación de la herramienta. PRECAUCIÓN: Asegúrese siempre de que la herramienta esté apagada y el cartucho de batería extraído antes de intentar realizar una inspección o mantenimiento.
GARANTÍA LIMITADA DE UN AÑO DE MAKITA Ésta Garantía no aplica para México Política de garantía Cada herramienta Makita es inspeccionada y probada exhaustivamente antes de salir de la fábrica. Se garantiza que está libre de defectos de mano de obra y materiales por el período de UN AÑO a partir de la fecha original de compra. Si durante este período de un año se desarrollara algún problema, devuelva la herramienta COMPLETA, con el envío prepagado, a un centro de servicio autorizado o de fábrica Makita.
< USA only > WARNING Some dust created by power sanding, sawing, grinding, drilling, and other construction activities contains chemicals known to the State of California to cause cancer, birth defects or other reproductive harm. Some examples of these chemicals are: • lead from lead-based paints, • crystalline silica from bricks and cement and other masonry products, and • arsenic and chromium from chemically-treated lumber.