INSTRUCTION MANUAL MANUAL DE INSTRUCCIONES Cordless Rotary Hammer Martillo Rotativo Inalámbrico RH02 IMPORTANT: Read Before Using. IMPORTANTE: Lea antes de usar.
ENGLISH (Original instructions) SPECIFICATIONS Model: Drilling capacities RH02 Concrete 14 mm (9/16") Steel 10 mm (3/8") Wood 13 mm (1/2") No load speed (RPM) 0 - 850/min Blows per minute 0 - 4,900/min Overall length 246 mm (9-11/16") Rated voltage D.C. 10.8 V - 12 V max Standard battery cartridge BL1016 / BL1021B / BL1041B Net weight • • • 1.9 - 2.6 kg (4.3 - 5.
4. 5. 6. 7. 8. 9. Remove any adjusting key or wrench before turning the power tool on. A wrench or a key left attached to a rotating part of the power tool may result in personal injury. Do not overreach. Keep proper footing and balance at all times. This enables better control of the power tool in unexpected situations. Dress properly. Do not wear loose clothing or jewellery. Keep your hair, clothing and gloves away from moving parts.
5. 6. 7. 8. 9. 10. 11. 12. 13. 14. Be sure the bit is secured in place before operation. Under normal operation, the tool is designed to produce vibration. The screws can come loose easily, causing a breakdown or accident. Check tightness of screws carefully before operation. In cold weather or when the tool has not been used for a long time, let the tool warm up for a while by operating it under no load. This will loosen up the lubrication. Without proper warm-up, hammering operation is difficult.
Overloaded: The tool is operated in a manner that causes it to draw an abnormally high current. In this situation, turn the tool off and stop the application that caused the tool to become overloaded. Then turn the tool on to restart. If the tool does not start, the battery is overheated. In this situation, let the battery cool before turning the tool on again.
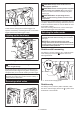
CAUTION: Always check the direction of rotation before operation. CAUTION: Use the reversing switch only after the tool comes to a complete stop. Changing the direction of rotation before the tool stops may damage the tool. CAUTION: When not operating the tool, always set the reversing switch lever to the neutral position. 1 ► 1. Switch trigger To start the tool, simply pull the switch trigger. Tool speed is increased by increasing pressure on the switch trigger. Release the switch trigger to stop.
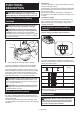
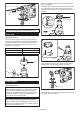
Installing or removing drill bit Clean the shank end of the drill bit and apply grease before installing the drill bit. 2 1 ► 1. Action mode changing knob 1 ASSEMBLY ► 1. Shank end 2. Grease CAUTION: Always be sure that the tool is switched off and the battery cartridge is removed before carrying out any work on the tool. Insert the drill bit into the tool. Turn the drill bit and push it in until it engages.
Before installing the dust cup set, remove the bit from the tool if installed. Install the spacer so that the grooves on the spacer fit in the protrusions on the tool barrel while widening it. Be careful for the spring not to come off from the slit of spacer. 1 2 1 2 ► 1. Hole 2. Depth gauge NOTE: Make sure that the depth gauge does not touch the main body of the tool when attaching it. Dust cup ► 1. Spacer 2.
To remove the dust cup set, hold the root of dust cup and pull it out. 1 1 2 ► 1. Dust cup NOTE: If the cap comes off from the dust cup, attach it with its printed side facing up so that groove on the cap fits in the inside periphery of the attachment. ► 1. Dust cup 2. Claws NOTE: If you connect a vacuum cleaner to the dust cup set, remove the dust cap before connecting it. 1 Hook ► 1.
Hammer drilling operation 1 CAUTION: There is tremendous and sudden twisting force exerted on the tool/drill bit at the time of hole break-through, when the hole becomes clogged with chips and particles, or when striking reinforcing rods embedded in the concrete. Always use the side grip (auxiliary handle) and firmly hold the tool by both side grip and switch handle during operations. Failure to do so may result in the loss of control of the tool and potentially severe injury.
If you need any assistance for more details regarding these accessories, ask your local Makita Service Center. • Carbide-tipped drill bits (SDS-Plus carbide-tipped bits) • Chuck adapter • Keyless drill chuck • Bit grease • Depth gauge • Blow-out bulb • Dust cup • Dust cup set • Grip base set • Safety goggles • Hook • Makita genuine battery and charger • Plastic carrying case 1 2 ► 1. Keyless drill chuck 2.
ESPAÑOL (Instrucciones originales) ESPECIFICACIONES Modelo: Capacidades de taladrado RH02 Concreto 14 mm (9/16″) Acero 10 mm (3/8″) Madera 13 mm (1/2″) Velocidad sin carga (RPM) 0 r/min - 850 r/min Golpes por minuto 0 gpm - 4 900 gpm Longitud total 246 mm (9-11/16″) Tensión nominal 10,8 V c.c. - 12 V (máx.) c.c.
6. 7. Si no es posible evitar usar una herramienta eléctrica en condiciones húmedas, utilice un alimentador protegido con interruptor de circuito de falla a tierra (ICFT). El uso de un ICFT reduce el riesgo de descarga eléctrica. Las herramientas eléctricas pueden producir campos electromagnéticos (CEM) que no son dañinos para el usuario.
Uso y cuidado de la herramienta a batería 1. Recargue sólo con el cargador especificado por el fabricante. Un cargador que es adecuado para un solo tipo de batería puede generar riesgo de incendio al ser utilizado con otra batería. 2. Utilice las herramientas eléctricas solamente con las baterías designadas específicamente para ellas. La utilización de cualquier otra batería puede crear un riesgo de lesiones o incendio. 3.
10. Símbolos A continuación se muestran los símbolos utilizados para la herramienta. volts o voltios corriente directa o continua velocidad sin carga revoluciones o alternaciones por minuto, frecuencia de rotación 11. número de percusiones GUARDE ESTAS INSTRUCCIONES. Instrucciones importantes de seguridad para el cartucho de batería 1. 2. 3. 4. 5. 6. 7. 8. 9. Las baterías de ión de litio están sujetas a los requisitos reglamentarios en materia de bienes peligrosos.
Sistema de protección de batería DESCRIPCIÓN DEL FUNCIONAMIENTO PRECAUCIÓN: Asegúrese siempre de que la herramienta esté apagada y el cartucho de batería haya sido extraído antes de realizar cualquier ajuste o comprobación en la herramienta. Instalación o extracción del cartucho de batería PRECAUCIÓN: Apague siempre la herramienta antes de colocar o quitar el cartucho de batería. PRECAUCIÓN: Sujete la herramienta y el cartucho de la batería con firmeza al colocar o quitar el cartucho de batería.
Accionamiento del conmutador de inversión de giro NOTA: Dependiendo de las condiciones de uso y la temperatura ambiente, la indicación podrá diferir ligeramente de la capacidad real. Accionamiento del interruptor ADVERTENCIA: Antes de insertar el cartucho de batería en la herramienta, compruebe siempre y cerciórese de que el gatillo interruptor se acciona debidamente y que vuelve a la posición “OFF” (apagado) cuando lo suelta. A B 1 ► 1.
1 1 ► 1. Perilla de cambio de modo de accionamiento ► 1. Empuñadura lateral Grasa Sólo rotación Para taladrar en materiales de madera, metal o plástico, gire la perilla de cambio de modo de accionamiento al símbolo . Utilice una broca helicoidal o broca para madera. Aplique previamente una pequeña cantidad de grasa (alrededor de 0,5 g - 1 g) en el extremo de la espiga de la broca. La lubricación del portabrocas asegura un accionamiento suave y una vida útil más larga.
Para extraer la broca, jale hasta abajo la cubierta del portabrocas y jale la broca hacia afuera. 1 1 2 ► 1. Contenedor de polvo Juego contenedor de polvo ► 1. Broca 2. Cubierta del portabrocas Accesorio opcional Calibrador de profundidad El calibrador de profundidad sirve para perforar orificios de profundidad uniforme. Afloje la empuñadura lateral e inserte el calibrador de profundidad en el orificio de la empuñadura lateral.
NOTA: Si conecta una aspiradora al juego contenedor de polvo, retire la tapa guardapolvos antes de conectarla. 1 Instale la empuñadura lateral (juego de la base de la empuñadura opcional y empuñadura estándar) de manera que la ranura en la empuñadura encaje en la protuberancia del espaciador. Gire la empuñadura en el sentido de las manecillas del reloj para asegurarla. ► 1. Tapa guardapolvos Para extraer la broca, jale hasta abajo la cubierta del portabrocas y jale la broca hacia afuera.
OPERACIÓN NOTA: Si la tapa llega a salirse del contenedor de polvo, fíjela con su lado impreso orientado hacia arriba de manera que la ranura en la tapa encaje en la periferia interior del accesorio. PRECAUCIÓN: Utilice siempre la empuñadura lateral (mango auxiliar) y sujete firmemente la herramienta tanto de la empuñadura lateral como del mango del interruptor durante las operaciones. PRECAUCIÓN: Asegúrese siempre de que la pieza de trabajo quede asegurada antes de la operación.
Soplador NOTA: Es posible que se produzca excentricidad en la rotación de la broca al operar la herramienta sin carga. La herramienta se centrará automáticamente durante la operación. Esto no afectará la precisión en el taladrado. Accesorio opcional Después de perforar el agujero, utilice el soplador para limpiar el polvo del agujero. Taladrado en madera o metal PRECAUCIÓN: Sujete firmemente la herramienta y tenga cuidado cuando la broca de taladro comience a penetrar en la pieza de trabajo.
• • • • • • • Contenedor de polvo Juego contenedor de polvo Juego de la base de la empuñadura Gafas de seguridad Gancho Batería y cargador originales de Makita Maletín de transporte de plástico NOTA: Algunos de los artículos en la lista pueden incluirse en el paquete de la herramienta como accesorios estándar. Éstos pueden variar de país a país.
< USA only > WARNING Some dust created by power sanding, sawing, grinding, drilling, and other construction activities contains chemicals known to the State of California to cause cancer, birth defects or other reproductive harm. Some examples of these chemicals are: • lead from lead-based paints, • crystalline silica from bricks and cement and other masonry products, and • arsenic and chromium from chemically-treated lumber.