
User Manual


9 ENGLISH
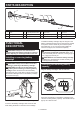
Indicator lamps Remaining
capacity
Lighted O Blinking
75% to 100%
50% to 75%
25% to 50%
0% to 25%
Charge the
battery.
Thebattery
mayhave
malfunctioned.
NOTE: Depending on the conditions of use and the
ambienttemperature,theindicationmaydierslightly
fromtheactualcapacity.
NOTE:Therst(farleft)indicatorlampwillblinkwhen
thebatteryprotectionsystemworks.
Tool / battery protection system
Thetoolisequippedwithatool/batteryprotectionsys-
tem.Thissystemautomaticallycutsopowertothe
motortoextendtoolandbatterylife.Thetoolwillauto-
maticallystopduringoperationifthetoolorbatteryis
placed under one of the following conditions:
Overload protection
Whenthetoolorbatteryisoperatedinamannerthatcausesitto
drawanabnormallyhighcurrent,thetoolautomaticallystops.In
thissituation,turnthetooloandstoptheapplicationthatcaused
the tool to become overloaded. Then turn the tool on to restart.
Overheat protection
Whenthetoolorbatteryisoverheated,thetoolstops
automatically.Inthiscase,letthetoolandbatterycool
before turning the tool on again.
Overdischarge protection
Whenthebatterycapacityisnotenough,thetoolstopsautomatically.
Inthiscase,removethebatteryfromthetoolandchargethebattery.
Switch action
WARNING:
Before installing the battery cartridge into
the tool, always check to see that the switch trigger actuates
properly and returns to the "OFF" position when released.
WARNING:
For your safety, this tool is equipped
with the lock-o button which prevents the tool from
unintended starting. Never use the tool if it starts when
you pull the switch trigger without pressing the lock-
o button.AskyourlocalMakitaServiceCenterforrepairs.
WARNING: Never disable the lock function or
tape down the lock-o button.
NOTICE: Do not pull the switch trigger forcibly
without pressing the lock-o button. The switch
maybreak.
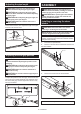
1
2
►1.Lock-obutton2. Switch trigger
Topreventtheswitchtriggerfrombeingaccidentally
pulled,alock-obuttonisprovided.
Tostartthetool,pressthelock-obuttonandpullthe
switch trigger. Release the switch trigger to stop. The
lock-obuttoncanbepressedfromeithertherightor
left side.
Adjusting the cutting angle
CAUTION: Always be sure that the tool is
switched o before folding or unfolding the head.
CAUTION: When folding the head for carrying
the tool or after using the tool, be sure to attach
the blade cover before folding the head.
CAUTION: When folding the head, be careful
not to pinch your ngers between the head and
the tool body.
Theangleoftheheadcanbeadjustedin10steps.To
change the angle of the head, follow the steps below.
1.
Holdtheheadandthetoolbodyasshowninthegure.
1
2
►1. Head 2.Angleadjustmentbutton
2. Adjusttheangleoftheheadwhileholdingdown
theangleadjustmentbutton,andthenreleasetheangle
adjustmentbutton.
3. Movetheheadslightlyuntilitislockedwithaclick.
NOTE:Makesurethattheheadissecurelylocked
before operating the tool.