
Instructions


8 ENGLISH
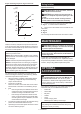
Proper fastening torque for high tensile bolt
M10
M8
210
M8
M10
100
(1020)
80
(816)
60
(612)
40
(408)
20
(204)
N•m
(kgf•cm)
1
2
1.Fasteningtime(second)2. Fastening torque
Holdthetoolrmlyandplacethepointofthedriverbit
inthescrewhead.Applyforwardpressuretothetoolto
the extent that the bit will not slip off the screw and turn
the tool on to start operation.
NOTE: Use the proper bit for the head of the screw/
boltthatyouwishtouse.
NOTE:WhenfasteningM8orsmallerscrew,carefully
adjustpressureontheswitchtriggersothatthescrew
is not damaged.
NOTE: Hold the tool pointed straight at the screw.
NOTE:Iftheimpactforceistoostrongoryoutighten
thescrewforatimelongerthanshowninthegures,
thescreworthepointofthedriverbitmaybeover-
stressed,stripped,damaged,etc.Beforestartingyour
job,alwaysperformatestoperationtodeterminethe
properfasteningtimeforyourscrew.
Thefasteningtorqueisaffectedbyawidevarietyof
factorsincludingthefollowing.Afterfastening,always
check the torque with a torque wrench.
1. Whenthebatterycartridgeisdischargedalmost
completely,voltagewilldropandthefastening
torque will be reduced.
2. Driver bit or socket bit
Failure to use the correct size driver bit or socket
bit will cause a reduction in the fastening torque.
3. Bolt
•
Eventhoughthetorquecoefcientandtheclass
of bolt are the same, the proper fastening torque
will differ according to the diameter of bolt.
• Even though the diameters of bolts are the
same, the proper fastening torque will differ
accordingtothetorquecoefcient,theclass
of bolt and the bolt length.
4.
The manner of holding the tool or the material of driving
position to be fastened will affect the torque.
5. Operating the tool at low speed will cause a reduc-
tion in the fastening torque.
Using holster
Optional accessory
CAUTION: When using the holster, remove a
driver bit/drill bit from the tool.
CAUTION: Turn off the tool and wait until it
comes to a complete stop before placing it in the
holster.
Be sure to close the holster securely with the
holster button so that it holds the tool rmly.
1.
Thread a waist belt or similar through holster holder.
►Fig.11: 1. Holster holder 2. Waist belt
2. Put the tool in the holster and lock it with the hol-
ster button.
►Fig.12
►Fig.13
You can keep two driver bits at the front of the holster.
MAINTENANCE
CAUTION:
Always be sure that the tool is switched
off and the battery cartridge is removed before attempting
to perform inspection or maintenance.
NOTICE: Never use gasoline, benzine, thinner,
alcohol or the like. Discoloration, deformation or
cracks may result.
To maintain product SAFETY and RELIABILITY,
repairs,anyothermaintenanceoradjustmentshould
beperformedbyMakitaAuthorizedorFactoryService
Centers,alwaysusingMakitareplacementparts.
OPTIONAL
ACCESSORIES
CAUTION: These accessories or attachments
are recommended for use with your Makita tool
specied in this manual.Theuseofanyother
accessories or attachments might present a risk of
injurytopersons.Onlyuseaccessoryorattachment
for its stated purpose.
Ifyouneedanyassistanceformoredetailsregardingthese
accessories,askyourlocalMakitaServiceCenter.
• Driver bits
• Socket bits
• Bit piece
• Holster
• Hook
• Plasticcarryingcase
• Makitagenuinebatteryandcharger
NOTE:Someitemsinthelistmaybeincludedinthe
toolpackageasstandardaccessories.Theymay
differfromcountrytocountry.