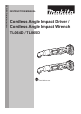
ENGLISH: Original instructions INSTRUCTION MANUAL Cordless Angle Impact Driver / Cordless Angle Impact Wrench TL064D / TL065D Read before use.
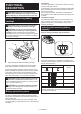
SPECIFICATIONS Model: TL064D Fastening capacities Machine screw 4 mm - 8 mm Standard bolt M4 - M12 High tensile bolt M4 - M8 No load speed 0 - 2,000 min-1 Impacts per minute 0 - 3,000 min-1 Maximum fastening torque 60 N•m Overall length 361 mm - 380 mm Rated voltage D.C. 10.8 V - 12 V max Standard battery cartridge BL1015 / BL1016 / BL1020B / BL1021B / BL1040B / BL1041B Charger DC10SA / DC10SB / DC10WC / DC10WD Net weight 1.2 - 1.
2. Vibration The vibration total value (tri-axial vector sum) determined according to EN62841: Model TL064D Work mode: impact tightening of fasteners of the maximum capacity of the tool Vibration emission (ah) : 15.0 m/s2 Uncertainty (K) : 1.5 m/s2 Model TL065D Work mode: impact tightening of fasteners of the maximum capacity of the tool 2 Vibration emission (ah) : 18.0 m/s Uncertainty (K) : 1.5 m/s2 3.
6. 7. 8. Dress properly. Do not wear loose clothing or jewellery. Keep your hair and clothing away from moving parts. Loose clothes, jewellery or long hair can be caught in moving parts. If devices are provided for the connection of dust extraction and collection facilities, ensure these are connected and properly used. Use of dust collection can reduce dust-related hazards. Do not let familiarity gained from frequent use of tools allow you to become complacent and ignore tool safety principles.
8. Hold the power tool by insulated gripping surfaces, when performing an operation where the cutting accessory may contact hidden wiring. Cutting accessory contacting a "live" wire may make exposed metal parts of the power tool "live" and could give the operator an electric shock. 5. SAVE THESE INSTRUCTIONS. WARNING: DO NOT let comfort or familiarity with product (gained from repeated use) replace strict adherence to safety rules for the subject product. 6.
Overloaded: The tool is operated in a manner that causes it to draw an abnormally high current. In this situation, turn the tool off and stop the application that caused the tool to become overloaded. Then turn the tool on to restart. If the tool does not start, the battery is overheated. In this situation, let the battery cool before turning the tool on again.
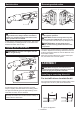
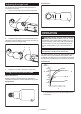
Switch action Reversing switch action 1 B 1 ► 1 . Switch lever A ► 1 . Reversing switch lever CAUTION: Before installing the battery cartridge into the tool, always check to see that the switch lever actuates properly and returns to the "OFF" position when released. CAUTION: Always check the direction of rotation before operation. CAUTION: Use the reversing switch only after the tool comes to a complete stop. Changing the direction of rotation before the tool stops may damage the tool.
To install the driver bit, pull the sleeve in the direction of the arrow and insert the driver bit into the sleeve as far as it will go. Then release the sleeve to secure the driver bit. 1 Installing or removing socket Always use the correct size socket for bolts and nuts. An incorrect size socket will result in inaccurate and inconsistent fastening torque and/or damage to the bolt or nut. To install the socket, push it onto the anvil of the tool until it locks into place.
Ratchet head Adjusting the angle head The angle head can be adjusted 360°(8 positions in 45-degree increments). 1. Loosen the hex bolt and remove the angle head. 1 2 OPERATION ► 1 . Angle head 2. Hex bolt CAUTION: Always insert the battery cartridge all the way until it locks in place. If you can see the red indicator on the upper side of the button, it is not locked completely. Insert it fully until the red indicator cannot be seen.
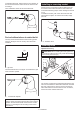
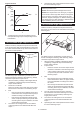
High tensile bolt 5. Nm (kgf cm) 40 (408) 2 NOTE: Use the proper bit for the head of the screw/ bolt that you wish to use. NOTE: Hold the tool pointed straight at the screw. M8 30 (306) 20 (204) (M8) NOTE: If the impact force is too strong or you tighten the screw for a time longer than shown in the figures, the screw or the point of the driver bit may be overstressed, stripped, damaged, etc.
NOTE: Hold the tool pointed straight at the bolt or nut. NOTE: Excessive fastening torque may damage the bolt/nut or impact socket. Before starting your job, always perform a test operation to determine the proper fastening time for your bolt or nut. MAINTENANCE CAUTION: Always be sure that the tool is switched off and the battery cartridge is removed before attempting to perform inspection or maintenance. NOTICE: Never use gasoline, benzine, thinner, alcohol or the like.
Makita Europe N.V. Jan-Baptist Vinkstraat 2, 3070 Kortenberg, Belgium Makita Corporation 3-11-8, Sumiyoshi-cho, Anjo, Aichi 446-8502 Japan www.makita.